SRE 250 SRE 260 3 MANUEL D'UTILISATION 2 2 GEBRAUCHSANWEISUNG 12 6 BRUGSANVISNING 22 5 INSTRUCCIONES DE USO 32 4 OPERATING MANUAL 42 > ISTRUZIONI D’USO 52 1 GEBRUIKSAANWIJZING 62 : INSTRUKCJA OBSŁUGI 72 TR KULLANIM KILAVUZU 82
3 PAGE PLIANTE 2 FALTBLATT 6 FOLDEUDSIDE 5 HOJA DESPLEGABLE 4 FOLD-OUT PAGE > PIEGHEVOLE 1 UITVOUWBLAD : WKŁADKA ILUSTRACYJNA KATLANIR SAYFA TR E E E E E E E E E E E E E E E E E E E E E
Dear Sir, Madam, Congratulations with your purchase of the Zibro, the number one brand among movable heaters. You have purchased a first-class quality product, which will serve you for many years to come. This, of course, provided you use the heater correctly. Please read these Directions for Use first, to ensure maximum lifetime for your Zibro. Your heater comes with a 24-month manufacturer’s warranty on all defects in material or workmanship. We wish you much warmth and comfort with your Zibro.
GENERAL DIRECTIONS FOR USE MAIN COMPONENTS Below you will find the main steps to be taken for using your Zibro. For more details, please refer to the A Front plate B Grid C Base plate 4 Lid for removable MANUAL (pages 45 ff.). 1 2 3 4 5 Remove all packaging materials (Fig. A). tank Fill the removable tank 7 (refer to Section B, Fig. D). Insert the plug into the wall-socket.
WHAT YOU NEED TO KNOW IN ADVANCE ALWAYS MAKE SURE THAT THERE IS SUFFICIENT VENTILATION For each model the minimum size of space is specified in which you can use the heater safely, without additional ventilation (refer to Section P). If a particular room is smaller than the specified space, always leave a window or door slightly ajar (± 2.5 cm). We also recommend doing this in highly insulated or draught-free rooms and/or at altitudes above 1,500 metres. However, if there is insufficient ventilation (i.e.
MANUAL A E E E E INSTALLING THE HEATER 1 Carefully remove your heater from the box and check the contents. In addition to the heater you also need to have: E a manual fuel pump E a transportation cap E a fuel cap cover E these directions for use Keep the box and the packaging materials (Fig. A) for storage and/or transportation. 2 Open the lid of the removable tank 7 and remove the piece of cardboard. Attach the sticker to the inside of the lid. 3 Fill the removable tank as indicated in Section B.
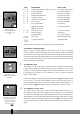
E 6 Check the removable tank fuel gauge G while filling the tank (Fig. E). Stop filling by loosening the switch button on top of the pump (turn anti-clockwise), once the gauge indicates that the tank is full. Never overfill the tank, especially not when the fuel is very cold (fuel expands when it heats up). empty full 7 Let the remaining fuel in the pump flow back into the jerrycan and carefully remove the pump. Carefully screw the fuel cap back on the tank using the fuel cap cover.
The available temperature settings range from 6°C minimum to 28°C maximum. When the heater has been unplugged (or after a power failure), the temperature will reset to the factory setting of 20°C. F USING THE TIMER The timer allows you to switch on the heater automatically at a preset time. In order to switch on the timer, the correct time must have been set (refer to clock temp. 20 set Section C) and the heater should be off.
clock temp. 0 eset room In case of any malfunctioning the information display will tell you what is the matter. CODE INFORMATION WHAT TO DO efefeeee- Temperature within the heater too high. Cool-down and re-ignite. 0 0 1 1 2 5 6 7 Power interrupted. Re-ignite the heater. Faulty thermostat. Contact your dealer. Faulty burner thermistor. Contact your dealer. Starting problems. Contact your dealer. Tipping-over protection. Re-ignite the heater. Poor burning. Contact your dealer.
☞ 10 clock temp. set room Without the 'SAVE' setting your heater will maintain the set temperature by approximation as well, by adjusting its heating capacity. 'SAVE' is an economy setting, which you can use when, for instance, you are not present in the room or to keep it frost-free. K THE 'FUEL' INDICATOR LIGHT When the FUEL indicator light lights up, there is enough fuel left for another 10 minutes of heater use.
☞ N Do not remove any heater components yourself. Always contact your Zibro dealer for repairs. When the power cord is damaged, it may only be replaced by an authorised fitter. Use a new cord of the type H05 VV-F. STORAGE (END OF THE HEATING SEASON) At the end of the heating season, you must store the heater in a dust-free place, if possible in its original packaging. Unused fuel cannot be used in the next heating season. We therefore recommend that you burn up all fuel.
1 We expressly dismiss all other claims for damages, including consequential damages. 2 Any repairs or replacements of components within the term of warranty will not result in an extension of the term of warranty. 3 The warranty shall no longer apply, when the heater has been modified, non-original parts have been used, or when it is repaired by third parties. 4 The warranty shall not apply to parts that are subject to normal wear, such as the burner mat and the manual fuel pump.
E E E E E E E E E E E E E E E E E E E E E E E
E R clock temp. D 15 20 set room G L M F E B H A C N key-lock S hour min. down up O P timer I Q save R fuel J vent.
DISTRIBUTED IN EUROPE BY PVG INTERNATIONAL BV 2 DEUTSCHLAND PVG Deutschland GmbH Beiersdorfstraße 4 46446 EMMERICH tel: +49 2821 76713 fax: +31 412 622 893 email: pvgint@zibro.com 6 DANMARK PVG Scandinavia A/S Niels Bohrsvej 10 6100 HADERSLEV +45 73 53 02 02 tel: fax: +45 73 53 02 04 email: pvgdenmark@zibro.com 5 ESPAÑA PVG España S.A. Pol. Ind. San José de Valderas II Comunidad ”La Alameda” C/ Aurora Boreal, 19 28918 LEGANÉS (Madrid) +34 91 611 31 13 tel: fax: +34 91 612 73 04 email: pvgspain@zibro.