
User manual

Ethernet Smart Cable
User Manual
UM020705-1012 Page 4 of 13
3. Launch ZDS II.
4. Navigate via the
File menu in ZDS II to open one of the projects listed in the samples
directory of your ZDS II installation.
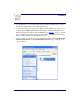
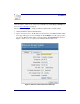
5. Select
Project Settings to display the Project Settings dialog.
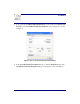
6. Select the
Debugger tab.
7. From the
Debug Tool drop-down menu, select EthernetSmartCable.
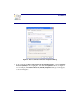
8. Click the
Setup button. Your Ethernet Smart Cable will be listed in the Smart Cables
Available
list. Select the checkbox for your Ethernet Smart Cable, then click the OK
button.
If you have more than one Ethernet Smart Cable, you can uniquely identify
them by comparing the MAC address listed in the
Smart Cables Available
list with the label on the bottom of the Ethernet Smart Cable.
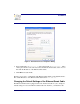
9. Click the
OK button in the Project Settings window. Your project is now configured
to run with the newly installed Ethernet Smart Cable.
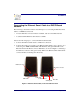
10. Connect the target board to the Ethernet Smart Cable as described in the Connecting to
the Target Board section on page 11.
Connecting the Ethernet Smart Cable Directly to a Host PC
When using a host PC that is not network-connected, configure the PC as follows to con-
nect it to the Ethernet Smart Cable.
The following instructions are designed for use on a MS Windows XP plat-
form. If your Windows operating system is different, refer to MS Windows
OS online help for details.
Observe the following steps to connect the Ethernet Smart Cable to a host PC:
1. Power on your host PC before proceeding.
Note:
Note: