
User's Manual
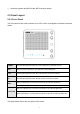
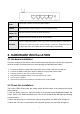
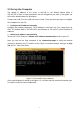


Table Of Contents

5
DC IN
This socket is used to connect the power adapter.
ON/OFF
This slide switch is used to power on or off the wireless router.
1/2/3/4 LAN
This port is used to connect the router to local PC.
WAN
This port is used to connect the router to the Internet.
RST-WPS
There is a RST-WPS button on
the rear panel. Press the button for more than 5
seconds, the router will restore factory settings. If press the button less than 5
seconds, the router will establish Wi-Fi protected settings automatically.
3. HARDWARE INSTALLATION
3.1 Hardware Installation
For those computers you wish to connect with Internet by this router, each of the computers
must be properly connected with the router through provided Ethernet cables.
1. Connect the Modem to ADSL Filter using RJ11 network cable, LINE port to LINE port.
2. Connect the ADSL’s LAN port to Router’s WAN port using RJ45 network cable.
3. Connect your PC to any one of router’s LAN port.
4. Plug the Power Adapter into the router and then into an outlet.
5. Turn on your computer.
6. Check and confirm that the Power & LAN LED on the router are ON.
3.2 Check the Installation
The control LEDs of the router are clearly visible and the status of the network link can be
seen instantly:
1. With the power source on, once the device is connected to the broadband modem, the
Power, WPS, LAN, WLAN and WAN port LEDs of the WLAN Router will light up indicating
a normal status.
2. When the WAN Port is connected to Internet successfully, the WAN LED will light up.
3. When the LAN Port is connected to the computer system, the LAN LED will light up.