
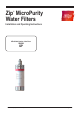
Installation and Operating Instructions


804984 - SP_Zip Filter MicroPurity - 06.18 v1.02 Page 3 of 8
This instruction is for the replacement of the filter in the Zip HydroTap product where the
filter is mounted internally. In preparation for your filter flushing, ensure you have a 10
litre container available.
Some water may drip from the filter head (socket) during replacement. Keep a towel
handy to dry up any drips.
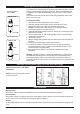
To change the Filter:
1. Go to filter flush in the menu, this isolates the water supply. Variations apply
depending on the product. Refer to individual instruction.
2. Relieve system pressure via the filter flush stop cock if provided, a quick open and
close will do. Use the bucket to catch the discharge.
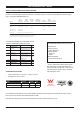
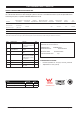
3. Grasp filter cartridge, rotate the cartridge a quarter turn to the left and gently pull
down.
Caution: a small amount of water will drip as the cartridge is removed.
4. Do not tilt the cartridge as water may spill from it if tilted.
5. Unpack replacement cartridge, write today’s date where shown on the label and
remove the sanitary cap.
6. Avoid touching the filter O-rings and filter opening as this may cause bacterial
contamination of the cartridge.
7. Push the new cartridge in and up into the filter head.
8. Turn the cartridge a quarter turn to the right until the cartridge comes to complete
stop and is locked into position.
9. Locate the filter flush hose (if provided) situated behind the filter cartridge and direct
the hose into a container ready for flushing. Open the filter flush stop-cock. On the
menu press Adjust or Start, this will start the water flow, flushing the cartridge. Allow
at least 10 litres of water through the cartridge before use, to activate the filter.
Isolate the filter flush stop-cock and re-fit behind the filter cartridge. Now stop lter
ush or press lter ush off to stop the flow. (It may take approximately 3 minutes to
flush the 10 litres.)
10. Wipe up any spills and dispose of spent filter cartridge and packaging thoughtfully.
11. If your unit is a G4 HydroTap with a touch screen. Go to Menu >Install>Filter Reset
>reset internal filter. Or in G3 HydroTap scroll through the menu to “Litres Filtered”,
press adjust
>
to reset litre counter. Press adjust
>
and it asks “are you sure”.
Press adjust
>
again to lock in the command.
12. Scroll through the menu to “Filter Used (Days)”, press adjust
>
to reset the timer.
Press adjust
>
and it asks “are you sure”. Press adjust
>
again to lock in the
command. After approx 10 seconds it will default to the selected mode.
13. Close the door to secure the appliance.
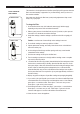
FILTER CARTRIDGE
REPLACEMENT
How to Replace the Internal Filter Cartridge
1. ROTATE
2. PULL DOWN
1. INSERT
2. ROTATE
REMOVE FILTER
INSERT FILTER