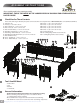
A S S E M B LY I N S T R U C T I O N S Zippity Pet or Garden Enclosure Kit (8’ x 8’ x 30”H) Assembly Time ... 3 to 4 Hours Zippity NO DIG GARDEN FENCE & SCREENS Installation Time ... 2 to 3 Hours 94 1/8 in 91 1/8 in 2 1/2 in 30 in 21 1/2 in 24 in 2 in 36 7/8 in Gate Opening Ground 40 in Top View Front View www.zippity-outdoor.com 701 Lawton Rd. , Charlotte NC USA 28216 Toll Free Phone: 1 877 234 6196 Fax: 704 631 4685 Ver 1.
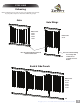
A S S E M B LY I N S T R U C T I O N S Zippity Please read through before starting assembly. NO DIG GARDEN FENCE & SCREENS IMPORTANT: CHECK THE INSIDE OF THE LARGER PIECES IN YOUR BOX FOR OTHER MATERIALS PACKED INSIDE. Check Box for These Contents In the event of missing or defective parts please call our customer service department at 1 877 234 6196 (Mon. to Fri. 8:00 AM to 4:00 PM EST). 1. Post Caps (12) 12. Pickets - 1 - (52) 1 1/2” x 1/4“ x 26 3/8“ 2. Posts (9) - 1 1/2” x 7/8“ x 36 1/2” 13.
STEP ONE Unboxing Zippity When unboxing, please refer to page 2 to identify and separate all your parts and pieces into three different groups. Gate NO DIG GARDEN FENCE & SCREENS Gate Wings Picket Count: 2 @ #2 2 @ #3 2 @ #4 1 @ #5 Picket Count: 5 @ #1 Note: The pickets will have numbered stickers at the bottom. Note: One of the Gate Wing Post is longer and x2 includes wood. See Page 9 for more Details.
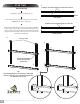
1 STEP T WO Small holes routed through the top and bottom of the rail. Gate Assembly 1 Top Identify the gate top and bottom rail. Bottom 2 Gate Top Rail Insert the gate posts into the routered holes as shown. Note that the tab is at the top. Small holes only routed through the top of the rail.
STEP T WO 4 Gate Assembly 4 Square the gate frame together as shown. 5 Lock the corner together using one of the corner brackets followed by four short screws as shown. 6 Square Repeat for all 4 inside corners of gate frame as illustrated.
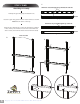
STEP T WO Gate Assembly 7 One by one, slide the pickets through the routered holes as shown. Note the different lengths of pickets. 7 8 Install top post caps. Push down on caps to lock it to vinyl post. Note: Once inserted, the pickets will lock into place. To remove the picket(s), gently insert a butter knife along the picket direction as shown and slowly pull up the picket(s).
STEP THREE Gate Hardware Installation 1 Center and align a hinge around the top rail as shown. To ensure a proper fit and function, firmly wrap the hinge around the front face and end of the rail as shown. 2 Fasten the hinge to the gate rail using two of the screws Repeat for second hinge on gate bottom rail. 3 To install finger latch, center and align the finger latch as shown. 4 Fasten finger latch into the top rail using four of the screws from the hardware kit.
1 STEP FOUR Small holes routed through the top and bottom of the rail. Gate Wings Assembly 1 Top Identify the gate wing top and bottom rails. Bottom 2 Gate Wing Top Rail Insert the gate wing posts into the routered holes as shown. Note that the tab is at the top. Small holes only routed through the top of the rail.
4 STEP FOUR Gate Wings Assembly 4 One by one, slide the pickets through the routered holes as shown. Note: Use pickets labeled “1” 5 Repeat for second gate wing. Picket #1 One of the longer gate wing post will have a wood insert. This post will be used to support the gate hinge as shown.
STEP FIVE Fence Panels Assembly 1 Identify the fence panel top and bottom rails. 2 Insert the fence panel posts into the routered holes as shown. Note that the tab is at the top. 1 Small holes routed through the top and bottom of the rail. Top Bottom Fence Panel Top Rail Small holes only routed through the top of the rail.
STEP FIVE Fence Panels Assembly 3 Align the pre-drilled holes on the rails with the pre-drilled holes on the post and fasten each intersection with two short screws (one from the front and one from the back) 3 n A lig H ole s Zippity NO DIG GARDEN FENCE & SCREENS Zippity Pet or Garden Enclosure Kit Instructions 11
STEP FIVE Fence Panels Assembly 4 One by one, slide the pickets through the routered holes as shown. Note the different lengths of pickets.
STEP SIX Panels Installation 1 With a helper, locate and move the back panel to its final location 1 Push down on the top of posts with both hands 2 Attempt to push the panel into the ground as illustrated. Optionally: 1. If your ground is too hard, loosen the top 4” of the ground with a claw hammer as illustrated. 2. Add water to loosen soil 3. Use a block of wood to the protect the top of post and gently hammer each post into the ground equally.
STEP SEVEN 1 With a helper, align and install the side fence panels to the back panel using the same methods from the previous step. 2 Zippity NO DIG GARDEN FENCE & SCREENS Drive two long screws at each corner as shown.
STEP SEVEN Install Panels into Ground 1 Insert the two gate side panels into the ground as illustrated, using the same methods from the previous steps. Zippity NO DIG GARDEN FENCE & SCREENS 2 Drive two long screws at each corner as shown. 1 2 One of the gate wing post will have a wood insert. This post will be used to support the gate hinge as shown.
STEP EIGHT Install Panels into Ground 3 Level the panels and backfill and compact dirt around the base of each post to strengthen the unit. 4 Push the post caps down over the top of posts as illustrated. The post caps will lock into place.
STEP NINE Gate Installation Zippity 1 With a helper, place the assembled gate on a block of wood as shown and align the horizontal rails on the gate so they are in line with horizontal rails on gate wings. NO DIG GARDEN FENCE & SCREENS 2 Fasten the hinge to the gate wing rail using two screws for the top hinge and two for the bottom as illustrated. 3 Congratulations on Your Finished Project! Guide the latch finger to locate the position of the latch catch and fasten with two more screws.