ZP19041 ASSEMBLY INSTRUCTIONS ALL AMERICAN VINYL PICKET FENCE WITH NO-DIG STEEL PIPE ANCHOR KIT ASSEMBLY INSTRUCTIONS ZP19041 (42”H X 72”W) 45 MIN Approximate assembly time Want to see a video on how to assemble this product? Scan the QR code This fence can be easily trimmed to fit your custom space by using a fine tooth or hack saw. WWW.ZIPPITY-OUTDOOR.COM WWW.ZIPPITY-OUTDOOR.COM 1 VER.
ZP19041 ASSEMBLY INSTRUCTIONS GENERAL INFORMATION IMPORTANT k Check the inside of the larger pieces in your box for other materials packed inside. k When assembling components, place on a non-abrasive surface (i.e. shipping box) to avoid scratching. k We recommend an area approximately 5’x 8’ for unobstructed assembling. k You should not need to use excessive force when assembling components.
ZP19041 ASSEMBLY INSTRUCTIONS AVOID THESE PITFALLS! HAVE YOU CONTACTED YOUR LOCAL UTILITIES? 1 You must call your local utilities before you start installing your fence to avoid puncturing any unseen underground utilities, especially electrical or gas lines. Fortunately, this is made easy for you. k Simply call 811 in the US or visit www.call811.com. k In Canada, visit www.transcanada.com/contactus.html for a list of phone numbers by province.
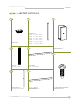
ZP19041 ASSEMBLY INSTRUCTIONS 68 1/2 in 6 in 42 in 38 5/8 in 18 1/8 in 22 3/4 in 2 in 4 in 70 3/8 in 24 in 72 in 4 WWW.ZIPPITY-OUTDOOR.
ZP19041 ASSEMBLY INSTRUCTIONS LAY OUT MATERIALS A B Picket (12) #1(2) - ⅜” x 2¾” x 36½” #2(2) - ⅜” x 2¾” x 34⅜” #3(2) - ⅜” x 2¾” x 32¾” #4(2) - ⅜” x 2¾” x 31½” #5(2) - ⅜” x 2¾” x 30¾” #6(2) - ⅜” x 2¾” x 30½” Post Cap (1) C G D Rail Bracket (4) H Top Rail (1) 1½” x 3½” x 68¼” Post (1) 2” x 3½” x 44⅝” E F Pipe Anchor (1) 1⅝” Diameter x 44⅞” WWW.ZIPPITY-OUTDOOR.
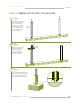
ZP19041 ASSEMBLY INSTRUCTIONS STEP 2: INSTALL PIPE ANCHORS STEP 2.1 After establishing your fence lines with a string and stakes, drive your first Pipe Anchor (E) into the ground. The bottom of the plastic ring should sit just above the ground when finished. Note: If your ground is dry and hard, use a claw hammer to loosen 2” to 4” of dirt around the base of the pipe anchor. E STEP 2.2 Try to drive the pipe anchor as level as possible. Check that it is level every few inches.
ZP19041 ASSEMBLY INSTRUCTIONS STEP 3: INSTALL POSTS OVER PIPE ANCHORS STEP 3.1 Orient the Post (C) with its tab at the top and slide the post over the pipe anchor down into the ground. Repeat for the second post (not included). C STEP 3.2 Using a wood block, pound the post so that the bottom 2” to 4” is below the ground. Repeat for the second post. STEP 3.3 Optional: Secure the post to the pipe anchor with (2) 1” self-drilling hex head steel screws (not included). WWW.ZIPPITY-OUTDOOR.
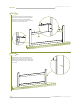
ZP19041 ASSEMBLY INSTRUCTIONS STEP 4: INSTALL RAILS STEP 4.1 H Install (1) Rail Bracket (G) on the post approximately 2” off the ground using (4) ¾” Self-Drilling Stainless Steel Screws (H). G 2” STEP 4.2 Slide the second rail bracket over the opposite end of the Bottom Rail (F) and slide the bottom rail down into the pre-installed rail bracket on the opposing side. F Note: Adjust this post to the rail length by sliding the post left or right. STEP 4.
ZP19041 ASSEMBLY INSTRUCTIONS STEP 4.4 After marking the location of the second rail bracket, temporarily remove the bottom rail and attach the rail bracket to the post by using (4) ¾” self-drilling stainless steel screws. STEP 4.5 Install the top rail brackets 18½” above the bottom rail brackets using (8) ¾” self-drilling stainless steel screws. 18½” WWW.ZIPPITY-OUTDOOR.
ZP19041 ASSEMBLY INSTRUCTIONS STEP 4.6 Orient the bottom and Top Rail (D) to receive vertical pickets and slide them down into the rail brackets. Use (2) ¾” self-drilling stainless steel screws to secure each rail. D STEP 4.7 Optional: If you are fastening your posts to your pipe anchors, now is the time to fasten the second post by following the same steps as outlined in step 3. 10 WWW.ZIPPITY-OUTDOOR.
ZP19041 ASSEMBLY INSTRUCTIONS STEP 5: INSTALL PICKETS AND POST CAPS STEP 5.1 Insert Pickets (B) through the top rail and lock them into the bottom rail. Pay special attention to the numbers on the bottom of each picket to ensure that they are inserted in the correct pattern. 1 B 2 3 4 4 3 5 6 6 5 2 1 STEP 5.2 Install Post Caps (A). Push down on the caps to lock them to the posts. WWW.ZIPPITY-OUTDOOR.
ZP19041 ASSEMBLY INSTRUCTIONS TIPS: INSTALLING BOTTOM FENCE BRACKETS AT A 90° ANGLE TIP 1 Place the bottom rail bracket on the post and mark the locations of the four holes on the post. TIP 2 Pre-drill the post and pipe anchor. TIP 3 Install the rail bracket to the post and pipe anchor. 12 WWW.ZIPPITY-OUTDOOR.
ZP19041 ASSEMBLY INSTRUCTIONS 6935 Reames Rd. Ste. K. Charlotte, NC 28216 support@zippity-outdoor.com 704-892-5222 877-234-6196 WWW.ZIPPITY-OUTDOOR.COM WWW.ZIPPITY-OUTDOOR.