ASSEMBLY INSTRUCTIONS WASHINGTON VINYL GATE KIT WITH FENCE WINGS (30in H x 60 1/2in W) 45 MIN approximate assembly time 6935 Reames Rd. Ste. K. Charlotte, NC 28216 @ support@zippity-outdoor.com 704-892-5222 / 877-234-6196 zippity-outdoor.com www.zippity-outdoor.
GENERAL INFORMATION IMPORTANT • Please read through before starting assembly. • Important: Check the inside of the larger pieces in your box for other materials packed inside. • When assembling components, place on a non-abrasive surface (i.e. shipping box) to avoid scratching. • We recommend an area approx 5’x 8’ for unobstructed assembling. • You should not need to use excessive force when assembling components.
STEP 1: LAY OUT MATERIALS WASHINGTON VINYL PICKET GATE KIT W/FENCE WINGS A B Post Caps (4) C Rail End Caps (12) (10 are installed, 2 are loose) D Horizontal Top Rail (2) 1 ½” x 1 ½” x 12” J Horizontal Bottom Rail (2) 1 ½” x 1 ½” x 12” K Latch Finger (1) Latch Catch (1) L E F G Hinges (2) Picket #1 (4) ¼” x 1 ¼” x 24 ½” M Picket #2 (2) ¼” x 1 ¼” x 22 ½” Picket #3 (2) ¼” x 1 ¼” x 21 ¼” Corner Bracket (4) N Picket #4 (1) ¼” x 1 ¼” x 20 ¾” Gate Post (2) 7/8” x 1 ½” x 26 ½” O Post (4) 7/8” x
STEP 2: ASSEMBLE THE GATE FRAME STEP 2.1 Identify the gate top rail (Part H) and gate bottom rail (Part I) as shown below. Pressure fit two rail end caps (Part B) onto the ends of the rails. Bottom rail has no picket holes on the underside of the rail STEP 2.2 Slide the two gate posts (Part E) down into the gate rails with the post tabs at the top. Align the pre-drilled holes in the posts and on the rails. Fasten the post to the rails with seven ¾” screws (Part N) Tabs A screw is not needed here.
STEP 3: INSTALL PICKETS AND CAPS STEP 3.1 Layout the pickets (Part G) as shown below. The pickets are numbered 1-4 at the bottom. Insert the pickets through the top and bottom gate rail. The tab of the picket will snap into the gate bottom rail when fully inserted. 1 2 1 2 STEP 3.2 3 4 3 Pressure fit the two post caps (Part A) down over the gate posts. The post caps will lock into place when fully inserted. www.zippity-outdoor.
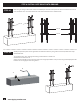
STEP 4: ATTACH HINGE AND LATCH STEP 4.1 Align the hinges (Part L) on the top and bottom gate rails as shown. Pre-drill two holes on the face of each rail as shown. The holes should be roughly ¼” from the edge of the gate rails. Fasten each hinge with two ½” small black screws (Part O). ¼ in STEP 4.2 6 Align the latch finger (Part J) to the top gate rail and pre-drill four holes into the gate rail as shown. Fasten four ½” small black screws to lock the latch finger in place. www.zippity-outdoor.
STEP 5: ASSEMBLE THE GATE WINGS STEP 5.1 Identify the horizontal top rail (Part C) and horizontal bottom rail (Part D) as shown below. Orient the posts (Part F) as shown. Slide the two posts down into the top rail and bottom rail. Align the pre-drilled holes on the posts and the rails and fasten eight total ¾” screws (Part N) into the holes. Tabs Bottom rail has no hole for picket on underside of rail Align Note direction of the spears. STEP 5.
STEP 6: INSTALL GATE WINGS INTO GROUND Move the gate wings to their final location and identify the location of the posts. The distance between the vertical posts should be 39 ½” or 36 ¾” between the ends of the horizontal rails as shown below. STEP 6.1 39½ in 39½ in 36¾ in Attempt to push the posts into the ground at the marked locations. If your ground is too hard, follow these steps illustrated below: STEP 6.2 1. Loosen the top 6” to 8” of the ground using a claw hammer or similar tool. 2.
STEP 6.3 Level the assembled unit. Backfill and compact dirt around the base of each post to strengthen the unit. Level STEP 6.4 Finish the assembly by pushing the post caps (Part A) down over the top of posts as illustrated. The post caps will lock into place. www.zippity-outdoor.
STEP 7: INSTALL GATE HARDWARE STEP 7.1 Align the gate hinges against the horizontal rails of the gate wing as shown. Mark and pre-drill two holes for each hinge. Fasten each hinge with two ½” small black screws (Part O). STEP 7.2 Align the latch catch (Part K) with the latch finger and pre-drill two holes into the horizontal top rail of the gate wing. Fasten two ½” small black screws into the horizontal top rail to secure the latch catch. 10 www.zippity-outdoor.
STEP 8: CONNECT GATES TO FENCE PANELS STEP 8.1 Follow the instructions included in your Washington Picket Fence Kit. Connect the top and bottom rails of the gate and fence panels using the supplied joiner clips in the Washington Picket Fence Kit. 6935 Reames Rd. Ste. K. Charlotte, NC 28216 @ support@zippity-outdoor.com 704-892-5222 / 877-234-6196 zippity-outdoor.com www.zippity-outdoor.