
Owner's Manual
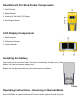


When the Low Battery Indicator appears, replace the battery as soon as possible to maintain
sensitivity.
Helpful Hints:
If the error condition occurs, start again keeping the unit flat and sliding smoothly across the wall. If
the surface is too rough, you can slide more smoothly by putting a piece of paper on the wall and
scanning through that.
To avoid interference, keep your free hand at least six inches (15 cm) away from the StudVision®
Pro stud finder while calibrating and scanning.
The tool should always be held parallel to the stud/joist and moved across it (see Figures 5, 6).
Working with Different Materials:
The StudVision® Pro stud finder is designed for use on interior walls only. Three main factors affect
sensing depth while scanning for studs. They are thickness, density, and moisture content. The
StudVision® Pro stud finder is capable of scanning through approximately 2" (5 cm) of common
construction materials in Extreme Precision mode. It can scan through most sheet materials
including:
Bare wood flooring and sub flooring
Linoleum on a wood base
Gypsum drywall over plywood sheathing
Wallpapered walls (if dry)
Textured ceilings if uniform thickness (use a thin cardboard in Extreme Precision mode and
scan through the cardboard to avoid damage to texturing)
Because of inconsistent density of the material, it is not effective on:
Ceramic floor tile
Carpeting and pad
Wallpaper with metallic fibers
Lath and plaster walls (in most cases)
Freshly painted walls that are still damp (must dry at least a week)
CAUTION
If electrical wiring or metal and plastic pipes are close to or touching the back surface of the wall,
the StudVision® Pro stud finder may detect them in the same manner as studs. Caution should
always be used when nailing, cutting, or drilling in walls, floors, and ceilings that may contain these
items.