
Installation Guide


1
Prior to Installation
Make sure that the cold and hot water lines are turned off.
Wrap all threaded connections with plumber’s tape. Always wrap in a clockwise
direction.
Cover your drain to avoid losing parts.
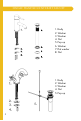
Do not disassemble the main faucet body, as it has been installed and commissioned
correctly and precisely before delivery to the factory.
To keep the faucet from jamming, flush the water pipe before installation.
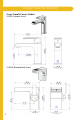
Operating conditions: Working pressure at 0.05-1.0 MPa (including cold and hot
water pressure) with applicable water temperature: 39.2°F - 194°F.
Installation Preparation
1. Shut off the water and let the water in the current faucet drain.
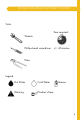
2. Assemble needed tools. The tools needed for each installation are included at the
beginning of each section.
3. Loosen the hardware that keeps the current faucet in place. Remove faucet.
Care and Maintenance
To keep the product clean and shining, follow the steps below:
1. Rinse clean with water and dry with a soft cloth.
2. Do not clean with soaps, acid, polish, abrasives, or harsh cleaners.
3. Do not use cloth with a coarse surface.
4. Unscrew the aerator and clean when necessary.
Safety Instructions
If soldering the water connections when installing the faucet, remove the O-rings,
cartridges, and washers before applying any heat.
Protect your eyes when cutting or soldering.
Do not over tighten screws/nuts. Finger tighten, then use a wrench/Philips-head
screwdriver to tighten the fixing screw/nut until snug.