Island Hood Installation Installation Tutorial Video 15
Island Hood Installation *The recommended height to install your hood is 30˝ minimum and 36˝ maximum above the cooktop. *For Outdoor (304 Series) hood installation, the unit must be installed at a minimum of 36˝ above the grill. 1 Locate the center above the stove where the hood is to be installed. Ensure that the bracket will be secured to solid wood backing. Attach mounting bracket to the ceiling. 2 Attach the transition piece and ducting to top of the hood.
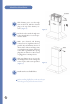
Island Hood Installation 3 Attach the four long angle iron pieces to the hood’s motor housing (Figure 3) 4 Determine desired height and attach the four short angle iron pieces to the long angle iron pieces that are attached to the hood (Figure 3) 5 Install the duct work in the center of the ceiling bracket.
Island Hood Installation 6 Slide chimney pieces over the angle iron on the hood. Pull the electrical plug to the top of the chimney sections. (Figure 4) 7 Lift the hood to attach the angle iron to the ceiling bracket. Use screws provided to attach. 8 Make your electrical and ducting connections. Use rigid duct wherever possible. Try and minimize the use of elbows. More elbows and longer runs create higher static pressure.