
Owners Guide


20
Island Range Hood Installation
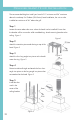
Step 6
Slide chimney pieces over the angle iron on the hood. Pull the electrical plug to the
top of the chimney sections. Figure 4
Step 7
Lift the hood to attach the angle iron to the ceiling bracket. Use screws provided to
attach.
Step 8
Make your electrical and ducting connections. Use rigid ducting wherever possible.
Try and minimize the use of elbows. More elbows and longer runs create higher static
pressure. No more than two to three elbows are recommended. The hood comes with
a grounded three prong plug that can either be direct wired or plugged into a 20
amp circuit in the ceiling. The cord is 68.5” long.
Step 9
Slide top chimney piece up over the mounting bracket on the ceiling and secure it in
place with the provided screws. Figure 5
Step 10
Install stainless steel baffle filters. Before installing baffle filters, make sure that you
insert the grease cup under the motor blower.
Figure 4
Figure 5