Two Locations 916 Delaware Avenue • Marysville, Ohio 43040 984 East Greg Street • Sparks, Nevada 89431-6521 www.ZLineKitchen.com www. TheRangeHoodStore.
Table of Contents Installation for: Walls............................................................................... 4 Designer Walls.............................................................. 9 Crown Molding............................................................. 14 Islands............................................................................ 15 Under Cabinets ............................................................ 19 Inserts......................................................
Important Safety Notice Read all instructions before installing and operating this appliance. ►The installation instructions in this manual is intended for qualified installers, service technicians or persons with similar qualified background. Installation and electrical wiring must be done by qualified professionals and in accordance with all applicable codes and standards, including first-rated construction. ►DO NOT attempt to install this appliance yourself.
Important Safety Notice ►Never leave surface units unattended at high settings. Boil overs cause smoking and greasy spillovers that may ignite. Heat oils slowly on low or medium settings. ►Clean ventilating fan frequently. ►Always use appropriate cookware and utensils size. ►Always use cookware appropriate for the size of the surface element.
Wall Range Hood Installation Installation Tutorial Video 4
Wall Range Hood Installation Please unpack your range hood when it is delivered and inspect to ensure all parts are included. E B F Parts Supplied: 1. Main Hood With All Lights and Button Banks Pres-installed 2. Adjustable Stainless Chimney Cover 3. Transition Piece (For 6˝ or 8˝) 4. Baffle Filters 5. Flexible Duct (For 6˝ or 8˝) 6. Packet of Screws and Anchors 7. Top Mounting Bracket 8.
Wall Range Hood Installation *The recommended height to install your hood is 30˝ minimum and 36˝ maximum above the cooktop. *For Outdoor (304 Series) hood installation, the unit must be installed at a minimum of 36˝ above the grill. 1 2 Find the center of the wall where you are installing the hood. Make sure there is sufficient bracing to hold the weight of the hood. Mark your center line and measure out from the center to find your two mounting points.
Wall Range Hood Installation 5 Install the transition piece securing it with screws provided. (Figure 4) 6 Make your electrical and ducting connections. Try and minimize the use of elbows. More elbows and longer runs create higher static pressure. The hood comes with a grounded three prong plug that can either be direct wire or plugged into a 20amp. circuit. (Figure 5) Figure 4 Figure 5 7 Connect the ducting to the transition piece using ring to hold into place. Attach ducting to the range hood.
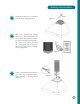
Wall Range Hood Installation 8 Install the two part chimneys on top of the hood. Slide the inside section up until the vertical vent slots are visible, attach top portion to mounting bracket with screws. Secure lower chimney portion to the hood with screws provided. (Figure 7) 9 Install plastic drip cup by sliding into brackets located at the bottom of the motor. Install ◆baffle channel and baffle filters. (Figure 8) ◆Not all models include baffle channels.
Designer Wall Range Hood Installation Installation Tutorial Video 9
Designer Wall Range Hood Installation Please unpack your range hood when it is delivered and inspect to ensure all parts are included. Parts Supplied: 1. Main Hood With All Lights and Button Banks Pre-installed 2. Chimney 3. Transition Piece (For 6˝ or 8˝) 4. Baffle Filters 5. Flexible Duct (For 6˝ or 8˝) 6. Packet of Screws and Anchors 7. Top Mounting Bracket 8. Crown Molding Bracket 9. Crown Molding 10.
Designer Wall Range Hood Installation *The recommended height to install your hood is 30˝ minimum and 36˝ maximum above the cooktop. *For Outdoor (304 Series) hood installation: The unit must be installed at a minimum of 36˝ above the grill. 1 2 Find the center of the wall where you are installing the hood. Make sure there is sufficient bracing to hold the weight of the hood. Mark your center line and measure out from the center to find your two mounting points.
Designer Wall Range Hood Installation Designer Wall Range Hood Installation 5 Make your electrical and ducting connections. Try and minimize the use of elbows. More elbows and longer runs create higher static pressure. The hood comes with a grounded three prong plug that can either be direct wire or plugged into a 20amp. circuit. (Figure 4) Figure 4 Figure 5 6 Install the transition piece securing it with screws provided.
Designer Wall Range Hood Installation 8 Cut chimney to height needed. (Figure 7) Figure 7 9 Install the chimney on top of the hood. Secure the lower portion with the provided screw at the bottom. (Figure 8) Figure 8 10 Slide crown molding over mounting bracket.
Installing Crown Moldings If using a crown molding follow instructions before attaching ducting and chimney sections. 14 1 Attach crown molding bracket to ceiling using hardware provided. 2 Attach ducting and electrical connections. 3 Attach chimney sections to the range hood then connect to crown molding bracket. 4 Slide crown molding onto crown bracket and secure into place.
Island Hood Installation Installation Tutorial Video 15
Island Hood Installation *The recommended height to install your hood is 30˝ minimum and 36˝ maximum above the cooktop. *For Outdoor (304 Series) hood installation, the unit must be installed at a minimum of 36˝ above the grill. 1 Locate the center above the stove where the hood is to be installed. Ensure that the bracket will be secured to solid wood backing. Attach mounting bracket to the ceiling. 2 Attach the transition piece and ducting to top of the hood.
Island Hood Installation 3 Attach the four long angle iron pieces to the hood’s motor housing (Figure 3) 4 Determine desired height and attach the four short angle iron pieces to the long angle iron pieces that are attached to the hood (Figure 3) 5 Install the duct work in the center of the ceiling bracket.
Island Hood Installation 6 Slide chimney pieces over the angle iron on the hood. Pull the electrical plug to the top of the chimney sections. (Figure 4) 7 Lift the hood to attach the angle iron to the ceiling bracket. Use screws provided to attach. 8 Make your electrical and ducting connections. Use rigid duct wherever possible. Try and minimize the use of elbows. More elbows and longer runs create higher static pressure.
Under Cabinet Installation Installation Tutorial Video 19
Under Cabinet Installation Preparation ► ► ► ► Decide the location of the venting pipe from the hood to the outside. Check hood for clearance. A straight, short vent run will allow the hood to perform more efficiently. Try to avoid as many transitions, elbows, and long runs as possible. This may reduce the performance of the hood. ► For installing under the cabinet with recessed bottom, attach 4-inch wide wood filler strips (not provided) on each side.
Under Cabinet Installation 5 Draw electrical wires through cabinet access opening, center the hood beneath the cabinet. 6 Align hood-mounting brackets to the screws on the wall and hook hood into place. Tighten screws to secure hood to the wall. 7 Connect ducting.
Range Hood Insert Installation Installation Tutorial Video *When installing a range hood insert, it is recommended to install the unit at a minimum of 30˝ from the cooktop. *For outdoor range hood inserts it is recommended to install the unit at a minimum of 36˝ from the grill top.
Range Hood Insert Installation 1 Unpack the contents of the hood. Attach transition piece and ducting to the top of the range hood insert. (Images 1 and 2) 2 Using L brackets and screws provided, attach L brackets to each side of the insert. 3 Lift the range hood insert into cabinet or custom hood structure.
Range Hood Insert Installation Image 3 1 Follow instructions for wall hood mount to mount the range hood. 2 Attach brackets provided to the remote blower. 3 Install remote blower unit in the attic, crawl space, DO NOT install outside of the home, must be attached to a joist, stud or rafter. 4 Connect ducting from the hood to the remote blower unit. 5 Connect ducting to the other side of the remote blower to outdoor where you will vent your hood.
Remote Blower Installation Options When installing your new remote blower type range hood, follow the instructions for the type of hood you are installing. If you are installing a wall, Island, under cabinet or insert hood then you will follow those instructions. This portion of the manual will explain how to install the remote blower for your range hood. Installation Tutorial Video Remote Blower Installation: 1 Run duct work into the area that you will install the remote from your range hood.
Remote Blower Installation Options 5 Run electrical cord (Provided) back to the range hood (up to 26). Remote Blower with Brackets 6 Install a regular outlet with a 20 amp circuit. 7 The hood comes with a grounded 3 prong grounded plug. 8 Run duct work to the outside of the house and add a back draft damper outside. NOTE: The remote blower must be kept inside the home, attic or crawl space etc. Never try to install a remote blower outside of the home.
Remote Blower Installation Options The Remote Blower is designed for our Remote Range Hoods. This unit is installed remotely in the interior of your home. This provides venting, but with reduced noise. T85 Remote Blower—Single Motor (This Blower must be used with Remote Blower Hood) Airflow 280 / 400 / 580 / 900 (CFM) Noise Level: 1.2 / 2.6 / 4.2 / 6.5 (Sones) Dimensions: 26.14 x 14.
Remote Blower Installation Options The Remote Blower is designed for our Remote Range Hoods. This unit is installed remotely in the interior of your home. This provides venting, but with reduced noise. T85 Remote Blower—Single Motor (This Blower must be used with Remote Blower Hood) Airflow 280 / 400 / 580 / 900 (CFM) Noise Level: 1.2 / 2.6 / 4.2 / 6.5 (Sones) Dimensions: 26.14 x 14.
How To Change or Replace Parts How To Change Out the Button Panel: Installation Tutorial Video 1 Remove baffle/aluminum filters. 2 Locate back of button panel. 3 Remove screws from each side of the button panel. 4 Disconnect button panel from cord connecting to circuit board. NOTE: Never work on or clean the range hood while power is ON! Always unplug the unit or switch the electrical breaker to the off position.
How To Change or Replace Parts How To Replace the Circuit Board: Installation Tutorial Video 1 Turn the power off at the breaker and unplug the Range Hood. 2 Remove all screws from the top of the circuit board cover. 3 Take a picture of the wiring layout (This will help you put the circuit board back together properly). 4 Remove the wiring connected to the circuit board. 5 Remove the screws form the circuit board. 6 Replace wiring and screws to reassemble the new circuit board per the diagram below.
How To Change or Replace Parts Replacing the Light Bulbs in Your Range Hood: Use 20 watt MR11 Halogen Bulb or a 2.5 watt LED Bulb for replacement. 1 Remove baffles. Remove baffles. Press light through socket. 2 Gently press light casting out until it falls out of the socket, disconnect the plug wires. 3 Press both sides of the mounting clip to remove the light bulb (Be certain not to touch the bulb). Remove mounting clip and replace bulb. 4 Pull light from the receptacle plug.
How To Change or Replace Parts Professional Series Baffle Filter Change: Installation Tutorial Video Covering Models 696 / 697 / 697 Island / KECOM / KECOM Island / 695 , 698, and 721 Inserts Other Types of Baffle Filter Removal/Replace The following diagrams illustrate filters specific to the professional series range hoods and inserts. Professional series hoods are equipped with 2 removable dishwasher safe baffle channels (one for series 695 and 698 inserts) that the baffle filters sit into.
How To Change or Replace Parts Baffle Filter: Installation Tutorial Video The Baffle Filter is equipped with a spring loaded handle. To remove from the hood, pull back toward the wall and down. The Baffle Filter can also be opened for easy cleaning. To open, unscrew the cylindrical handle and separate the layers to clean. Aluminum Filter: To remove the filter, pull the spring loaded handle back toward the wall and down.
How To Change or Replace Parts Installation Tutorial Video Change / Replace Capacitor: 1 Remove screws from the circuit board cover. 2 Remove screws from capacitor. 1 3 Remove both wired connections from the capacitor. 5 4 Connect new capacitor with wire connectors. Dual Motor Unit Capacitors 5 Replace screws in cover. 3 6 Repeat operation if dual motor. 4 2 Dual Motor Unit Capacitors NOTE: Some units have more than one motor. If you have a unit with dual motors, there will be two capacitors.
How To Change or Replace Parts Filter Installations Replace or Change Charcoal Filters: Installation Tutorial Video It is recommended to direct vent the hood whenever possible. It is recommended to direct the hood whenever possible. If your situation does not allow forvent a direct vent install carbon If your situationtodoes not allow the for aair direct vent install, carbon filters filters are available recirculate through your hood. are available to recirculate the air through your hood.
How To Change or Replace Parts How To Clean, Install, or Replace the Grease Cup: Installation Tutorial Video Grease Cup Installation: A removable grease cup is provided to catch any excess grease at the bottom of the motor. Remove it every 2 to 3 months, wash it , then re-install. Slide into place. NOTE: Never work on or clean the range hood while power is ON! Always unplug the unit or switch the electrical breaker to the off position.
How To Change or Replace Parts Change / Replace Transformer: Installation Tutorial Video 1 Remove the screws from the transformer. 2 Remove the two connections to the lights. 3 Remove the two wired connections to the circuit board (You must remove the circuit board cover). 4 Install the new connections from your new transformer. (Be certain the correct wires are connected). 5 Reinstall the cover for the circuit board with screws. 6 Replace all screws in the transformer.
How To Change or Replace Parts Single Motor Electrical Diagram 38
How To Change or Replace Parts Dual Motor Electrical Diagram 39
Trouble Shooting and FAQ's ► No power: 1. Check electrical connections. 2. Check that all connections to the circuit board are secure. 3. If problem still exists, the circuit board needs to be replaced. ► What size hood should I choose for CFM purposes? 1. You must determine the output of the cooktop burners of your range; this is measured in British Thermal Units (BTU’s). 2. You should provide 100 CFM of airflow per linear foot of range. To determine this, divide the BTU rating of your range by 100.
Trouble Shooting and FAQ's ► Do I need a chimney extension or a shortening kit when I purchase my hood? Your hood will come with a default chimney that has a telescoping chimney to allow for an adjustable mounting height for a ceiling of up to 9 to 9.5 feet. An extension is needed for a ceiling from 10 to 12 tall. A short chimney is recommended for a ceiling height of 8ft, however measure to be certain. All extensions and short kits will come with brackets that go specifically with that chimney.
Trouble Shooting and FAQ's for obstructions in the ductwork. A common obstruction is buildup in the roof or wall cap, such as: bird nests or other debris. ► My hood is making a rattling noise. This is probably attributed to one of the following: 1. The motor is loose—Turn off the power and remove the filter and check that all screws are secure and tight around the motor. 2. The duct work connection is loose—Turn off the power to the unit and check that the ductwork connection to the pipe is tight.
Warranty and Disclaimer Warranty ► Three Year Parts Warranty: For three years from the date of original purchase, we will provide free of charge, non-consumable replacement parts for the components that failed due to manufacturing defects. Subject to the conditions and limitations set forth below at its option, either repair or replace any part of its products that prove defective by reason of improper workmanship or material. Repaired parts or replacement products will be provided by www.therangehoodstore.