D ouble W all O ven Installation Guide and Users Manual
Ignite your kitchen experience with the ZLINE Wall Oven. Integrated with the highperformance you expect from ZLINE Ranges, ZLINE Wall Ovens combine the speed of a microwave and the power of an oven to make it an elite appliance. The built-in installation achieves a seamless, sleek aesthetic and a clutter-free kitchen.
CONTENTS IMPORTANT SAFETY INSTRUCTIONS 1 PRODUCT SPECIFICATIONS 4 PARTS AND TOOLS 5 GROUNDING INSTRUCTIONS 6 INSTALLATION REQUIREMENTS 8 OPERATION 17 MAINTENANCE 47 TROUBLESHOOTING 55
Model Number Rating Plate The model number rating plate shows the model number. Refer to the rating plate on the appliance when requesting service. The rating plate is located under the control panel on the upper oven cavity.
Important Safety Instructions To reduce the risk of fire, electrical shock, injury to persons, or damage when using the oven, follow basic precautions, including the WARNING following: PROPER INSTALLATION: • This appliance must be properly installed and electrically grounded by a qualified technician. Connect only to properly grounded outlet. See “Grounding Instructions” found in the Installation Instructions. • This appliance should be serviced only by a qualified service technician.
important safety instructions • If materials inside the oven should ignite, keep oven door closed. Turn oven off and disconnect the circuit at the circuit breaker box. • Be sure the blower fan runs whenever the oven is in operation. If the fan does not operate, do not use the oven. Call an authorized service center. • Never use the oven to warm or heat a room. PERSONAL SAFETY: • Do not allow children to use this appliance unless closely supervised by an adult.
important safety instructions PAR SAFETY FOR THE SELF-CLEANING OVEN: • Before self-cleaning the oven, remove the broiler pan, oven racks (only when not made of porcelain), other utensils and excess soft spillage. • Confirm that the door locks and will not open once both selectors are in CLEAN position and the door lock icon appears. If the door does not lock, turn the cook mode selector to OFF and do not run Self-Clean. Call an authorized servicer. • Do not clean the door gasket.
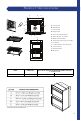
E F A K Product Specifications TION REQUIREMENTS INSTALLATION REQUIREMENTS S T N E M E R I U Q E R N O I TA L L AT S N I RT AND FEATURES TION REQUIREMENTS INSTALLATION REQUIREMENTS S T N E MLOCATION E R I USQTE RRANPREQUIREMENTS O IDTNAAL LSALTOS NOIT ND PARTS STN TOOLS E M E R IU AND QERPARTS NOITACOL LOCATION REQUIREMENTS M L ired dnaPARTS tools seS doT before cN gGather nE inM rstarting evE othe gRlIlrequired aU installation.
PARTS AND TOOLS Gather the required tools before starting installation. Read and follow the instructions provided with any tools listed here.
GROUNDING INSTRUCTIONS Electric Shock Hazard If codes permit and a separate ground wire is used, it is recommended that a qualified electrical installer determine that the ground path is adequate and wire gauge is in accordance with local codes. Do not use an extension cord. WARNING IN U.S.A. Be sure that the electrical connection and wire size are adequate and in conformance with the National Electrical Code, ANSI/ NFPA No. 70-latest edition and all local codes and ordinances.
GROUNDING INSTRUCTIONS • Check with a qualified electrician if you are in doubt as to whether the appliance is properly grounded. Failure to do so could result in death, fire or electric shock. • To properly install your oven, you must determine the type of electrical connection you will be using and follow the instructions provided for it here. • Oven must be connected to the proper electrical voltage and frequency as specified on the model number rating plate.
Installation Requirements This appliance shall be installed only by authorized persons and in accordance with the manufacturer’s installation instructions, local gas fitting regulations, municipal building codes, electrical wiring WARNING regulations, local water supply regulations. Observe all governing codes and ordinances. • Cabinet opening dimensions that are shown must be used. Given dimensions provide minimum clearance with oven.
Single -- Installed in Single Oven Oven Double Installed Oven - Installed in Cabinet Cabinet in Cabinet and and Installed Installed Undercounter Undercounter - Installed in Cabinet led Undercounter D Electrical Junction Box Location NOTE: Junction box may be located in adjacent cabinet 4" 4" 4" D Electrical Electrical Junction Junction Box Box Location Location NOTE: NOTE: Junction Junction box may be box may be located located in in adjacent adjacent cabinet cabinet D 4" C Double Double Oven Ove
IMPORTANT: This appliance shall be installed only by authorized 3 Grasp the edges of the oven doo persons and in accordance with the manufacturer’s installation STEP 3 - INSTALL OVEN oven door fully closed. Lift up a remove. Set the oven door(s) asid regulations, local water supply regulations. 3 Remove the hardware package from insideelectrical the bagwiring containing for lifting. 2 Remove the shipping materials and tape from the oven.
bag containing WARNING inside the oven. EXCESSIVE WEIGHT HAZARD Use two or more people to move and install oven. Installation Requirements will be installed. Failure to do so can result in back or other injury. OOR OVEN 1 Using two or more people, grasp the ceiling of the oven cavity and le, and the STEP door 3 - INSTALL lift the onto grasp a tablethe or platform with the cutout use both hands, 1. Using two or moreoven people, ceiling ofeven the oven cavity andopening. lift the oven onto e.
Failure to do so can result in death, re or electrical shock. Be sure your appliance is properly installed and grounded by a Installation Requirements qualified technician. Ask your dealer to recommend a qualified technician or an authorized repair service. This oven is manufactured with a(white) neutralpower (white) powerwire supply • This oven is manufactured with a neutral supply and wire a cabinet and a cabinetconnected green (or bare) ground wire twisted together.
and recreational vehicles, or in an area where local codes proDisconnect hibit grounding through the neutral conductor.1For installationspower. eath,where re orgrounding electricalthrough shock.the neutral conductor is prohibited, see the Ungrounded Neutral graphic. Grounded Neutral Installation I A Requirements erly installed and grounded by a Connect neutral terminal or lead to branch circuit neutral in dealer tomanner. recommend a qualified usual B pair service.
4-WIRE CABLE FROM HOME POWER SUPPLY IMPORTANT: Use the 4-wire cable from home power supply in the U.S. where local codes do not allow grounding through neutral, Installation New BranchRequirements circuit installations (1996 NEC), mobile homes and recreational vehicles, new construction and in Canada. 1 Disconnect power. 4-WIRE CONNECTION (UNGROUNDED NEUTRAL) - U.S.A. AND CANADA 4-WIRE CABLE FROM HOME POWER SUPPLY A 4-WIRE CONNECTION (UNGROUNDED NEUTRAL) Use the 4-wire cable from U.S.A.
wire connector. • Electric 6 Connect the ground (green or bare) wire FA from the oven cable to the ground (green or bare) wire (in the junction box) using a UL listed wire connector. • See “Tro 4 When oven feel heat o the oven an Installation Requirements 7 Install junction box cover. 5 Press STO STEP 5 - MOUNT THE5OVEN STEP - MOUNT THE OVEN 1.
Installation Requirements STEP 7 - COMPLETE INSTALLATION 1. Check that all parts are now installed. If there is an extra part, go back through the steps to see which step was skipped. 2. Dispose of/recycle all packaging materials. 3. Check Operation of Oven. • Turn on power. • Press BROIL. • Set the temperature. • Press START. NOTE: If oven(s) does not operate, check the following: • Household fuse is intact and tight; or circuit breaker has not tripped. • Electrical supply is connected.
Operation CONTROL PANEL A M B C L K A Upper Oven Controls J I D E F H G H Lower Oven Start B Display I Settings C Cook Time J Light E Upper Oven Start L Lower Oven Controls D Start Time K Timer F Upper Oven STOP/CLEAR M Self-Clean G Lower Oven STOP/CLEAR • OVEN MODE CONTROLS TO UNLOCK CONTROL PANEL: OVEN MODE CONTROLS UPPERBAKE, OVEN: BAKE, BROIL, CONVEC UPPER OVEN: BROIL, • Press and hold START/HOLD for 3 seconds or until symbol disappears.
When power is first supplied to the oven or if a power failure occurs, “12:00” will appear on the display. See “Clock,” later in this section, for instructions to set the time-of-day. When the oven is not in use, the time-of-day appears in the display. START The Start control begins any oven function. If Start is not pressed within 2 minutes after pressing a keypad the function is canceled and the time-of- day is displayed.
OPERATION COOK TIME • The Cook Time feature allows the oven to be set to cook for a set length of time, and then turn off automatically. • You must select an Oven Mode before you can set a Cook Time. • Cook Time can be set in hours or minutes up to 12 hours. • To change the cook time during cooking, press STOP/ CLEAR. Enter the new cook time and press START.
Operation SETTINGS • The Settings control allows you to access the menu for additional functions and features. 1. Clock 2. Temp Unit 3. Sound 4. Sound Volume 5. 12/24 hour 6. Language 7. Sabbath 8. Brightness 9. Calibration 0 Demo Mode • Press SETTINGS to show Menu Options 1 - 6. Then, press START to show Options 7 - 0. CLOCK The clock can be set to display time in a 12-hour or 24-hour format. The clock is factory preset for the 12-hour format.
OPERATION TO CHANGE THE CLOCK TO 24-HOUR FORMAT: 1. 1 Press SETTINGS. The various Options will appear in the display. 2. 2 Press “5” on the number keypad. “12/24 HOUR” and “12” will appear in the display. 3. Press “1” on the number keypad to change the 12/24 Hour setting to 24-hour. 4. Press SETTINGS to confirm. The 12/24-Hour setting has been changed.
Operation TO ADJUST SOUND VOLUME The oven sound is factory preset for High but can be changed to Low. 1. Press SETTINGS. The various Options will appear in the display. 2. Press “4” on the number keypad. “SOUND VOLUME” and “HIGH” will appear in the display. 3. Press “1” on the number keypad. HIGH/LOW” will appear in the display. 4. Press “1” on the number keypad to turn the sound Low. 5. Press SETTINGS to confirm. The sound volume has now been changed. 6.
OPERATION SABBATH MODE The oven is factory preset with Sabbath Mode Off. TO TURN ON/OFF SABBATH MODE 1. Make sure the oven is turned Off, and the meat probe is not plugged in. NOTE: Sabbath mode cannot be set when the oven is On. The oven will not recognize the meat probe while in Sabbath mode. 2. Press SETTINGS, Press START to go to the next page, and then press “7”. 3. Press “1” to toggle between ON/OFF 4. Press SETTINGS again to enable Sabbath mode.
Operation CALIBRATION See “Oven Temperature Control” on page 30. DEMO MODE 1. Press SETTINGS and Press START to go to the next page. 2. Press “0” on the number keypad. “DEMO MODE” and “OFF” will appear in the display. 3. Press “1” to toggle between ON/OFF. 4. Press SETTINGS to confirm. • NOTE: Oven does not heat in DEMO MODE. The display counts down quickly. BEFORE USING THE OVEN 1. Select Bake cooking mode. 2. Set temperature to 500˚F. 3.
T ack robe OPERATION PREHEATING THE OVEN • Preheat the oven when using the Bake, Convection Bake and Convection Roast OVEN CARE modes. • Selecting a higher temperature does not shorten the preheat time. CLEANING METHOD PART CLEANING METHOD • Preheating is necessary for good results when baking cakes, cookies, pastry and A Clean with hot sudsy water and sponge or F Reflective plastic scrubber. Rub stubborn stains with E • Preheating will help to sear roasts andGlass seal in meatvinegar, juices.
Operation TO USE THE TEMPERATURE PROBE: 1. Insert the probe into the food. NOTE: For meats, the probe tip should be inserted into the center of the thickest part of the meat. Make sure that the probe tip is not into the fat or touching bone. 2. Place the food into the oven. Keeping the temperature probe as far away from a heat source as possible, plug the temperature probe into the oven outlet. Close the oven door. 3. Select the oven mode. 4.
OPERATION HIGH ALTITUDE BAKING When cooking at high altitude, cooking times may be extended. OVEN RACKS To avoid permanent damage to the porcelain finish, place food or bakeware on an oven rack. Do not place food or bakeware directly WARNING onto the oven door or oven bottom. • The oven racks can be placed in any of the six height positions with the oven. • Position racks before turning on the oven. • Make sure the oven racks are level.
Operation OVEN DOOR To avoid oven door glass breakage: • Do not close the oven door if the racks are not fully inserted into the oven cavity or if bakeware extends past the front edge of an oven rack. • Do not set objects on the glass surface of the oven door. • Do not hit glass surfaces with bakeware or other objects. • Do not wipe down glass surfaces until the oven has completely cooled.
OVEN USE maintain an accurate temperature. Your previous oven may have had a mechanical thermostat that drifted gradually over time to a higher temperature. It is normal that you may need OPERATION to adjust your favorite recipes when cooking in a new oven. to the porcelain ck. Do not place or oven bottom.
nds past the front 3 Press number 3 on the keypad to increase or number 6 to decrease the temperature in 5°F (3°C) increments. The adjustment can be set between 30°F (18°C) and -30°F (-18°C). the oven door. r other objects. 4 Press SETTINGSOperation to save the adjustment, and then exit the Temperature Calibration menu. ven has completely OVEN MODES OVEN MODES The illustrations show the heating elements and fans used for se poor air circulaThe illustrationseach show themode.
the option to set a ing START. See number keypad, and then press START. • After selecting an Oven Mode and Temperature, you have the option to set a Cook Time and Start Time before pressing START. SeeOPERATION “Cook Time” and “Start Time.” 5 Press STOP/CLEA food from the oven 3 Press STOP/CLEAR when finished baking, and remove food from the oven. BROIL WARM/PROOF The Warm mode keep The Proof mode prep yeast. Follow the reci BROIL • Broiling uses direct heat to cook food.
and then press START. The temperature can be set from 450°F (232°C) to 550°F (288°C). (177°C). 4 “BROIL” will appear in the display after Start is pressed. e number keypad, be set from 170°F NOTES: Operation • The broil temperature can be changed at any time during cooking. Press STOP/CLEAR to clear the settings. Select oven mode, then enter the desired temperature by pressing • The broil temperature cankeypad, be changed at any during cooking. Press STOP/ the number and then presstime START.
OPERATION TO CANCEL WARM FEATURE: Press STOP/CLEAR. Remove food from oven. PROOF (UPPER OVEN) 1. Before proofing, place the dough in a lightly greased bowl and cover loosely with wax paper, coated with shortening. Place on second rack from the bottom and close the oven door. 2. Press PROOF. “PROOF” and “Set Temp or Press START” and 100°F (38°C) will be displayed. 3. Use the number keypad to enter the desired temperature. The temperature can be set from 80°F (27°C) to 120°F (49°C). 4. Press START. 5.
Operation ADVANTAGES OF CONVECTION COOKING • Saves time and energy. • Even baking, browning and crisping are achieved. • During roasting, juices and flavors are sealed in while the exterior is crisp. • Yeast breads are lighter, more evenly textured, more golden and crustier. • Air-leavened foods such as cream puffs, soufflés and meringues are higher and lighter. • Baking on multiple racks at the same time with even results is possible. • Dehydrates herbs, fruits and vegetables.
• • Dehydrates herbs, fruits and vegetables. shortening. e oven door. • Requires no specialized bakeware. OPERATION • Convection broiling allows for extraordinary grilling with thicker cuts of food. ds. “Proof” 8°C) will be 0°F (38°C). CONVECTION CONVECTION BAKE BAKE Convection bake single multiple rack baking. When • UseUse Convection bake forfor single or or multiple rack baking.
Operation CONVECTION BROIL CONVECTION BROIL 5 “Convect Roast” w When convection broiling, enter your normal broiling tempera 6 When convection broiling, enter your normal broiling temperature. The oven door must be closed using Convection Broil. when It is not necessary to preheat for oven. ture.when The oven door must be closed using Convection Broil. the oven the is not necessary to preheat the oven for Convection Broil. ConvectionItBroil.
(77°C) to 550°F (288°C). • When using Conve temperature and ti NOTE: After selecting an Oven Mode and Temperature, you have the option to set a Cook Time and Start Time before pressing START. See “Cook Time” and “Start Time.” • The oven door m Conversion. OPERATION 5 “Convect Broil” will be displayed, once Start is pressed. 6 MEATS (ONLY) It is not necessary to version MEATS opti CONVECTION ROAST preheat is required fo CONVECTION ROAST When Convection roasting, enter your normal roasting temperature.
Operation CONVECTION CONVERSION • Convection conversion can be used to convert from conventional cooking to convection cooking. This function will automatically convert the cooking temperature and cooking time to recommended cooking settings. • As a result, the cooking temperature is lower and the cooking time is shorter. Options that can be selected include Meats, Baked Goods or Others. • When using convection conversion, enter the normal cooking temperature and time.
OPERATION BAKE TIPS • For best results, bake food on a single rack with at least 1”-1½” (2.5-3 cm) space between utensils and oven walls. • Use one rack when selecting the bake mode. • Check for doneness at the minimum time. • Use metal bakeware (with or without a non stick finish), heatproof glass, glassceramic, pottery or other utensils suitable for the oven. • When using heatproof glass, reduce temperature by 25F from recommended temperature. • Use baking sheets with or without sides or jelly roll pans.
rature by 25°F • Avoid using the opened door as a shelf to place pans. lly roll pans. • See Troubleshooting for tips for Baking and Roasting problems. Operation TEMP. °F (°C) (PREHEATED OVEN) K POSITION TIME (MIN.) CONVECTION BAKE TIPS 2 1 1 2 2 • Reduce recipe350 baking (177)temperatures by 25°F (15°C). 19-22 (177) 40-45 • For best results,350 foods should be cooked uncovered, in lowsided pans to take 350 (177) 35-39 advantage of the forced air circulation.
OPERATION FOODS RECOMMENDED FOR CONVECTION BAKE MODE: • Appetizers, Biscuits, Coffee Cakes • Cookies (2 to 4 racks), Yeast Breads • Cream Puffs, Popovers • Casseroles and One-Dish Entreés • Oven Meals (rack positions 1, 2, 3) OVEN USE • Air-Leavened Foods (Soufflés, Meringue, Meringue-Topped Desserts, Angel Food • Casseroles and One-Dish Entreés FOODS RECOMMENDED FOR CONVECTION BAKE MODE: Cakes, Chiffon Cakes) • Oven Meals (rack positions 1, 2, 3) • Air-Leavened Foods (Soufflés, Meringue, Meringue-Toppe
G Stainless and dried. If stubborn soil remains, follow the recommended cleaning methods below. • Always use the mildest cleaner that will do the job. • Rub metal finishes in the direction of the grain. Operation • Use clean, soft cloths, sponges or paper towels. • Rinse thoroughly with a minimum of water so it does not drip into door slots. AUTOMATIC SELF-CLEANING WARNING • Dry to avoid water marks.
• Turkey, not stuffed 12-15 • Turkey, not stuffed • Turkey, not stuffed Lamb 10-14 180 (82) 325 (163) 1 6-10 180 (82) 3-8 325 (163) 1-11/2 • Cornish Hen 1 325 (163) 21-25 • Turkey Breast 325 (163) 16-20 1 9-11 1 OPERATION 15-20 350 (177) 2 45-75 total 22-27 28-33 • Half Leg 3-4 325 (163) 2 • Whole Leg 6-8 325 (163) 1 CONVECTION BROIL TIPS 180 (82) 170 (77) 180 (82) 160 (71) medium 170 (77) well 22-27 28-33 160 (71) medium 170 (77) well • Place rack in the required
handling of various foods. The circulating heated air at a lower temperature slowly removes the moisture for food preservation. • This mode is suitable for a variety of fruits, vegetables, herbs and meat strips. • Oven temperature for dehydrating is between 120ºF (49ºC) to 160ºF (71ºC). • Multiple racks can be used simultaneously. • Drying screens can be purchased at specialty kitchen shops.
OPERATION BROIL TIPS • Place rack in the required position needed before turning on the oven. OVEN USE BROIL TIPS • Preheat oven for 5 minutes before use. oven. •on the Preheat oven for 5 minutes before use. • Turn meats once halfway through the cooking time (see convection broil chart). • Use Broil mode with the oven door closed. • • Place rack in the required position needed before turning • Use Broil mode with the oven door closed. • Use the 2-piece broil pan. Use the 2-piece broil pan.
OVEN USE Operation FOOD SERVICE TEMPERATURE FROM FROM FSISFSIS (USDA FOOD SERVICE GUIDELINES TEMPERATURE GUIDELINES (USDAFOOD FOOD SAFETY & 170°F (77°C) SAFETY & INSPECTION SERVICE) INSPECTION SERVICE) 140°F (60°C) Ham, precooked ( to Reheat) 145°F (63°C) Fresh beef, Veal, Lamb (medium rare) Ground Meat & Meat mixtures (Beef, Pork, Veal Lamb) Fresh beef, Veal, Lamb (medium) 160°F (71°C) Fresh Pork (medium) Fresh Ham (raw) Egg Dishes Ground Meat & Meat mixtures (Turkey, Chicken) 165°F (74°C) TURE USDA
Stuffing (cooked alone or in bird) 165°F (74°C) Leftovers & Casseroles Maintenance OVEN CARE GENERAL CLEANING GENERAL CLEANING Before Cleaning, make sure all controls are off and the oven is cool. IMPORTANT: Before Cleaning, make sure all controls are off the instructions printed on the label of on the cleaning and theAlways oven is follow cool. Always follow the instructions printed WARNING the label of the cleaning products. products. USING THE CLEANING CHART 1. 2.
d in the following Maintenance umn if the oven is STAINLESS STEEL OVEN PART olumn if the oven CLEANING METHOD 1 Control Panel on following chart.
• Use clean, soft cloths, sponges or paper towels. • Rinse thoroughly with a minimum of water so it does not drip into door slots. AUTOMATIC • Dry to avoid water marks. Maintenance The cleaners listed below indicate types of products to use and are not being endorsed. Use all products according to package directions. PART A Chrome Plated CLEANING METHOD Wash with hot sudsy water. Rinse thoroughly and dry. Or, gently rub with Soft Scrub®, Bon-Ami®, Comet®, Ajax®, Brillo® or S.O.S.® pads as directed.
use the mildest cleaner that will do the job. Keeper’s Friend® or RevereWare Sta Steel Cleaner®, to remove heat discolo tal finishes in the direction of the grain. an, soft cloths, sponges or paper towels. AUTOMATIC SELF-CLEANING horoughly with a minimum of water so it Maintenance does not o door slots. WARNING avoid water marks. AUTOMATIC SELF-CLEANING ers listed below indicate types of products to use and ng endorsed.
OVEN CARE • When the oven heat drops to a safe temperature, the automatic door lock will release and the door can be opened. Maintenance • The oven light does not operate during Clean mode. BEFORE SELF-CLEANING BEFORE SELF-CLEANING 1 Remove all utensils and bakeware. 1. 2. Remove2 all utensilsnon-porcelain and bakeware. Remove oven racks. If chromed racks are left After the door is l selected text area Self-clean Cycle E and the oven door NOTE: SELF CL CLEAR.
Maintenance 5. Use the number keypad to select the clean level. Select 1-3. 6. If you want to delay the start of the self-cleaning cycle, press START TIME, and then set a time, by pressing the number keypad. The oven door will remain locked if the oven cavity is above a safe temperature and will unlock when the oven cavity has cooled. 7. Press START. After the door is locked, “SELF CLEAN” will scroll in the selected text area until the clean cycle is finished.
ing a soapy sponge rgent and hot water. t. • The oven door is heavy and fragile, and the door front is glass. To avoid oven door glass breakage, use both hands, and grasp only the sides of the oven door to remove. Do not grasp the handle. Maintenance • Be sure both levers are securely in place before removing the door. Hand clean 1” (2 cm) from rack guides to front of oven cavity • Do not force door open or closed. TO REMOVETO THE OVEN DOOR REMOVE THE OVEN DOOR: 1. 2. Open the1 door Opencompletely.
Maintenance REPLACING AN OVEN LIGHT • Make sure the oven and lights are cool and power to the oven has been turned off before replacing the light bulb(s). WARNING • The lenses must be in place when using the oven. The lenses serve to protect the light bulb from breaking. • The lenses are made of glass. Handle carefully to avoid breakage. • Failure to do so could result in death, electric shock, cuts or burns. • The oven light is a standard 25 watt (G9) appliance bulb.
Troubleshooting BAKING AND ROASTING Problem Food browns unevenly Possible Cause • Oven not preheated • Aluminum foil on oven rack or oven bottom • Baking utensil too large for recipe • Pans touching each other or oven walls Food too brown on bottom • Oven not preheated • Using glass, dull or darkened metal pans • Incorrect rack position • Pans touching each other or oven walls Food is dry or has shrunk • Oven temperature too high excessively • Baking time too long • Oven door opened • Pan size too la
Troubleshooting Problem Possible Cause Cakes high in middle with • Oven temperature too high crack on top • Baking time too long • Pans touching each other or oven walls • Incorrect rack position • Pan size too small Pie crust edges too brown • Oven temperature too high • Edges of crust too thin
Troubleshooting OPERATION Problem Possible Cause F03 or F04 Error appears in A problem with latch Turn off power at the main the display window. mechanism occurred. power supply (fuse or breaker Solution box), wait a few seconds and turn it back on again. The oven should run a latch auto– test. If condition persists, note the code number and call an authorized service center. Other F_ Error appears in Turn off power at the main the display window.
Troubleshooting Problem Possible Cause Solution Oven door is locked and Turn the oven off at the circuit will not release, even after breaker and wait a few cooling. seconds. Turn breaker back on. The oven should reset itself and will be operable. Oven is not heating. No power going to Turn on power at the main the oven. power supply (fuse or circuit breaker box). If condition persists, call a qualified electrician.
Troubleshooting OPERATION Problem Oven light stays on. Possible Cause Solution Oven door does not Check for obstruction in oven close completely. door. Check to see if hinge is bent or door switch is broken. Cannot remove lens cover Lens cover is dirty. There may be a soil build-up around the lens cover. Wipe on light. lens cover area with a clean dry towel prior to attempting to remove the lens cover. Oven will not Self- Clean Oven was still warm Allow the oven to cool before properly.
Troubleshooting Problem Possible Cause Solution Clock and timer are not No power going to Turn the oven off at the circuit working properly. the oven. breaker and wait a few seconds. Turn breaker back on. The oven should reset itself and will be operable. Excessive moisture Clock or Timer not See Timer on page 19 and set correctly. Clock on page 21. Oven was not When using bake mode, properly preheated. preheat the oven first.
Kitchen and Bath Three Locations: 350 Parr Circle Reno, NV 89512 916 Delaware Avenue Marysville, OH 43040 427 Rowland Mill Road Bruceton, TN 38317 www.zlinekitchen.com 1-614-777-5004 1.1.