
Installation Guide and Users Manual


42
Operation
• Use an oven mitt to remove temperature probe.
• Do not touch broil element.
• Failure to do so can result in burns.
• Use the probe or a meat thermometer to determine the internal doneness on “END”
temperature (see cooking chart).
• Double-check the internal temperature of meat or poultry by inserting meat
thermometer into another position.
• Large birds may also need to be covered with foil (and pan roasted) during a
portion of the roasting time to prevent over-browning.
• The minimum safe temperature for stuffing in poultry is 165ºF (74ºC).
• After removing the item from the oven, cover loosely with foil for 10 to 15 minutes
before carving if necessary to increase the final foodstuff temperature by 5° to 10°F
(3° to 6° C).
E19
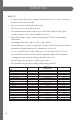
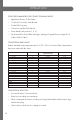
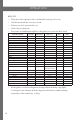
OVEN USE
CONVECTION ROAST CHART
MEAT
WEIGHT
(LB)
OVEN TEMP.
˚F (˚C)
RACK
POSITION
TIME
(MIN. PER LB)
INTERNAL TEMP.
˚F (˚C)
Beef
• Rib Roast 4-6 325 (163) 2 16-20
18-22
145 (63) medium rare
160 (71) medium
• Rib Eye Roast, (boneless) 4-6 325 (163) 2 16-20
18-22
145 (63) medium rare
160 (71) medium
• Rump, Eye, Tip,
Si rloin (boneless)
3-6 325 (163) 2 16 -20
18-22
145 (63) medium rare
160 (71) medium
• Tenderloin Roast 2-3 400 (205) 2 15-20 145 (63) medium rare
Pork
• Loin Roast (boneless
or bone-in)
5-8 350 (177) 2 16 -20 160 (71) medium
• Shoulder 3-6 350 (177) 2 20-25 160 (71) medium
Poultry
• Chicken whole 3-4 375 (190) 2 18-21 180 (82)
• Turkey, not stuffed 12-15 325 (163) 1 10-14 180 (82)
• Turkey, not stuffed 16-20 325 (163) 1 9-11 180 (82)
• Turkey, not stuffed 21-25 325 (163) 1 6-10 180 (82)
• Turkey Breast 3-8 325 (163) 1 15-20 170 (77)
• Cornish Hen 1-1
1
/2 350 (177) 2 45-75 total 180 (82)
Lamb
• Half Leg 3-4 325 (163) 2 22-27
28-33
160 (71) medium
170 (77) well
• Whole Leg 6-8 325 (163) 1 22-27
28-33
160 (71) medium
170 (77) well
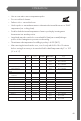
CONVECTION BROIL TIPS
• Place rack in the required position needed before turning
on the oven.
• Use Convection Broil mode with the oven door closed.
• Do not preheat oven.
• Use the 2-piece broil pan.
• Turn meats once halfway through the cooking time (see
convection broil chart).
CONVECTION BROIL CHART
FOOD AND THICKNESS
RACK
POSITION
BROIL SETTING
°F (°C)
INTERNAL
TEMP. °F (°C)
TIME SIDE 1
(MIN.)*
TIME SIDE 2
(MIN.)*
Beef
• Steak (1
1
/2" or more)
- Medium rare 4 450 (232) 145 (63) 9-12 8-10
- Medium 4 450 (232) 160 (71) 11-13 10-12
- Well 4 450 (232) 170 (77) 18-20 16-17
• Hamburgers (more than 1")
- Medium 4 550 (288) 160 (71) 8-11 5-7
- Well 4 550 (288) 170 (77) 11-13 8-10
BURN HAZARD
E23
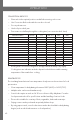
OVEN CARE
PART CLEANING METHOD
15 Oven Rack (3) A
16 Broiler Pan Rack E
17 Broiler Pan E
18 Temperature Probe A
OVEN FINISHES / CLEANING METHODS
The entire oven can be safely cleaned with a soapy sponge, rinsed
and dried. If stubborn soil remains, follow the recommended
cleaning methods below.
• Always use the mildest cleaner that will do the job.
• Rub metal nishes in the direction of the grain.
• Use clean, soft cloths, sponges or paper towels.
• Rinse thoroughly with a minimum of water so it does not
drip into door slots.
• Dry to avoid water marks.
The cleaners listed below indicate types of products to use and
are not being endorsed. Use all products according to package
directions.
PART CLEANING METHOD
A Chrome
Plated
Wash with hot sudsy water. Rinse thoroughly
and dry. Or, gently rub with Soft Scrub
®
,
Bon-Ami
®
, Comet
®
, Ajax
®
, Brillo
®
or S.O.S.
®
pads as directed.
Easy Off
®
or Dow
®
Oven Cleaners (cold
oven formula) can be used, but may cause
darkening and discoloration.
Racks may be cleaned in the oven during the
Self-Cleaning mode. However, chromed racks
will lose their shiny nish and permanently
change to a metallic gray.
B Fiberglass
Knit
DO NOT HAND CLEAN GASKET.
C Glass
Spray Windex
®
or Glass Plus
®
onto a cloth
rst, then wipe to clean.
Use Fantastik
®
or Formula 409
®
to remove
grease spatters.
D Painted
Clean with hot sudsy water or apply Fantas-
tik
®
or Formula 409
®
rst to a clean sponge
or paper towel and wipe clean. Avoid using
powdered cleansers and steel wool pads.
E Porcelain
Immediately wipe up acidic spills like fruit
juice, milk and tomatoes with a dry towel.
Do not use a moistened sponge/towel on hot
porcelain. When cool, clean with hot sudsy
water or apply Bon-Ami
®
or Soft Scrub
®
to
a damp sponge. Rinse and dry. For stubborn
stains, gently use Brillo
®
or S.O.S.
®
pads. It is
normal for porcelain to craze (ne lines) with
age due to exposure from heat and food soil.
PART CLEANING METHOD
F Reective
Glass
Clean with hot sudsy water and sponge or
plastic scrubber. Rub stubborn stains with
vinegar, Windex
®
, ammonia or Bon-Ami
®
DO
NOT USE HARSH ABRASIVES.
G Stainless
Always wipe or rub with grain. Clean with
a soapy sponge then rinse and dry. Or, wipe
with Fantastik
®
or Formula 409
®
sprayed
onto a paper towel. Protect and polish with
Stainless Steel Magic
®
and a soft cloth.
Remove water spots with a cloth dampened
with white vinegar. Use Zud
®
, Cameo
®
, Bar
Keeper’s Friend
®
or RevereWare Stainless
Steel Cleaner
®
, to remove heat discoloration.
AUTOMATIC SELF-CLEANING
WARNING
BURN HAZARD
Do not touch the oven during the Self-Cleaning cycle.
Keep children away from oven during Self-Cleaning cycle.
Failure to do so can result in burns.
This oven features a self-cleaning function that eliminates the
need to manually scrub the oven interior. During self-cleaning, the
oven uses very high temperatures, burning soil to a powdery ash.
IMPORTANT: The health of some birds is extremely sensitive
to the fumes given off during the Self-Cleaning cycle. Exposure
to the fumes may result in death to certain birds. Always move
birds to another closed and well-ventilated room.
• Keep the kitchen well ventilated during the Self-Cleaning
cycle to help get rid of heat, odors and smoke.
• It is common to see smoke and/or an occasional ame-up
during the Self-Clean cycle, depending on the content and
amount of soil remaining in the oven. If a ame persists, turn
off the oven and allow it to cool before opening the door to
wipe up the excessive food soil.
• Do not block the oven vent(s) during the Self-Cleaning cycle.
Air must be able to move freely. See “Oven Vents” on page 13.
• Do not clean, rub, damage or move the oven door gasket.
• The door latch is automatically activated after selecting the
Self-Clean cycle. “AUTO LOCK” will appear in the display.
This ensures that the oven door cannot be opened while the
oven interior is at clean temperatures.
• The oven is preset for a 2.5 hour clean cycle; however, the time
can be changed. Suggested clean times are 2 hours for light soil
and between 3.0 hours and 3.5 hours for average to heavy soil.
• Clean mode stops automatically at the end of the set cleaning
time.