
Installation Guide and Users Manual


12
Sink Installation
Before Installation
Inspect the sink for any visible defects. Do not install the sink if defects are found. Call
customer service for assistance.
Remove the drain by unscrewing the screw from the drain until it is completely
separated from the sink.
Top Mount Installation
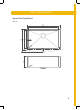
1. Trace the opening.
Locate the “top mount” template in the box.
Carefully cut along the dotted lines. Keep the inside portion of the template. It
contains important information concerning the care and maintenance for your sink.
Place the template on the counter where you would like your sink to be installed.
When installing the template, make sure that the tank will not interfere with cabinet
doors or panels. Ensure that there is enough space for the water supply installation.
Fix the template on the counter using masking tape.Trace the inside of the template
meticulously with a pencil. Remove the template.
OR
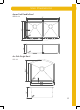
Turn the sink upside down and place it on top of the counter. Note the location
of cabinet doors and panels to ensure that they will be compatible with the sink
installation.
Ensure that there is enough space for the water supply installation.
Trace the outer edge of the sink with a pencil, then remove the sink.
Measure 7 mm from the initial sink measurement and trace another line on the inside
of the drawing. This second line will be the cutting line.
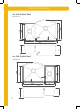
2. Cut the Opening
Using the drill, make a small starting hole of about 1.2 cm (0.5 in) on the inside of the
cutting line. Drill a second time in this same hole with a larger bit so the jigsaw can be
inserted properly.
Put masking tape on the outer side of the cutting line. This will protect the counter from
scratches and shattered fragments caused by the jigsaw.
Using the jigsaw, trim the inside of the cutting line.
Insert the sink and adjust the opening if required.