
User's Manual


3
®
1.When you received the package product, please check the equipment and accessories according to the
packing list inside the packing case.
2.Before installation please carefully read this user manual.
3.When you install the IP camera, please close the power source of all the related devices.
4.Check the voltage of the power source, to prevent device damage by mismatching of voltage.
5.Installation environment: please do not use equipment under high humidity or temperature. Make sure there
is good ventilation. Do not install it in an environment that experiences frequent vibration.
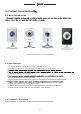
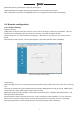
1.4 Network IP Camera Connection
Figure 1-4 Device Connection of Network IP Camera
Step one:
Connect the IP Camera to internet through network cable.
Step two:
Connect the power adaptor in the package to the power plug of the IP camera, and access into
electric supply.
Step three:
Open the PC, connect with the front-end network IP camera, to congure via software.
Note: It can also apply the way of IP Camera directly connecting with PC.
Note: When using IE browser to visit IP Camera, the IP of local PC should be in the same network
segment with the IP of the IPC.
2. Log in
▇▅▃
When using IE (Internet Explorer) to visit IP camera for the rst time, you have to set the security level for
ActiveX controls.
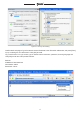
Set security level: Open Internet Explorer, enter the IE Tools menu [Tools/Internet Options/Security Settings/
Custom Level…], set Active X Controls and Plugins to “enable” or “Prompt”, and set the IP address of the IP
Camera as “Trusted sites”.