H.264 Standalone DVR NVR 4CH/8CH 16 CH User Manual User Manual DVR User Manual For further help, please visit kb.zmodo.com NVR User Manual For further help, please visit www.zmodo.
Thank you for buying our DVR Dear customer, thank you for choosing to purchase and use our product! If while using this product you encounter any technical problems or problems with quality, please contact us. We are ready to serve you. Before using this product, please carefully review the warranty information. 1. Service Contract This device may be returned for a refund from the seller within 30 days.
Contents Chapter One: Introduction ......................................................................................................... 4 1 Brief Introduction. ................................................................................................................ 4 2 Main Features. .................................................................................................................... 4 Chapter Two: Installation ......................................................................
)Format HDD. ................................................................................................................ 19 5)Lock out. ....................................................................................................................... 19 6)Restore to factory defaults............................................................................................. 19 7)Input/output parameter ................................................................................................
Chapter One: Introduction 1 Brief Introduction This SBN Series DVR is 4-channel playback H.264 main profile stand alone DVR with Pentaplex function: record, playback, live preview, remote preview and backup supported. It is a professional, high performance intelligent audio & video solution with a user-friendly GUI and practical industrial design. This series DVR is suitable for civil applications such as a home, office, and small business beside the common security and surveillance applications.
Chapter Two: Installation This chapter provides a general description of the device’s interfaces and connections. It will describe how to install a hard disk drive, the buttons on the front panel, and the connections on the back panel. 1 Package Content After removing the DVR from its shipping box, unpack the contents on a flat surface or immediately place it where it will be located. Please refer to the “Package Contents” to ensure you have the entire contents.
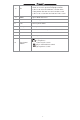
PTZ Return to upper menu. The same as 【ESC】 button of remote control. One key PTZ control TV/VGA Switch the TV/VGA default output. REW<< Play in slow mode/fast rewind PAUSE 1.Play FWD>> Fast Forward STEP Go to next frame STOP Stop ESC 2.Pause 3 Rear Panel Operation Table 1- 3 16 Channel DVR Rear Panel Description NO.
1) Press it to switch from single split to multi split view 8 FN 9 mode, or reverse in preview and playback mode. 2) Press it to enter/exit continuous selection when setting motion detection area and schedule record. 3) Press it to set start time and end time in file search. MENU Opens DVR main menu. 10 ESC Return to upper menu. 11 PTZ One key PTZ control 12 Backup Backup record 13 TV/VGA Switches the default output between TV and VGA. 14 CLEAR Alarm off.
5 Hard Disk Installation The hard disk is not included in factory configurations. Users can mount a suitable hard disk by calculating its capacity referring to “Appendix 5.2 Methods of Calculating HDD Capacity”. 1) Installation procedure *Open the DVR case. Mount the 4 shock absorption washers into the clamping slots in the case. (If included, they are not necessary for operation) *Connect the HDD data cable and HDD power cable to HDD.
Chapter Three: Menu Description 1 Menu Structure FigIII 1Menu Structure Language Video Standard VGA Setting Time Format Time Setting System Setting Manual Record Record Search Clear Alarm Quick Playback Shut down Video Single Channel Four Channels Nine Channels Sixteen Channels Video CH HDD Overwrite Record Schedule Add User Record Quality Del User Record Frame Rate Authority Manage Record Source Preview Cruise OSD Setting DVR ID Number Record Resolution SPOT SETTING Sub Code Camera CH
2 Menu Operations Press [SET] button to enter into system setting screen. Press [●] button to start/stop recording manually. Press [►] button to play record file. Press [PTZ] button to enter into PTZ control screen. Note: This manual shows the Menu selection icons and selection boxes in 〖XX〗; the buttons in the menu screen (except menu selection icons) in; the buttons on front panel and remote controller in 【XX】 The highlighted menu is the active menu.
Date/Time: Please enter→→→
1) system status bar In preview mode, the system status bar will display current system status, including: "External alarm input" "Alarm output" / "hard disk capacity" / "number of the client connection" / "system time." Indicates hard disk being ok. The number indicates the percentage of the total capacity of the hard disk. Indicates “Hard disk error” Or “No hard disk”. Indicates client connection.
1) Manual Record Please enter → to enable or disable manual record on specific channels. Press the 【●】 button to start/stop recording manually. Note1: The video type shown in the playback menu for “Manual Record” will appear as “Common Record” Note2: When Manual Record is enabled it takes precedence over any Record Schedule settings. 2) Record Schedule Please enter→→ to set record schedule.
Table IV 1 PTZ Operation Description NO. Name Description ① Direction Click the arrow icons to control the pan and tilt of PTZ. Click the center icon to call sequence or run scanning. Please refer to the PTZ manual for details of PTZ scanning mode. ② Speed Set the turning speed of PTZ camera. ③ Advanced ④ Focus ⑤ Iris ⑥ Auxiliary Click and to show/hide the advanced setting options. Click to focus-in and focus-out (it is disabled for cameras with an automatic focus).
Select →. Specify the date/time and channel number. Click 〖Search〗 in the pop-up screen to start searching. The search results will be listed on the screen in corresponding colors so as to distinguish different recording types. Please see Fig IV-2Record Schedule for details of colors description. FigIV 3File Search You may click the mouse or use panel to specify time. Panel operation: move highlight icon to relevant selection box using [◄],[►] buttons.
7 Alarm Settings Please make sure that the alarm input and output cables are connected correctly. Please refer to II.6 Rear Panel Connection for details. Select→→ to configure alarm parameters. Note: All the settings will take effect after being saved 1) Alarm Input The alarm input attribution includes N/O. and N/C. Please select a suitable attribution according to the types of alarm devices connected and methods of operation on the alarm device. N/O.: Normally open.
the future for potential updates regarding this feature. *Email Setting: Click [], the EMAIL setup screen will appear. To take effect this function must be paired with an alarm email setting.
*Address Display the DVR IP address. *Tool Bar The description of icons from left to right is: Configure device parameters. Search and playback record files. View logs and export them. Set the storage directory of record files. Click to switch image view modes among full-screen, single view and 4/8/9 split view mode.
“User” authority and password can only be changed by “Admin” account, *Device Upgrade: Click [Browse] to select the software package needed, and click [Start Upgrade] to progress. User can stop the progress of upgrade by clicking [Stop Upgrade]. Note: As of 4/01/2013 there have as of yet been no upgrades to this software version. Adjust Time: Click [Adjust Time] to adjust time of device accordance with the PC time.
*File Download The File download operation part is on the bottom right of the screen. Click to set the storage directory of the file to be downloaded. Click [Download] to start downloading. Refer to pg.16 Backup information regarding playback of downloaded files. 6) Bidirectional Talk Click in the Tool Bar to enable the bidirectional talk between IE Web Client and DVR side.
reboot itself periodically(This is recommended). There are three types of maintenance: per day, per week, per time. Turn this feature off to prevent the DVR from rebooting. 10 Advanced Settings Note: Operations in this chapter require the operator to be logged in with Admin authority. 1) Settings of System Please enter→< Settings >→→【Advanced Setting>>】 Preview Cruise: Select →【】to enter the setting screen.
2) Advanced Setting of Record Please enter →< Setting >→→【Advanced Setting>>】→, select “On” and press 【】 key to enter the setting screen. Then user can customize the sub-stream frame rate and bit rate. The Sub-stream supports a frame rate of 1-15, and a bit rate 32K-512K.
Audio Audio Channel Type Mono Sampling Bit 16 bit Power Supply DC 12V 5A,positive inside, negative outside, power adapter is connected outside. Operating Temperature 0℃-+50℃ Environmental Operating Humidity 10%~90%RH Power Consumption <12W(without HDD) Dimension 13.9in (W) x 10.8in (D) x 1.85in (H) / 354mm (W) x 275mm (D) x 47mm (H) Table V 2 Main Functions Main Functions Operating Interface Multiple control methods: mouse, IR remote controller, front panel and GUI with navigation supported.
2) Calculate the compression bit rate for recording T hours. *Timing Recording Step 1: Suppose the capacity of the hard disk as S, the total numbers of the channel as n. The capacity of hard disk needed per channel supposed as Di is: Di = S / n Step 2: Suppose the total recording time as T hours. The capacity of the hard disk needed per hour per channel supposed as Dt is: Dt = Di / T Step 3: The bit rate of all channels supposed as Dc is: Dc = Dt *(8*1024)/ 3600 = Dt * 2.
Network Settings Network Settings Video loss handling Alarm out, sound, report to the center, email Video Loss Handling Alarm out, buzzer, upload, email Off Channle name settings Click into the sub menu screen CH1/2/3……./16 Network Static IP、 Dynamic access of IP, ,PPPoE Static IP IP Address Click into sub menu screen. 192.168.0.10 Subnet Mask Click into sub menu screen. 255.255.255.0 Gateway Click into sub menu screen. 192.168.0.1 HTTP Port Click into sub menu screen.
Android Setup Figure 1 Figure 3 Figure 2 Figure 4 Connecting to a Device: 1.From the main interface tap the settings gear in the bottom left corner and enter the device list.(Fig1) 2.If there are no devices added you will be prompted with “No device, please add”. Tap “Add new device”(Fig2) 3.Enter a name for the DVR. Now enter the corresponding IP address, Mobile port number, case sensitive username and password, and the number of channels your DVR has. Select OK to save your device.(Fig3/Fig4) 4.
iOS Setup Figure 1 Figure3 Figure 2 Figure 4 Device Management: 1. 2. 3. 4. From the home screen(Fig1) press the settings arrow in the bottom left and select “Device Manage”(Fig2). From the management screen(Fig3) select the “+” icon in the upper right hand corner to add a device. From the “Add Device” page(Fig4) enter a name for the DVR. Now enter the corresponding IP address, Mobile port number, case sensitive username and password, and the number of channels your DVR has. Current channel is 0.
Lifetime Customer Support Informative Knowledge Base at kb.zmodo.com 24/7 Live Support on www.zmodo.