
User manual


11
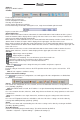
Date/Time: Please enter<Tool Bar>→<System>→<System Setting>→<Time Format> to set time format. 12
and 24 hour clocks are supported. Please enter<Tool Bar>→<System>→<System Setting>→<Time Setting>
to set the date and time.
Video Standard: Please enter<Tool Bar>→<System>→<System Setting>→<Video Standard> to set video
standard. PAL, SECAME, and NTSC are supported. Please set according to the parameters of camera.
Note1: In order to avoid record files’ time confusion, you’d better stop recording before modifying system time.
Note2: “Language” and “Time” will take effect instantly. “Record Resolution” and “Video Standard” will take
effect after being saved.
Note3: when the resolution setting exceeds the range of the display, please click 【ESC】->【2】->【ESC】
on the Front Panel or remote control (within 3 seconds) to reduce the resolution to 800X600@60HZ
Note4: All Zmodo cameras are NTSC cameras. If your image is in black and white and rolling
please check this setting to verify it is not on PAL or SECAME.
2 Preview
After starting up the system, the screen has a live view area and a tool bar. Right click on the mouse in preview
mode or press【OK】on the front panel to make the System Status/Tool Bar appear. System status bar can be
dragged to anywhere on the screen by the mouse. It will go back to the original position after a device reboot.
The system status bar will switch to the Tool Bar by right-clicking on the mouse and hidden by right clicking
again.
The Camera Images, channel name, record time, and alarm notifications will be displayed on the main screen.
1) Channel Status Display Area
Under preview mode, channel shows current input image and channel status information (video status,
mode, and motion detection)
*View Mode Switching
When in 1/4/6/8/9/16 split view mode, the tile with a light green border is the current selected channel.
User can use the mouse or press 【Direction】 buttons to switch to another tile. If the audio output device
is connected, the audio can also be heard together with the video when the matching channel is selected.
The audio will also be heard on its corresponding channel in playback mode.
User can select to display a single particular channel by pressing the Numbers buttons.
When in preview mode, user can enter into 1/4/6/8/9/16 split view mode by pressing 【FN】 button directly, or
by the toolbar.
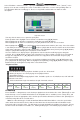
*Image Parameters Setting
Please enter <Tool Bar>→<System>→<Video>→<Color Setting> to set brightness, contrast, hue and
saturation. It will take effect instantly.
Note1: User can set image parameters of one channel one at a time or all channels at once by
selecting 〖All〗 in <Camera Channel>.
Note2: In preview mode, brightness, contrast can be adjusted by remote controller directly.
*OSD Settings
The OSD of channel name and system time is supported. Please enter<Tool Bar>→<System>→<Record
Setting>→<OSD Setting> to set. The channel name will be displayed on upper left corner and the channel
time will be displayed on the upper right corner of the camera window.
*Channel Status Display Area
The channel statuses include: “motion detection triggered recording” / “common recording”
/”motion recording”/ “alarm triggered recording” / “external alarm input” /“alarm output”.
Indication of “motion detection” / “common recording” / “alarm recording” will be displayed on the right upper
corner of screen. The details are as follows:
indicates “motion detected”. The settings of motion detection include sensitivity and area selection.
Please see Motion Detection Settings for details.
Blue indicates “common recording”. Please see Record for details.
Green indicates “motion detection triggered recording”.
Red indicates “alarm triggered recording”.
Grey indicates “manual recording”.
Indication of “external alarm input” / “alarm output” will be displayed on system status bar or Tool Bar. The
details are as follows:
The 4/8 icons indicate the alarm input status. If alarm record mode is set, the icon is , otherwise it
is .When triggered, it changes into red . External alarm input can trigger multiple events handling
rules.
Please see Alarm Settings section for details.
: This icon indicates an alarm output. When the alarm output is in effect it will display this symbol.