
User manual


13
1) Manual Record
Please enter <Tool Bar>→<Manual Record> to enable or disable manual record on specific channels.
Press the 【●】 button to start/stop recording manually.
Note1: The video type shown in the playback menu for “Manual Record” will appear as “Common Record”
Note2: When Manual Record is enabled it takes precedence over any Record Schedule settings.
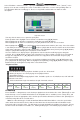
2) Record Schedule
Please enter<Tool Bar>→<System>→<Record Setting> to set record schedule. The setting screen is shown
as the figure below:
1
2
3
① The current recording channel
number
② The record schedule
③ Description of record type
FigIV 2Record Schedule
The grid based recording schedule allows users to customize a schedule by inputting different record types
for days of the week on horizontal columns and hours of the day on vertical columns as matches the users
needs.
① Move highlight icon to a time grid using 【Direction】 buttons.
② Specify the recording type by repeat pressing 【OK】 button or double left clicking mouse,(the color of the
grid will change relevantly). Alternatively with the mouse you may click on a record type selection at the bottom
and then click and drag across the grid to change large grid portions at once.
③ Select 【OK】 to confirm settings. The settings will take effect after being saved.
Note1: User can copy the current Record type onto the neighboring grid by pressing 【Fn】 button first ,
【Direction】 buttons secondly, and then the 【Fn】 button again to exit.
Note2: When motion detection recording is selected, the motion detection sensitivity and area should be
set to match your needs. Please refer to 4.4.2 Motion Detection Settings for details. When alarm recording
is selected, the alarm triggering settings should be set to match your needs. Please refer to 4.7.2 Event
Handling for details.
4 Camera Control
1) PTZ Control
*PTZ Settings
Enter <Tool Bar>→<System>→<Video> to set camera channel, protocol, baud rate and ID.
Note: The different PTZ controlled by one PCI should have the corresponding PTZ ID. There are 256PTZ ID
supported currently: 0-255.
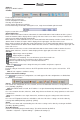
*PTZ Operations
In preview mode, select a camera first (in 4/9/16 splits view mode, the selected tile is has a green highlighted
border) using mouse or 【Numbers】 buttons, and then enter <Tool Bar>→<PTZ Control> to bring up the
PTZ control menu as shown below:
2
7
1
4
5
6
8
9
10
3