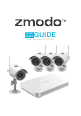
QUICK START GUIDE WIRELESS SECURITY SYSTEM
1 Introduction Congratulations on the purchase of your NVR system. This quick start guide will assist you on getting your system up and running as soon as possible. We recommend that you connect everything and give it a try before you do a permanent installation, to make sure nothing was damaged during shipping.
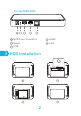
For the MINI NVR NVR Power Connector HDMI Reset LAN USB 3 HDD Installation 2
Make sure your NVR is unplugged from its power source, and unscrew the four screws at the cover at the bottom panel with a Philips screw driver. Slide the cover off, and connect the SATA power and data cables from the NVR to the corresponding ports on your HDD. Once connected, place the HDD into the NVR with the cables inside the NVR case, and cover the HDD with the buffer rubber. Slide the bottom panel back on.
NVR Power Connector - This is where you connect the NVR's DC power supply. Mini USB power connector - This is where you connect the cameras in the kit to DC power supply. 5 Connecting Your NVR System Fasten the four WiFi antennas to the back of the included four cameras. Note: this is necessary for mobile setup before actual installation. Connect the four cameras to the included four camera power adapters, and plug the power adapters to a power source. Connect a monitor using the HDMI connection.
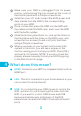
Set up with Mobile Devices Mobile setup is necessary before you actually install the cameras to your target area. It helps you connect the NVR and cameras to your WiFi network, and also allows you to access your NVR system from any location with available network using any Android or iOS mobile devices with our “MeShare” App installed. The following images are captured from the iOS version of the mobile app, the Android app works in the same way.
MeShare 66
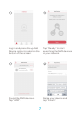
Log in and press the Add Device option located on the bottom of the screen. Tap “Ready” to start searching the NVR devices in your network. 6 ZM-SS7008D4 (+08:00)Beijing,Urumqi,chongqing,H... Found the NVR devices. Tap “ADD”. Name your device and tap” Finish”.
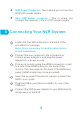
7 5454SDBDF455655 (+08:00)Beijing,Urumqi,chongqing,H... 8 Now the app will pop out a message that “this kit has wireless cameras that need to be configured”, tap “OK” (in Android) or “Set up wireless cameras” (in iOS) to connect with the wireless IP cameras in the kit. Enter the WiFi password in LAN, make sure you saw the IP camera's status indicator in this kit is changing from sold green to blinking green and tap “Next”.
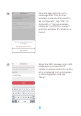
9 Now the NVR will start WiFi connection searching. The result will be shown as a completed circle. For the kit with four cameras, the circle will show four cameras are connected successfully. Click “Finish” to finish the mobile setup.
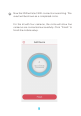
10 Now the setup has been successfully finished.
7 Mounting the Cameras Set up the NVR system and find the best mounting location based on the live view from your smartphone. Make sure that your cameras are within range of your WiFi network. 1 Line the camera bracket against the wall and mark the appropriate holes. Drill three holes slightly smaller than the wall anchor and use a hammer to gently insert the anchors into the wall. Fasten the three screws through the holes on the bracket and into the anchors.
2 Fasten the bracket to the camera (bracket not together with camera body when out of factory). You can rotate the whole bracket basing and adjust the camera to a direction with a better view. Connect the supplied power adapter to the USB power port on cable attached to your camera body and then plug the power adapter into an electrical outlet. And repeat the three steps for all the four cameras.
8 Viewing Options 1 MeShare Web App You can also view your device on any computer using MeShare’s free web app. Simply use your MeShare username and password and log in to user.meshare.com. Now Compatible with MeShare! We have partnered with MeShare to bring you optional cloud services! The MeShare Cloud Service (MCS) allows you to: Record continuously and store the footage on our secure cloud servers. Create and save video clips from your recordings.
2 View on Your Monitor Locally Once you've finished the system connection and mobile setup, log in to your NVR, no password is required initially. Once you have successfully logged in, you will see a startup guide, if you don't see it, right click anywhere on the screen of the monitor. Follow the on-screen instructions to complete the NVR setup. Your system will automatically add your cameras. Please wait 3-5 minutes until the live video appears. Note: The password function is disabled by default.
Connect with us! 9 Like us on Facebook.com/Zmodo Scan the QR-code below! Follow us on Twitter @Zmodo Scan the QR-code below! Android is a trademark of Google Inc. Google Play is a trademark of Google Inc. Apple, the Apple Logo, and iPhone are trademarks of Apple Inc., registered in the U.S. and other countries. App Store is a service mark of Apple Inc.