505 G2 Manual.
1505 G2 Manual.qxp 26/9/11 8:19 AM Page 2 ZODIAC BETTER LIFE Zodiac lives in the backyards of Australian families, at home in the pool. Not just supplying swimming pool products, but ensuring the pool is everything it should be. Zodiac began and continues with a dedication to innovation and new product development, focused on ensuring a better way of life.
1505 G2 Manual.qxp 26/9/11 8:19 AM Page 3 Dear Customer 8 1 7 3 i 5 6 2 3 4 1 0 4 4 3 2 2 9 6 5 THE CONTENTS OF YOUR ZODIAC G2™ BOX ARE AS FOLLOWS: Part No.
1505 G2 Manual.
1505 G2 Manual.qxp 26/9/11 8:19 AM Page 5 INDEX Page SECTION 1 – INSTALLATION.................................................................2 SECTION 2 – ZODIAC ACCESSORIES ...................................................7 SECTION 3 – CARE AND MAINTENANCE ..........................................8 SECTION 4 – DIAPHRAGM REMOVAL .................................................9 SECTION 5 – DIAPHRAGM ASSEMBLY ..............................................10 SECTION 6 – POOL PULSE® .................
1505 G2 Manual.qxp 26/9/11 8:19 AM Page 6 SECTION 1 – INSTALLATION It is much easier to assemble your new Zodiac G2TM automatic pool cleaner beside the skimmer box of your pool. PREPARE POOL AND FILTRATION SYSTEM Step 1: Where the main drain is connected to your skimmer box, block off the access to the main drain. Step 2: Manually vacuum your pool. Step 3: Clean the filter and empty the skimmer basket(s) and the pump strainer basket according to the manufacturer’s instructions.
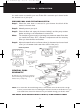
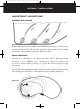
1505 G2 Manual.qxp 26/9/11 8:19 AM Page 7 SECTION 1 – INSTALLATION ZODIAC G2™ INSTALLATION 1) Firmly push the wheel deflector (part # 5) onto the outer extension pipe (connected to cleaner head) until it clicks into place just above the yellow hand nut, on the machine head. 2) Firmly push the pink leader hose adaptor (part # 7) onto the end of the outer extension pipe. Submerge cleaner head to remove all air.
1505 G2 Manual.qxp 26/9/11 8:19 AM Page 8 SECTION 1 – INSTALLATION Wheel Adaptor Deflector Wheel on hose 7) Before connecting hose to the fittings in the skimmer box it is essential that all air is removed from the cleaner head and hose. 7a) For pools with more than one skimmer box; close off all suction points except for the one the cleaner will be operating from. This provides the cleaner with maximum suction. The hose is now ready to be attached to the fittings in the skimmer box.
1505 G2 Manual.qxp 26/9/11 8:19 AM Page 9 SECTION 1 – INSTALLATION AD FLOW VALVE The use of the Zodiac AD Flow Valve is recommended on pools with only one skimmer box/suction point, or when the filtration system needs to be used but the pool cleaner does not, such as when people are swimming in the pool. It regulates the flow of water to the pump through the pool cleaner. As the filter collects debris, the valve automatically maintains the correct flow to the cleaner.
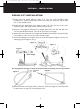
1505 G2 Manual.qxp 26/9/11 8:19 AM Page 10 SECTION 1 – INSTALLATION ADJUSTMENT SUGGESTIONS CORRECT BALANCING Diagram 1: Positioning of the hose weight Proper balancing must be accomplished in the DEEPEST area of the pool. The buoyancy of the hose tends to LIFT the Zodiac G2™ especially in deeper water. The hose weight is provided to help neutralise the buoyant effect of the hose.
1505 G2 Manual.qxp 26/9/11 8:19 AM Page 11 SECTION 2 – ZODIAC ACCESSORIES ZODIAC ACCESSORIES: PART ILLUSTRATION PART NO DESCRIPTION 1. W22800 Return Line Diverter Use when no other return inlet directional fittings exist 2.
1505 G2 Manual.qxp 26/9/11 8:19 AM Page 12 SECTION 3 – CARE AND MAINTENANCE CARE & MAINTENANCE Hose: Sunlight (ultraviolet rays), water and pool chemicals create a harsh environment. To increase the lifespan of the Zodiac G2™ and hose, you should: 1. Remove the Zodiac G2™ from the pool before Super Chlorinating and reinstall it a minimum of four hours later. 2. Always disconnect the hose from the skimmer or vacuum line before backwashing your filter. 3. Always store the hose straight.
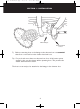
1505 G2 Manual.qxp 26/9/11 8:19 AM Page 13 SECTION 4 – DIAPHRAGM REMOVAL Diaphragm Removal Step 1: Holding the frame assembly in one hand, unscrew the yellow hand nut (approximately three turns anti-clockwise). Step 2: Pull the cassette inner body out of the cleaner head body. Step 3: Grasp the cassette in one hand and unscrew the blue outer extension pipe (approximately three turns anti-clockwise), then remove the outer extension pipe from the cassette.
1505 G2 Manual.qxp 26/9/11 8:19 AM Page 14 SECTION 5 – DIAPHRAGM ASSEMBLY Diaphragm Assembly: Prior to reinstalling the diaphragm, rinse the diaphragm and the inner extension pipe thoroughly to remove any grit or algae. Make sure grey retaining ring is fitted onto diaphragm. Make sure grey retaining ring is fitted onto diaphragm. Step 1:Push the diaphragm onto the end of the inner extension pipe until it sits flush against the raised lip.
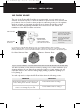
05 G2 Manual.qxp 26/9/11 8:19 AM Page 15 SECTION 6 – POOL PULSE POOL PULSE®: 5 6 6 5 2 3 4 4 3 2 O 1 The Pool Pulse® is a flow meter that measures the volume of water flowing through your Zodiac cleaner. It must be used to properly set the flow and can be used as a diagnostic tool when the cleaner isn’t running properly. 1 0 IDEAL Showing Setting 2 TOO HIGH Showing Setting 3 TOO LOW Showing Setting 1 HOW TO USE POOL PULSE®: Pool Pulse can only be used if the filtration system is on.
1505 G2 Manual.qxp 26/9/11 8:19 AM Page 16 SECTION 7 – TROUBLESHOOTING GUIDE Note: If the automatic pool cleaner is climbing the walls excessively, that is an indication that the flow is too high. Review the installation procedures and ensure the AD Flow Valve is set at setting #1. For additional assistance contact our customer service department on 1800 688 552. PROBLEM SOLUTION Cleaner stops & starts Check diaphragm for blockage or damage. Use Pool Pulse® to determine proper flow.
1505 G2 Manual.qxp 26/9/11 8:19 AM Page 17 Pure, Clear, Natural. • Advanced Water Sanitising and Purification System • Advanced Electrode Technology for Maximum Sanitation • Incorporates Clearwater & Nature2 Technology • Reduces the Time Spent on Maintenance and Manual Cleaning • Self Cleaning Electrode • Easy ‘Set and Forget’ Operation www.zodiac.com.
1505 G2 Manual.qxp 26/9/11 8:19 AM Page 18 EXPRESS WARRANTY AND GUARANTEES Express Warranty Zodiac Group Australia Pty Ltd (Zodiac Australia) warrants that the Zodiac G2™ Pool Cleaner will be free from defects in materials and workmanship for the period of two (2) years from date of purchase.The Zodiac G2™ hose is warranted for two (2) years against manufacturing defects and ultraviolet breakdown.
1505 G2 Manual.qxp 26/9/11 8:19 AM Page 19 EXPRESS WARRANTY AND GUARANTEES How to make a warranty claim 9 The Purchaser must telephone or email Zodiac Australia Customer Service and obtain a warranty ID number for the warranty claim. Contact details are: Zodiac Group Australia Pty Ltd 219 Woodpark Road Smithfield NSW 2164 Customer Service Telephone: 1800 688 552 Email address: apac.aftersales@zmp.zodiac.
1505 G2 Manual.qxp 26/9/11 8:19 AM Page 20 Zodiac is a registered trademark of Zodiac Group Australia Pty Ltd ABN 87 002 641 965 Zodiac Customer Service Centre Zodiac Group Australia: 219 Woodpark Rd, Smithfield, NSW 2164 Australia Tel: 1800 688 552 Fax: 1300 781 688 Email: apac.aftersales@zmp-zodiac.com www.zodiac.com.au Due to constant developments and improvements, specifications may change without notice. Improper use could affect performance and void warranty.