Instruction Manual & Warranty Card
MASTERING THE ELEMENTS Renowned worldwide for the quality and reliability of its products in the aeronautical and marine sectors, Zodiac has now brought its expertise to swimming pools, to bring you a full range of pools, automatic pool cleaners and water treatment systems. Backed by Baracuda technology, expertise and experience, Zodiac brings you the reassurance of top quality equipment in terms of both design and performance.
Dear Customer, Thank you for buying a Zodiac Genie Series II™. It is thanks to you that we have achieved our position as market leader. The Zodiac Genie Series II™ has been designed and manufactured to be easily installed and to provide years of low maintenance operation. • Your Zodiac Genie Series II™ has no moving parts to jam, wear or come adrift. No nuts, bolts, screws, gears or wheels to corrode. • Its innovative cassette diaphragm system sucks up dirt, debris, bugs, leaves and even pebbles.
ii
INDEX Page SECTION 1 – PREPARING YOUR POOL AND FILTRATION SYSTEM ...........................................................1 SECTION 2 – INSTALLATION......................................................................4 SECTION 3 – CARE AND MAINTENANCE ...............................................7 SECTION 4 – TROUBLESHOOTING GUIDE ...........................................13 SECTION 5 – PARTS IDENTIFICATION ...................................................14 SECTION 6 – LET US HELP.................
SECTION 1 – PREPARING YOUR POOL FILTRATION SYSTEM PREPARE POOL AND FILTRATION SYSTEM Step 1: Turn off the main drain, where main drain control is connected. Step 2: Manually vacuum your pool. Step 3: Clean the filter and empty the skimmer basket(s) and the pump strainer basket according to the manufacturer’s instructions.
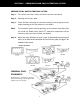
SECTION 1 – PREPARING YOUR POOL FILTRATION SYSTEM ADJUSTMENT SUGGESTIONS WEIR VALVE WITH BYPASS The Zodiac Weir Valve is preset at the factory to obtain maximum pool cleaning efficiency. Your Zodiac Genie Series II™ is preset on setting 2. However, if you do experience difficulties, it can be manually adjusted to one of the three settings (high, medium or low).
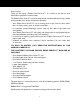
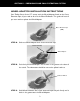
SECTION 1 – PREPARING YOUR POOL FILTRATION SYSTEM WHEEL ADAPTOR INSTALLATION INSTRUCTIONS Your Zodiac Genie Series II™ comes with the Wheel Adaptor fitted to the Outer Extension Pipe, all you need to do is fit the Wheel Deflector. This guide will assist if you ever need to replace the Wheel Adaptor. Outer Extension Pipe (OEP) STEP A: Slide new Wheel Adaptor over Outer Extension Pipe.
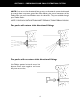
SECTION 1 – PREPARING YOUR POOL FILTRATION SYSTEM NOTE: If no return inlet directional fittings exist, or directionals cannot be directed far enough down to prevent water flow from affecting the natural movement of the Zodiac hose, you must install Zodiac return line diverters. They are available through your Zodiac dealer. NOTE: FOR POOLS WITH RETURN INLET EYEBALLS,TURN EYEBALL DOWN.
SECTION 2 – INSTALLATION POOLS WITH ONE SKIMMER Step 5: Select the hose with the pink insert (leader hose fig.3). Fit the hose weight at the end of this hose length (about 1 metre from the Machine head) which will be attached to the Zodiac Genie Series II™. Assemble the hose to the correct length (Fig. 4/5). Now fit the hose protector mesh to the skimmer end of the hose. NOTE: Attach the leader hose (Fig.
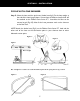
SECTION 2 – INSTALLATION Step 6: Put deflector wheel on wheel adaptor & place on outer extension pipe of Zodiac Genie Series II™ Return inlet SKIMMER MAIN DRAIN RETURN INLET Step 7: Fill the hose with water by placing the end over a return inlet. Step 8: With the weighted hose end in the pool, cover the other end (the end with the protector mesh) tightly with your hand. Move to the skimmer and attach this hose end to the regulator valve.
SECTION 2 – INSTALLATION 10 Step 9-11 8 1 3 Vacuum Plate Refer to page 8 for Part Description Step 9-11 Step 9: Attach Regulator Valve to weir cuff & elbows (weir adaptor) Step 10: Attach wheel adaptor to leader Hose (see over) Step 11: Attach Weir adaptor into skimmer box vacuum plate.
SECTION 2 – INSTALLATION Step 12: Submerge the Zodiac Genie Series 11™ head.When the bubbles have stopped flowing from the head, re-connect the head to the cuffed hose end. Wheel Adaptor Deflector Wheel SECTION 3 – CARE & MAINTENANCE Sunlight (Ultraviolet rays), water and pool chemicals create a harsh environment.
SECTION 3 – CARE & MAINTENANCE SKIMMER SKIMMER 8 8 1 10 10 3 3 Vacuum Plate Vacuum Plate DESCRIPTION 1. Weir 45° Elbow 3. Universal Weir Cuff 8. Hose Protector 10.
SECTION 3 – CARE & MAINTENANCE Connection to a (or the) skimmer point 1 Fit the automatic flow control valve into (one of) the skimmer box using the weir adapter. Warning: the tension of the springs on this valve is preset - do not touch! 2 Make sure there is no air in the hose of your Zodiac Genie Series II™ then connect to the valve. 3 Close all other suction points: skimmers, vacuum point. Make sure that main drain outlet at skimmer box is closed.
SECTION 3 – CARE & MAINTENANCE QUICK ACCESS CONTROL SYSTEM Unlike other competitive automatic pool cleaners, the Zodiac Genie Series II™ has the Quick Release Access Cassette System. This unique feature allows almost instantaneous access to the one moving part – the diaphragm. Large foreign objects, such as children’s toys, tree branches and rocks, should be removed manually from your pool prior to operating an automatic pool cleaner.
SECTION 3 – CARE & MAINTENANCE STEP 3 PARTING DIAPHRAGM ASSEMBLY Grasp the rim of the diaphragm and pull the diaphragm assembly out of the cassette. Step 3 STEP 4 REMOVAL OF INNER EXTENSION PIPE Remove the diaphragm from the inner extension pipe. The retaining ring on the diaphragm must be placed on the new diaphragm. Step 4 STEP 5 EXAMINATION Inspect the diaphragm for the blockage or damage. If damage is evident, i.e.
SECTION 3 – CARE & MAINTENANCE STEP 6 DIAPHRAGM ASSEMBLY Prior to reinstalling the diaphragm, rinse the diaphragm and the inner extension pipe thoroughly to remove any grit or algae. Attach the diaphragm to the inner extension pipe using the retaining ring (Figure 4). Slide the top of the inner extension pipe (the end which is opposite the diaphragm) into the body. Pressing on the underside of the diaphragm’s ridges, push the diaphragm into the body (Figure 5).
SECTION 4 – TROUBLESHOOTING GUIDE MECHANICAL (MACHINE STOPS OR MOVES SLUGGISHLY) 1. Turn the filter system off and check all the connections of the ZODIAC GENIE SERIES II™ to the skimmer. 2. Remove the ZODIAC GENIE SERIES II™ head from the hose, turn it upside down and inspect for debris blocking the diaphragm. 3. Backwash or clean the filter and clean pump and skimmer baskets of all debris. Turn the filter system on and check that there is good flow.
SECTION 5 – PARTS IDENTIFICATION CHECK THAT THE FOLLOWING PARTS ARE INCLUDED 2 3 1 5 10 9 4 6 8 7 11 DESCRIPTION 1. 45-degree installation adaptor elbows 2. Wheel Deflector 3. Universal Weir Cuff 4. Wheel adaptor 5. Machine head with a. hard foot for concrete finishes b. soft foot for fibreglass pools 6. Finned disc - suits all pool surfaces 7. Genuine Zodiac Long Life hose lengths 8. Hose protective mesh 9. Hose weight 10. Regulator valve 11.
If you are having a problem you cannot solve, mail or fax us the following information, along with a sketch of your pool shape, indicating the location of all skimmers, vacuum lines, inlets, stairs, ladders, spas, waterfalls etc, or other significant features. Briefly describe the problem. (Send a photocopy and retain this page for future use). Mail to: Zodiac Group Australia, 1/23 Rowood Road, Prospect NSW 2148, Australia. Fax to: +61 (0)2 9896 5766 Your Name: ..............................................
WARRANTY INFORMATION ZODIAC GENIE SERIES II™ TWO-YEAR WARRANTY This ZODIAC GENIE SERIES II™ was carefully inspected before shipment from our warehouse. Upon unpacking,if any part is missing or found to be defective, please notify your dealer immediately. Please consult owner's manual for complete instructions on the installation and operation of your Zodiac Genie Series II™.