OWNER’S MANUAL
A BETTER LIFE For over 100 years we have been motivated by innovation... and innovation has inspired our greatest successes. Every day we strive to supply the highest quality products... and constantly seek to develop INNOVATIVE products. Innovation, is what we create every day... for everyone... for a better life: Because the pool is a source of PLEASURE and JOY... a place to REUNITE FAMILIES...which CREATES RELATIONSHIPS and memories... a place where time stands still.
INDEX Page No.
INTRODUCTION Dear Customer, Thank you for purchasing a G2™. It is through customers such as you that our position as worldwide market leader in poolcare remains unchallenged. Our renowned, patented technology is still unbeaten for innovation and design, reliability and effieciency. • Your G2™ has no moving parts to jam, wear or come adrift. No nuts, bolts, screws, gears or wheels to corrode. • Its innovative Long-Life Cassette Diaphragm System sucks up dirt, debris, bugs, leaves and even pebbles.
SECTION 1 - INSTALLATION STEP 1: Preparing your pool and filtration system IMPORTANT The filtration system must be operating at its maximum water flow before you install your G2™, otherwise you will have to re-adjust it after cleaning the pool filter. Installation is easy if you follow these simple preliminary steps: 1. Empty the weir basket. 2. Clean the pump basket. 3. Backwash the filter until the sight glass is clear. 4.
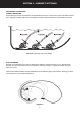
SECTION 1 - INSTALLATION STEP 3: Assembling the Hoses 1. Always insert the male hose cuff into the female cuff and twist until hose locks together. Hoses must connect fairly tightly. Setting 1 or 2 is recommended on the Twist Lock ratchet system. The ideal length of hose is from the weir to the farthest point of the pool plus one extra section of hose. If the weir is opposite the steps, use lowest step as furthest point (see Diagram 3).
SECTION 1 - INSTALLATION STEP 4: Assembling the Hose Protector 1. Place the hose into one half of the Hose Protector. 2. Place the other half of the Hose Protector over the hose ensuring that the male clip line up with the female clip. 3. Apply pressure to both halves of the Hose Protector until both pieces clip into place. STEP 5: Positioning of the Hose Protector The ideal positioning to fit the Hose Protector is directly after the hose cuff.
SECTION 2 – CORRECT SETTINGS AUTO WEIR VALVE The ZODIAC Auto Weir Valve is preset at the factory to obtain maximum pool cleaning efficiency. Your G2™ is preset on setting 2. However, if you do experience difficulties it can be manually adjusted to one of the three settings (hight, medium or low – See Adjustment Settings below). 90° Elbow Note: To obtain maximum Diaphragm efficiency, please ensure a genuine ZODIAC Auto Weir Valve is used.
SECTION 2 – CORRECT SETTINGS ADJUSTMENT SUGGESTIONS CORRECT BALANCING Proper balancing must be accomplished in the deepest area of the pool. The buyoancy of the hose tends to lift the G2™, especially in deeper water. The Hose Weight is provided to help neutralise the buyoant effect of the hose. Diagram 5: Positioning of the Hose Weight POOL COVERAGE Normally it is undesirable for the return line water flow to affect the natrual movement of your ZODIAC Hose.
SECTION 3 – QUICK RELEASE CASSETTE SYSTEM The G2™ has a Long-Life Diaphragm and a Quick Release System. This unique feature allows almost instantaneous access to the Diaphragm. Large foreign objects, such as children’s toys, tree branches and rocks, should be removed manually from your pool prior to operating an automatic pool cleaner.
SECTION 3 – QUICK RELEASE CASSETTE SYSTEM STEP 2: Removal of Diaphragm Grasp the Extension Pipe in one hand and unscrew the Cassette +/- 4 turns anti-clockwise until the two separate (Diagram 9). Diagram 9 Push the Inner Extension Pipe with Diaphragm through the Cassette Body (Diagram 10).
SECTION 3 – QUICK RELEASE CASSETTE SYSTEM Remove the Diaphragm from the Inner Pipe (Diagram 11), leaving the Retaining Ring on the Diaphragm. Diagram 11 STEP 3: Examination Inspect the Diaphragm for a blockage or any damage. Even small holes will compromise its operation. If any damage is evident, i.e. a cut or hole on the sides of the Diaphragm, replace it. If there is a blockage, carefully remove it. If this can’t be done, a garden hose may be used to flush the obstacle through.
SECTION 3 – QUICK RELEASE CASSETTE SYSTEM Pull the Inner Extension Pipe with Diaphragm through the Cassette Body (Diagram 13). Diagram 13 STEP 5: Resetting the Diaphragm If the gap of the Diaphragm is excessive (more than 5 mm), yet the Diaphragm is not torn or damaged, it can be reset by leaving one ridge of the Diaphragm exposed from the Cassette Body (Diagram 14). This may resolve performance-related problems such as running and stopping, coverage problems and/or your G2™ not climbing walls.
SECTION 3 – QUICK RELEASE CASSETTE SYSTEM Diagram 15 STEP 6: Cassette Reassembly Re-insert the assembled Cassette unit into the G2™ body (Diagram 16) and tighten Cassette Swivel nut +/- 3 turns clockwise until Hand-nut is flush with the threaded Locking Collar (Diagram 17).
SECTION 4 – HOW TO KEEP YOUR G2™ OPERATING EFFICIENTLY As a pool accessory connected to the suction line, your G2™ relies on the filtration system in order to operate efficiently. Follow these simple maintenance tips: 1. The weir basket, pump basket, cartridge filter, sand filter (whichever is applicable) should be thoroughly cleaned on a regular basis to ensure optimum pool cleaner efficiency. N.B. Always disconnect the hose from the weir or vacuum line before backwashing your filter. 2.
SECTION 5 – PROBLEM SOLVING PROBLEMS CHECKS Your G2™ works slowly, runs then stops or not at all. Is the filter clean? Are the baskets clean? Is the vacuum lid sitting flush in the weir? Is the vacuum lid damaged? Are the Auto Weir Valve and the hose secure? Is the Diaphragm operational or does it need adjusting? Your G2™ is working slowly and air bubbles are noticeable at the return jet. Is there a leak in the system? SOLUTIONS Backwash and rinse the filer thoroughly.
SECTION 5 – PROBLEM SOLVING PROBLEMS CHECKS Your G2™ does not reach the shallow end of the pool or moves in a fixed pattern. Is the hose long enough? Add more sections of hose. Is the hose affected by the return flow? Adjust the return outlet towards the bottom of the pool to make sure that the jet of water does not influence the direction of the G2™ hose. Are the hose lengths straight? Your G2™ climbs above the water level. Is there too much suction? Your G2™ does not climb the walls easily.
SECTION 6 – PARTS IDENTIFICATION Exploded diagram - G2™ Description 1. Main Body 2. Locking Collar 3. Flexi-foot 4. Deflector Wheel 5. Extension Pipe with Hand-nut 6. Compression Ring 7. Cassette Diaphragm Chamber 8. Inner Extension Pipe 9. Retaining Ring 10. Long-Life Diaphragm 11.
SECTION 7 – OPTIONAL ACCESSORIES 1. WEIR ADAPTOR Fits suction inlets from 40 to 60mm 2. WEIR COMBINATIONS Auto Weir Valve and Weir Elbows illustrating some of the different combinations that an be used 3. AIM FLOW DIVERTOR To allow pool cleaner to clean close to return flow 4. LARGE DEFLECTOR WHEEL If unit sticks in difficult corners, eg steps CYCLONIC LEAF CATCHER An in-line filter which collects all leaves, seeds, twigs and grit before they reach the weir, using an innovative vortex technology.
SECTION 8 – THE PERFECT PARTNER FOR YOUR G2™ A ZODIAC Salt Chlorinator – The Perfect Partner for your G2™ Installing a ZODIAC Salt Chlorinator in conjuntion with having a G2™ is the effortless way to having a crystal clear pool all the time. ZODIAC Salt Chlorinator with Clearwater technology offer both convenience and peace of mind. Clearwater technology means that you are assured of quality and product excellence.
SECTION 9 – GETTING TO KNOW YOU BETTER At ZODIAC, we strive to give our customers superior quality products as wll as service excellence. To help us improve please spare a moment of yoru time and let us understand your needs a little better. Once you filled in the following survey please fax a copy to (011) 314 5225. Title: .......................................................................................................................................................................................
SECTION 10 - AT YOUR SERVICE If you are having a problem you cannot solve, mail or fax us the following information, along with a sketch of your pool shape, indicating the location of all weirs, vacuum lines, inlets, stairs, ladders, spas, waterfalls, etc, or other significant features. Briefly describe the problem in the space below. (Send a photocopy and retain this page for future use.) Mail to: ZODIAC Pool Care SA, Private Bag X127, Halfway House, 1685 or Fax to: (011) 314 5225 Your Name...............
ZODIAC POOL CARE SOUTH AFRICA(PY) LTD Private Bag X127 Halfway House 1685 Customer Care Helpline 0860 88 POOL (0860 887 665) www.zodiac.co.za WARNING: In terms of Section 2 of the Import and Export Control Act of 1989 (Act 45 of 1983), it is illegal to export Automatic Pool Cleaners and parts thereof.