How to Enjoy Zojirushi Bakery II Operating Instructions BBCC – M15 CONTENTS Important Safeguards Save These Instructions Machine Specifications Major Parts Names Front Panel Settings Length of Cycles How to Use the Bakery II Bread Settings • Dough Settings • Using the Timer Care and Cleaning Trouble Shooting Guide Questions & Answers 2 3 3 4 5 6 7~10 11 12 13~14 15 16~17
IMPORTANT SAFEGUARDS Important Safeguards WHEN USING ELECTRICAL APPLIANCES, BASIC SAFETY PRECAUTIONS SHOULD ALWAYS BE FOLLOWED, INCLUDING THE FOLLOWING: Operation Instructions & Recipes 1. Read all instructions carefully. 2. Do not touch hot surfaces. Use handles or knobs. Do not close or clog the steam vent opening under any circumstances. 3. To protect against electrical shock, do not immerse cord, plug, Home Bakery, lid, or baking pan bottom in water or other liquid. 4.
SAVE THESE INSTRUCTIONS/ MACHINE SPECIFICATIONS Save These Instructions Machine Specifications THIS APPLIANCE IS FOR HOUSEHOLD USE ONLY. Operation Instructions & Recipes Note: A. A short power supply cord is provided to reduce the risk resulting from becoming entangled in or tripping over a longer cord. B. Extension cords are available and may be used if care is exercised in their use. C.
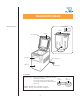
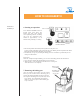
MAJOR PARTS NAME Major Parts Name Kneading Blade Handle Handle Lid: Detachable Rotating Shaft Front Panel Power Supply Cord Main Body Attachment Plug Accessories Measuring Spoon: The large cup measures. 1 tablespoon; the small cup measures 1 teaspoon. You can also measure to the halfway mark, which equals half tablespoon and half teaspoon respectively. SMALL: The small spoon equals about 1 teaspoon. LARGE: The large spoon equals about 1 tablespoon.
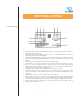
FRONT PANEL SETTINGS 1 Front Panel Settings 2 7 3 4 5 8 6 9 10 1 "Timer" light: Lights green when the machine has been pre-set for baking at a later time. The light flashes when the timer is being set. 2 "Operation" light: The light flashes during the first 5 to 30 minutes indication the machine is monitoring the temperature of the ingredients. 3 "Complete" light: When baking is finished or when dough is ready, the light flashes yellow and beeps, then it will stay illuminated.
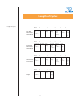
Length of Cycles Length of Cycles Hours Dry Milk Basic Bread Mixed Bread Second rising 1 0 0 1 Preheating Kneading First rising (5~ 30 min.) -6- 3 Third rising (40~ 60 min.) 2 2 Second rising 2 Second rising 4 Baking (44~ 52 min.) Cooling (Completion) 3 Baking (44~ 52 min.) Second rising (45~ 65 min.) 1 Preheating Kneading First (5~ rising 30 min.) Hours Dough 0 2 Preheating Kneading First (5~ rising 30 min.
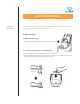
HOW TO USE BAKERY II How to Use the Bakery II The Recipe Book includes recipes for many varieties of breads, and doughs. Choose the recipe and the setting you will need, and follow the steps listed below. For Bread Settings. 1. Remove the baking pan. Open the lid and pull the baking pan, by the handle, up out of the unit. 2. Attach the kneading blade to the baking pan. As shown in the figure, insert the kneading blade onto the rotating shaft.
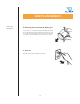
HOW TO USE BAKERY II How to Use the Bakery II 3. Put ingredients into the baking pan. Place ingredients in the baking pan, follow the order given in the recipe book. 1 Water 2 Flour, salt, sugar, butter, milk as needed. 3 Dry yeast. Be sure to add this last so that the dry yeast does not come into direct contact with the water. * Be careful not to mix the yeast with the water, otherwise, the bread may not bake properly. 1 2 3 4. Insert the baking pan into the unit and close the lid.
HOW TO USE BAKERY II How to Use the Bakery II 6. Starting an operation. TIMER OPERATION COMPLETE SELECT COURSE Press "SELECT COURSE" button to desired course. Press "Start". The Bakery starts each course selection with a preheating function, and during this cycle, the "Operation Light" flashes for approximately 5 to 30 minutes when preheating is occurring.
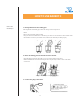
HOW TO USE BAKERY II How to Use the Bakery II 8. Removing the bread from the baking pan. Use hot pads or oven mittens and turn the baking pan upside down, and shake to loosen the bread. Place the bread on a rack to cool. If the kneading blade comes out stuck to the bread, it may still be very hot. Carefully remove it with a pair of tongs. 9. After use. Disconnect the attachment plug from the outlet.
HOW TO USE BAKERY II How to Use the Bakery II For Dough Setting Follow steps 1 through 5 for Bread Settings, then follow steps 6 through 8 listed below. •When using the "Dough Setting", the timer cannot be used. 6. Starting Procedure. 1. Press "SELECT COURSE" to "DOUGH" setting. 2. Press "START" The dough will be ready in about two hours. 1 2 SELECT COURSE START Press Press 7. Removing dough from the baking pan. 1. When the "COMPLETE" light is illuminated, the dough is ready.
HOW TO USE BAKERY II How to Use the Bakery II Using the Timer • The "Timer Setting" can only be used for the Dry Milk basic bread or Dry Milk mixed bread settings. • Timer settings range from 4 hr. 30 min. to 13 hr. 1. • Using the arrows, set the timer for the desired completion time, the time indication moves in thirty minute increments. The green timer light will flash as the timer is being set. TIMER OPERATION COMPLETE Press Setting example: To complete the bread 6 hr.
CARE AND CLEANING Care and Cleaning Warning • To prevent electrical shock, unplug the unit before cleaning. After the unit has cooled, pull out the plug and the cord, clean them if necessary. • For cleaning, only use a mild, nonabrasive dish washing liquid so the unit's surface will not be damaged. Open the lid about 45 degrees and pull it up towards the arrow's direction. Main body and lid • Wipe with a damp cloth. After the unit has cooled. wipe out the crumbs using a damp cloth.
CARE AND CLEANING Care and Cleaning Baking pan If the kneading blade is hard to remove, hold the main shaft located underneath the pan and with your other hand, turn the kneading blade to the left and right to loosen, then pull it out. Clean the rotating shaft with a soft sponge so that you don’t damage the rotating shaft seal. Rotating shaft Lukewarm water Do not immerse the base of the baking pan in water. Wipe it with a damp cloth. Kneading Blade Clean with soft sponge.
WHOLE GRAIN(BASIC, WHEAT, TROUBLESHOOTING GUIDE QUICK WHEAT) RESULTS: CORRECTIONS: MECHANICAL Increase Water or Milk Salt Liquid INGREDIENT 2 Tbs. 2 Tbs. Increase 1/4 tsp. 1/4 tsp. Decrease Decrease Yeast Flour Yeast 2 Tbs. Decrease Sugar or Increase Honey Flour Loaf rises Loaf rises Loaf does Loaf is Light crust. Uncooked. Over Not mixed. Smoke High then falls. too high. not short cooked. appears altitude rise enough. and heavy. from vent. adjustment. 2 Tbs. 1/4 tsp. 1/2 Tbs.
QUESTIONS & ANSWERS Questions & Answers ABOUT THE PERFORMANCE Q1. Why does the height and shape of my bread loaves differ? Operation Instructions & Recipes A1. Both the room temperature and setting time of the timer can affect the final outcome of your bread. Also, if the ingredients were measured incorrectly, your bread can be affected. Q2. Why didn’t my bread rise completely? A2. Check to see that the yeast was added and that the blade was firmly attached to the baking pan.
QUESTIONS & ANSWERS Questions & Answers About the Timer Q7. Why can’t I set the timer for less than 4 hr. 30 min. or more than 13 hr? Operation Instructions & Recipes A7. It takes at least 4 hr. to make bread, therefore you can’t set the timer for less than 4 hr. Also, if you set for more than 13 hr. the dough may change consistency or the bread may not bake properly. Q8. Why can’t I use the timer for the "Dough Setting"? A8.