How to Enjoy the Zojirushi Home Bakery Expert Operating Instructions & Recipes BBCC – Q15 CONTENTS Important Safeguards Specifications Descriptions of Parts Control Panel Settings Length of Cycles 2 2 3 4 4 LET’S START BAKING • Basic Bread • Quick Baking • Mix Bread • Whole Grain • Dough Using the Timer Cleaning the Machine and Baking Pan Storing the Home Bakery Junior Questions and Answers Recipe Table of Contents 5 6 7 8 9 10 11 11 11 12
IMPORTANT SAFEGUARDS/SPECIFICATIONS Important Safeguards WHEN USING ELECTRICAL APPLIANCES, BASIC SAFETY PRECAUTIONS SHOULD ALWAYS BE FOLLOWED, INCLUDING THE FOLLOWING: Specifications 1. Read all the instructions carefully. 2. Do not touch hot surfaces. Use handles or knobs. Do not close or clog the steam vent opening under any circumstances. 3. To protect against electrical shock, do not immerse cord, plug, or baking machine in water or other liquid. 4.
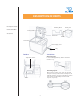
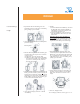
DESCRIPTION OF PARTS Description of Parts Inside of the Oven Kneading Blade Viewing Window Baking Pan Lid Accessories Steam Vent Handle Front Panel Power Supply Cord Plug Inside of the Oven Accessories Measuring Cup: Is for measuring liquids only; filled to the brim it measures 1 cup. Temperature Sensor Measuring Spoon: May be used to measure yeast, sugar, salt, dry milk and spices. The large side measures 1 tablespoon; the small side measures 1 teaspoon.
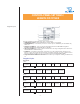
CONTROL PANEL SETTINGS / LENGTH OF CYCLES 6 Length of Cycles 1 5 Operation Instructions & Recipes 2 4 3 Each key should be pressed firmly until a "beep" sound is heard. 1 OPERATION LIGHT - This light illuminates when the Bakery is in operation. 2 START/RESET key – Press this key to start or to cancel a process. To RESET, press and hold the key about 1 sec. 3 SELECT COURSE key – Press to select the desire baking function: BASIC BREAD, QUICK BAKING, MIX BREAD, WHOLE GRAIN, or DOUGH.
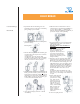
BASIC BREAD Let's Start Baking! Basic Bread 1. Open the lid and turn the baking pan to the "UNLOCK" direction. Then remove the baking pan by pulling up on the handle. 6. Make sure that the "Basic Bread" course is selected and press the CRUST CONTROL key to select either "LIGHT", or "REGULAR". When the CRUST CONTROL or START key is pressed, the display will stop blinking. 2. Attach the kneading blade to the rotating shaft; push down firmly. 7. Press the START key.
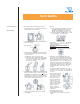
QUICK BAKING Let's Start Baking! Quick baking 1. Open the lid and turn the baking pan to the "UNLOCK" direction. Then remove the baking pan by pulling up on the handle. 6. Starting (1) Press the SELECT COURSE key and select the QUICK BAKING setting. When the SELECT COURSE key is pressed, the display will stop blinking and show 1:58. (2) Press the CRUST CONTROL key to select either "LIGHT", or "REGULAR". 2. Attach the kneading blade to the rotating shaft; push down firmly. 7. Press the START key.
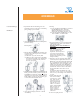
MIX BREAD Let's Start Baking! Mix Bread 1. Open the lid and turn the baking pan to the "UNLOCK" direction. Then remove the baking pan by pulling up on the handle. 6. Starting (1) Press the SELECT COURSE key and select the MIX BREAD setting. When the SELECT COURSE key is pressed, the display will stop blinking and show 3:50. (2) Press the CRUST CONTROL key to select either "LIGHT", or "REGULAR". 2. Attach the kneading blade to the rotating shaft; push down firmly. 7. Press the START key.
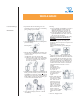
WHOLE GRAIN Let's Start Baking! Whole Grain 1. Open the lid and turn the baking pan to the "UNLOCK" direction. Then remove the baking pan by pulling up on the handle. 2. Attach the kneading blade to the rotating shaft; push down firmly. Rotating Shaft 3.
DOUGH Let's Start Baking! Dough 1. Open the lid and turn the baking pan to the "UNLOCK" direction. Then remove the baking pan by pulling up on the handle. 2. Attach the kneading blade to the rotating shaft; push down firmly. 6. Starting (1) Press the SELECT COURSE key and select the DOUGH setting. When the SELECT COURSE key is pressed, the display will stop blinking and show 2:00. (2) Press the START key. The red operation light will illuminate. The entire cycle will take 2 hours.
USING THE TIMER Using the Timer The TIMER can be used for the BASIC BREAD, MIX BREAD, WHOLE GRAIN and DOUGH settings. The completion time, the time when the bread will be ready can be set in units of 10 minutes starting from 4.5 hours to 13 hours. But we do not recommend using TIMER with MIX BREAD recipes for food safety reason. How to set the TIMER: 1.
QUESTIONS AND ANSWERS Cleaning the Machine and Baking Pan Storing the Home Bakery Super Questions & Answers CLEANING THE MACHINE AND BAKING PAN Since dust and crumbs left inside the unit may cause scorching or uneven baking with the next use, be sure to clean the machine and the baking pan each time you use the HOME BAKERY Super. Do not immerse the HOME BAKERY Super or the baking pan in water or any other liquids. After use, be sure to unplug the unit and wait until the machine cools before cleaning.
RECIPE TABLE OF CONTENTS Recipe Table of Contents TABLE OF CONTENTS Introduction The "Secret" Ingredients for Success Tips on Using your Bread Machine Yeast Bread Creating your Own Yeast Bread Tips on Dark Bread Special Glazes for Yeast Bread Measuring Ingredients Yeast Bread Basic Bread Course Basic White Bread Hearty Oatmeal Bread Potato Bread Crusty French Bread Italian Herb Bread Sugar Free White Bread Cheese ‘N’ Onion Bread Pumpkin Bread Curry Bread Quick Baking Course Basic White Bread Whole Grain C
INTRODUCTION THE "SECRET" INGREDIENTS FOR SUCCESS Chapter 1 Introduction The "Secret" Ingredients for Success If baking bread has always been a mystery to you, you’ll be pleasantly surprised to find how easily the Home Bakery Super can make you a great baker! The recipes outlined in this book have been carefully tested, but there are few tips we’d like to pass on to you to insure success every time. The most important tip is to follow the direction in the recipes exactly.
TIPS ON USING YOUR BREAD MACHINE Tips on Using Your Bread Machine Yeast Breads Creating Your Own Yeast Breads Tips on Dark Breads Yeast Breads Nothing is more satisfying – or more rewarding – than the heady aroma of freshly baked bread. With your Home Bakery, you can have it anytime! All of the mystery has been taken out of the bread-baking ritual – the mixing, kneading, rising, and even the baking.
TIPS ON USING YOUR BREAD MACHINE Special Glazes for Yeast Breads Measuring Ingredients Special Glazes for Yeast Breads Give your just-baked bread a professional finish. Select one of these special glazes to enhance your bread. Egg glaze: 1 egg, beaten; 1 Tbsp. Water croissants: 1/3 cup butter, softened; 1 medium egg, beaten; 2 teaspoon water. butter rich rolls:1/2 egg beaten; 2 teaspoon water. Egg Glaze: Beat 1 egg and 1 tablespoon of water together, brush generously over top crust of bread.
BASIC BREAD COURSE Basic Bread Course Basic Bread COURSE Method 1. Measure all the ingredients except yeast into baking pan in the order listed bellow. 2. Tap the baking pan firmly to level ingredients. Make a depression in the middle of flour and sprinkle the yeast into it, ensuring that the yeast does not touch any liquids. 3. Insert and lock baking pan securely into baking unit and close lid. 4. Select BASIC BREAD course then select the desired CRUST CONTROL setting. 5. Push START.
BASIC BREAD COURSE QUICK BAKING COURSE Basic Bread Course Quick Baking Course Basic Bread COURSE Method 1. Measure all ingredients except yeast into baking pan in the order listed below. 2. Tap the baking pan firmly to level ingredients. Make a depression in the middle of flour and sprinkle the yeast into it, ensuring that the yeast does not touch any liquids. 3. Insert and lock baking pan securely into baking unit and close lid. 4. Select BASIC BREAD course then select the desired CRUST CONTROL setting.
WHOLE GRAIN COURSE Whole Grain Course Whole Grain COURSE (CRUST CONTROL cannot be used with this setting.) Method 1. Measure all the ingredients except yeast into baking pan in the order listed bellow. 2. Tap the baking pan firmly to level ingredients. Make a depression in the middle of flour and sprinkle the yeast into it, ensuring that the yeast does not touch any liquids. 3. Insert and lock baking pan securely into baking unit and close lid. 4. Select WHOLE GRAIN course.
WHOLE GRAIN COURSE Whole Grain Course Whole Grain COURSE (CRUST CONTROL cannot be used with this setting.) Method 1. Measure all ingredients except yeast into baking pan in the order listed below. 2. Tap the baking pan firmly to level ingredients. Make a depression in the middle of flour and sprinkle the yeast into it, ensuring that the yeast does not touch any liquids. 3. Insert and lock baking pan securely into baking unit and close lid. 4. Select WHOLE GRAIN course . The CRUST CONTROL can not select.
MIX BREAD COURSE Mix Bread Course Mix Bread COURSE Method 1. Measure all the ingredients except yeast into baking pan in the order listed bellow. 2. Tap the baking pan firmly to level ingredients. Make a depression in the middle of flour and sprinkle the yeast into it, ensuring that the yeast does not touch any liquids. 3. Insert and lock baking pan securely into baking unit and close lid. 4. Select MIX BREAD course then select the desire CRUST CONTROL setting. 5. Push START.
MIX BREAD COURSE Mix Bread Course Mix Bread COURSE Method 1. Measure all ingredients except yeast into baking pan in the order listed below. 2. Tap the baking pan firmly to level ingredients. Make a depression in the middle of flour and sprinkle the yeast into it, ensuring that the yeast does not touch any liquids. 3. Insert and lock baking pan securely into baking unit and close lid. 4. Select MIX BREAD course, then select the desired CRUST CONTROL setting. 5. Push START.
DOUGHS Croissants CROISSANTS 3/4 cup Water 3 Tbsp. Butter 3 Tbsp. Sugar 3/4 tsp. Salt 1-1/2 2-1/4 cups 3/4 cup 3 Tbsp. Method Large Egg Bread Flour All Purpose Flour Dry Milk 1-1/2 tsp. 1 cup Egg Glaze: 1 2 tsp. Active Dry Yeast Butter, Softened Medium Egg, beaten Water 1. Measure all ingredients except yeast into baking pan in the order listed above. Tap the baking pan firmly to level ingredients.
DOUGHS Croissants 1. Roll dough into 13 X 9 inch rectangle on a lightly floured surface. Using about 7 Tbsp. softened butter. Butter 2/3 of the dough while leaving 1/3 of the dough unbuttered. 2. Fold dough into thirds and repeat step 4 twice more. Add flour to rolling surface as needed to prevent sticking. Cover securely with plastic wrap and place in the refrigerator for 1 to 2 hours or overnight. (In summer, place the dough in the freezer. Must thaw slightly before continuing.) 3.
DOUGHS Traditional Pizza Dough Pizza Dough with Butter TRADITIONAL PIZZA DOUGH 1-1/2 cups 1-1/2 Tbsp. 1-1/2 Tbsp. 1-1/2 tsp. 3-3/4 cups 1-1/2 tsp. Thin-Crust Pizza Thick-Crust Pizza Crusty Rolls Water Olive Oil Sugar Salt Bread Flour Active Dry Yeast Vegetable Oil PIZZA DOUGH WITH BEER 1-1/2 cups 1-1/2 Tbsp. 3 Tbsp. 1-1/2 tsp. 3-3/4 cups 1-1/2 tsp. Flat Beer Butter Sugar Salt All Purpose Flour Active Dry Yeast Vegetable Oil Method 1.
DOUGHS Soft Pretzels SOFT PRETZELS Prepare Pizza Dough with Beer recipe. 1. Turn dough onto lightly floured board and divide dough into 8 equal portions. 2. Cut each portion into another 8 equal portions. Roll each piece of dough into a thin rope about 20 inches long and pencil-thin. 3. To shape into pretzel, pick up ends of rope in each hand and curve into a circle, crossing ends at top. 4. Twist ends once and lay down over bottom of circle. 5.
DOUGHS Butter-Rich Roll & Bread Dough Traditional Loaf BUTTER-RICH ROLL & BREAD DOUGH 1 cup 1/3 cup 4-1/2 Tbsp. 1 Water Butter Sugar Large Egg 3/4 tsp. 3-1/3 cups 3 Tbsp. 1-1/2 tsp. Salt Bread Flour Dry Milk Active Dry Yeast Egg Glaze: 1/2 Egg, beaten 2 tsp. Water Pan Rolls Cloverleaf Rolls Method 1. Measure all ingredients except yeast into the baking pan in order listed above. Tap the baking pan firmly to level ingredients.
DOUGHS Cinnamon-Raisin Rolls Cinnamon-Raisin Swirl Loaf Bread Sticks CINNAMON-RAISIN ROLLS Prepare Butter-Rich Roll & Bread Dough. 1. Turn dough onto lightly floured board. Divide dough in half. 2. Roll each half into a 8 X 9 inch rectangle. Spread surface with 1/4 cup butter, thinly sliced. 3. Sprinkle surface with 1/4 cup brown sugar, 1 teaspoon cinnamon. Then sprinkle 1/3 cup raisins over dough. 4. Start with 8-inch side and roll dough jelly-roll style, pinch seam to seal.
WHOLE GRAIN(BASIC, WHEAT, TROUBLESHOOTING GUIDE QUICK WHEAT) This Troubleshooting Guide was created to help you through any difficulties you may encounter as you learn to use your new Zojirushi Home Bakery SUPER. Be patient. If, at first, the results of your baking are not completely satisfactory, please consult this guide. In most cases, you will find the solution, as well as the answers to any question you may have.