How to Enjoy your Home Bakery Operating Instructions BBCC – S15A CONTENTS Important Safeguards Welcome To The Zojirushi Home Bakery Other Safety Tips From Zojirushi Description Of Parts Control Panel Settings Setting The Clock How The Home Bakery Works Bread Settings Overview Lengths Of Cycles: Yeast Breads Cakes And Jams Let’s Start Baking With Basic White Bread White/Whole Grain Setting Quick Baking Setting Raisin Bread Setting French Bread Setting Dough Setting Cake Setting Jam Setting Home Made Menu H
IMPORTANT SAFEGUARDS Important Safeguards WHEN USING ELECTRICAL APPLIANCES, BASIC SAFETY PRECAUTIONS SHOULD ALWAYS BE FOLLOWED, INCLUDING THE FOLLOWING: 1. Read all instructions carefully. 2. Do not touch hot surfaces. Use handles or knobs. Do not close or clog the steam vent opening under any circumstances. 3. To protect against electrical shock, do not immerse cord, plug, or baking machine in water or other liquid. 4. Close supervision is necessary when the appliance is used by or near children. 5.
WELCOME TO THE ZOJIRUSHI HOME BAKERY Welcome to the Zojirushi Home Bakery Congratulations! With the HOME BAKERY in your kitchen, you’re ready to enjoy preparing freshly baked yeast breads, luscious cakes and fruitful jams anytime at all with a minimum of effort. Whether you’re an experienced baker or a novice, you’ll find it easy and satisfying to bake with the HOME BAKERY. Take the time to read this booklet and learn how simple your machine is to operate.
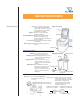
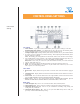
DESCRIPTION OF PARTS Description Of Parts Major Parts Names Lid: To open, push up gently on front with your thumbs. Lid should be closed during operation except when Lid extra ingredients are being added. Lid detaches for cleaning. Window: Allows you to check machine Window operation at all times. Storage compartment: Is located on top left of machine, behind the lid. Measuring cup, spoon, kneading blade and kneading rod are stored here. Front panel: Computerized panel allows fingertip programming.
CONTROL PANEL SETTINGS Control Panel Settings Top of Panel 1 2 3 4 5 6 7 Timer Indicator - Lights green when the Home Bakery has been preset for baking at a later time Preheating/Operation Indicator - The light flashes in red as the unit is in the Preheating mode. When the machine has been programmed to begin, the light illuminates in red. Cooling/Complete Light - The light flashes yellow when your bread, cake, or jam is finished. When the cooling cycle has completed, the machine will beep.
SETTING THE CLOCK Setting the Clock The Home Bakery has a built-in lithium battery which operates the clock and memory functions even when the machine is not plugged in. (For additional battery information see page 16.) The Clock is a 24-hour clock: 12:00 means noon, 0:00 means midnight. For times after noon, subtract 12 hours from the time. For example, 17:00 would be 5:00 PM or 17 minus 12. (The clock is preset to 6:00 AM Pacific Standard Time at the time of shipment from the factory.
HOW THE HOME BAKERY WORKS How the Home Bakery Works Read this section thoroughly to understand how to select the course you desire for superb results with our recipes and yours. The Home Bakery allows you to choose from eight different settings, depending on the type of recipe you’re using.
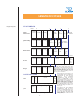
LENGTH OF CYCLES French Dough Cake Jam Resting Preheating First 5~15 min. kneading Second kneading Preheating First 5~15 min. kneading Second kneading CAKES AND JAMS First Secmix- ond ing mixing Preheating 15 min. Stirring down Second rising 70 min. 3 4 Baking Cool50~ ing Cycle length 55 min. /Com- 3 hrs / 50 min. pletion Second Baking Cool50 rising ing Cycle length 45 min. min. /Com2 hrs / 50 min. pletion Stirring down Second Rising kneading Preheating First 5~15 min.
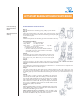
LET’S START BAKING WITH BASIC WHITE BREAD Let's Start Baking With Basic White Bread White/Whole Grain Setting WHITE/WHOLE GRAIN SETTING Step 1: Open the lid and remove the baking pan by pulling up on the handle. Step 2: Attach the kneading blade to the rotating shaft; push down firmly. Insert the kneading rod into the hole at the side of the baking pan and push tightly to lock the fins in place.
QUICK BAKING SETTING/RAISIN BREAD SETTING Let's Start Baking With Basic White Bread Quick Baking Setting Raisin Bread Setting QUICK BAKING SETTING Step 1: Use BASIC WHITE BREAD recipe on page 8, substituting 2 teaspoons of RAPID RISE YEAST for the 2 teaspoons of active dry yeast the recipe calls for. Step 2: Press SELECT COURSE key until the display panel arrow points to QUICK BAKING setting. Press START. The bread will be ready in 2 hours and 50 minutes.
FRENCH BREAD SETTING/DOUGH SETTING Let's Start Baking With Basic White Bread French Bread Setting Dough Setting FRENCH BREAD SETTING Step 1: Remove baking pan by pulling up on the handle. Attach kneading blade to rotating shaft; push down firmly. Insert kneading rod into hole at side of baking pan and lock tightly in place. Step 2: Measure ingredients and place in baking pan in the order listed in the recipe book.
CAKE SETTING/JAM SETTING Let's Start Baking With Basic White Bread Cake Setting Jam Setting CAKE SETTING Step 1: Remove baking pan by pulling up on the handle. Attach kneading blade to rotating shaft; push down firmly. Insert kneading rod into hole at side of baking pan and lock tightly in place. Step 2: Place cake mix in baking pan; add liquid and eggs in quantity that the package directs. Insert pan into machine with kneading rod facing front panel and handle folded toward front.
HOME MADE MENU Home Made Menu Home Made Menu Memory Using the Home Made Menu This “custom course” is for yeast bread recipes only. It allows you to set your own kneading, rising, baking and cooling times for your own particular favorite recipe. This can be a benefit for those with special dietary needs such as diabetics or wheat or gluten allergies. This cycle is especially well-suited to making heavier breads such as fruit bread and dark breads which often call for longer rising and baking times.
HOME MADE MENU Home Made Menu Using the Home Made Menu Resetting the Home Made Menu To Use a Home Made Menu in Memory When the displayed time reaches “30” or your desired time for KNEAD 1, push “CYCLE” key to advance to the next cycle. Please refer to the time chart below for our 100% Whole Wheat recipe. Function: Preheating Knead 1 Rest Knead 2 Rise 1 Rise 2 Bake Cooling Time available on this setting: 5-15 min.* 30 min. 70 min. 1 min.** 60 min. 60 min. 50 min. 20 min.
HOME MADE MENU Home Made Menu How to Set and Use Daily Timer for Baking Bread Using the Timer HOW TO SET AND USE DAILY TIMER FOR BAKING BREAD For those who bake bread often and want to have their bread finished and ready to eat at a certain time each day, such as at 7:00 AM for breakfast or 6:00 PM for dinner, the DAILY TIMER makes this simple. Once it is programmed as below, all you need do is press DAILY TIMER and your timer will be set.
HOME MADE MENU Home Made Menu Cleaning the Machine and Baking Pan Storing the Home Bakery About the Lithium Battery If the Power Goes Off CLEANING THE MACHINE AND BAKING PAN Since dust and crumbs left inside the unit may cause scorching or uneven baking with the next use, be sure to clean the baking pan and the machine thoroughly each time you use the Home Bakery. Do not immerse the Home Bakery or the baking pan in water or other liquids.
QUESTIONS AND ANSWER Questions & Answers Q. May I open the lid during operation: A. You may open the lid for short times during the kneading to add ingredients and to make sure the dough is neither too dry nor too wet. At this time a tablespoon or so of either liquid or flour added may make the consistency perfect. It is not good to open the lid during rising and baking because heat will escape and cause less than perfect results in the bread. Q.
QUESTIONS AND ANSWER Questions & Answers Q. What should I do if I make a mistake in setting the course for baking? A. Press and hold the RESET button to reset the CRUST CONTROL, SELECT COURSE or other settings. Q. Why can’t raising, nuts, dried fruits and other coarse ingredients be added at the beginning of baking breads and Cakes? A. With the mixing and kneading action of the machine, ingredients such as raisins and dried fruit tend to become mashed and misshapen.
WHOLE GRAIN(BASIC, WHEAT, TROUBLESHOOTING GUIDE QUICK WHEAT) This troubleshooting guide was created to help you through any difficulties you may encounter as you learn to use your new Zojirushi Home Bakery. Be patient. If, at first, the results of your baking are not completely satisfactory, please consult this guide. In most cases, you will find the solution, as well as the answers to any questions you may have.