How to Enjoy the Zojirushi Home Bakery Operating Instructions BBCC – S15 CONTENTS Important Safeguards Welcome to the Zojirushi Home Bakery Special Features of the Home Bakery Front Panel Settings Setting the Clock How the Home Bakery Works Settings for Yeast Breads Settings for Quick Breads, Cakes & Jams Settings for Creating Your Own Recipes Start Baking! Quick Start White Bread Basic Steps for Yeast Bread Settings For Cake Setting For Jam Setting Resetting the Machine The Home Made Menu Setting Resetti
IMPORTANT SAFEGUARDS Important Safeguards WHEN USING ELECTRICAL APPLIANCES, BASIC SAFETY PRECAUTIONS SHOULD ALWAYS BE FOLLOWED, INCLUDING THE FOLLOWING: 1. Read all instructions carefully. 2. Do not touch hot surfaces. Use handles or knobs. 3. To protect against electrical shock, do not immerse cord,. plug, Home Bakery, lid, or baking pan bottom in water or other liquid. 4. Close supervision is necessary when the appliance is used by or near children. 5.
WELCOME TO THE ZOJIRUSSHI HOME BAKERY Welcome to the Zojirushi Home Bakery Congratulations! With the HOME BAKERY in your kitchen, you're ready to enjoy fresh-fruitful jams any time, and with a minimum of effort! Whether you're experienced scratch baker or a novice, you're find baking easy and fun with the HOME BAKERY. Take a bit of time to read this booklet to learn how easy it is to operate your machine, then choose one of our simple recipes to begin using the HOME BAKERY.
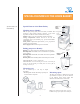
SPECIAL FEATURES OF THE HOME BAKERY Special Features of Home Bakery Special Features of the Home Bakery Major Parts Names Machine parts to identify: Lid: To open, push up gently in the front with your thumb. This should be closed during machine operation, except when ingredients are added. Lid can be detached for cleaning. Window: Allows you to check machine operation at all times. Storage compartment: Behind and left of the lid, this compartment stores your measuring cup,.
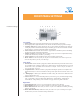
FRONT PANEL SETTINGS 1 Front Panel Settings 2 3 4 5 6 7 12 13 8 9 10 11 14 15 Top of Panel: 1 "Timer" light: Lights green when machine has been pre-set for baking at a later time. 2 "Preheating/Operation" light: Illuminates in red when the machine has been programmed to begin. 3 "Complete" light: Flashes yellow when bread, cake, or jam is finished. The flashing stops when the cooling-off period has ended and machine beeps.
SETTING THE CLOCK Setting the Clock The clock is on a 24-hour clock; so 12:00 means twelve noon, while 24:00 means twelve midnight. For times past twelve noon, subtract 12 from the time; for example, 17:30 would be 17 - 12, or 5:30 p.m. (The clock is preset at 6:00 a.m. of the Pacific Coast Standard Time (PST) at the time of shipment from the factory.) Example: Setting clock to 9:15 a.m. Step 1: Press the "Time Setting" bar 3 times; the present time indicate on the display panel will blink.
HOW THE HOME BAKERY WORKS How the Home Bakery Works Read this section thoroughly to understand how to select the course you desire for superb results with our recipes and yours. The Home Bakery allows you to choose from eight different settings, depending on the type of recipe you're using. Settings for Yeast Breads include: • Basic White Bread For any ordinary yeast bread recipe; this is the setting you'll use most often. It takes about 3 hours and 50 minutes from start to finish.
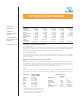
SETTINGS FOR YEAST BREADS Setting for Yeast Breads Settings for Creating Your Own Recipes Settings for Quick Beads, Cakes & Jams Included Cake/Jam Process Functions: Settings: White Bread Preheating 5-15 min. First kneading 10 min. Resting 5 min. Second kneading 20-25 min. Rising 35 min. Stirring down 5 sec. Second rising 70 min. Baking 50-55 min. Cooling/ 13-38 min. Completion Cycle length 3 hr./50 min. Quick Baking 5-15 min. 10 min. 5 min. 20-25 min. 5 min. 5 sec. 45 min. 50 min. 13-38 min.
START BAKING! QUICK START WHITE BREAD Start Baking! Here's a fast way to start using your Home Bakery. Follow this step-by-step method to make our Basic White Bread recipe. Quick Start White Bread Step 1: Remove baking pan from unit by pulling it up and out of the unit with the handle. Attach kneading blade to the rotating shaft.
BASIC STEPS FOR PROGRAMMING YEAST BREAD SETTINGS Basic Steps for Programming Yeast Bread Settings For Basic Bread Setting For Quick Baking Setting For Basic White Bread Setting: Step 1: Remove baking pan by opening the machine lid and holding baking pan by its handle. Attach the kneading blade to the rotating shaft (see diagram on page 4). Insert the kneading rod through the outside of the baking pan by fitting the two small fins of the kneading rod to the slots in the outside hole on the baking pan.
BASIC STEPS FOR PROGRAMMING YEAST BREAD SETTINGS Basic Steps for Programming Yeast Bread Settings For Raisin Bread Setting For French Bread Setting For Dough Setting For Raisin Bread Setting: Step 1: Follow steps 1 through 5 for the "basic White Bread" setting, reserving ingredients to be added later, according to your recipe. Step 2: Press Select Course bar until the display panel arrow points to the "Raisin Bread" setting. If you wish to start the cycle immediately, press "Start.
BASIC STEPS FOR PROGRAMMING YEAST BREAD SETTINGS Basic Steps for Programming Yeast Bread Settings For Cake Setting For Jam Settins Resetting the Machine For Cake Setting: Step 1: Follow steps 1 through 4 for Basic White Bread setting. Step 2: Ignore Baking Degree setting. Press Select Course until arrow points to "Cake" setting. (Arrow should not be blinking; if it blinks, keep pressing until a non-blinking arrow points to "Cake.") Step 3: Press "Start." The panel will display the present time.
THE HOME MADE MENU SETTING The Home Made Menu Setting Creating Home Made Menu Programing and Time Setting CREATIVE HOME MADE MENU PROGRAMMING AND TIME SETTING For the Home Made Menu Setting: Use ONLY for making yeast breads. Before using this setting, read "Setting for Creating Your Own recipes" on page 8. Note that one of the preset yeast bread settings may also be appropriate for your won recipe.
THE HOME MADE MENU SETTING The Home Made Menu Setting Resetting the Home Made Menu: Resetting the Home Made Menu To Use a Home Made Menu in Memory: To Use a Made Menu in Memory How to Set the Memory Timer To Bake Bread Using the Memory Timer The "Home Made Menu" can be reset by following steps 1 through 8 above. Note that the previous menu set will be erased by setting a new "Home Made Menu." (Only 1 cycle setting can be set in memory at one time.
THE HOME MADE MENU SETTING The Home Made Menu Setting To Bake Bread Using Timer, Not Memory Timer To Bake Bread Using the Timer, Not Memory Timer: When you want to set the timer to start the Home Bakery at a specified time, not at a time you have programmed into memory, follow these steps. Note that recipes that call for milk should not be programmed more than 4 hours ahead; recipes calling for eggs should no be used with this function for food safety reasons. Step 1: Same as for Memory Timer.
THE HOME MADE MENU SETTING The Home Made Menu Setting When the Power Goes Off When the Power Goes Off If power in interrupted and returns after more than ten minutes, the cycle will stop and the "completion Time" indication on the display panel will blink. Of the timer had been set, and it has passed the starting time by more than 10 minutes, the panel display will blink "Completion Time" and the machine will start the cycle.
WHOLE GRAIN(BASIC, WHEAT, TROUBLESHOOTING GUIDE QUICK WHEAT) RESULTS: CORRECTIONS: MECHANICAL Water Increase or Milk Salt Liquid INGREDIENT 2 Tbs. 2 Tbs. Increase 1/4 tsp. 1/4 tsp. Decrease Decrease Yeast Flour Yeast 2 Tbs. Decrease Sugar or Increase Honey Flour Ingredients Loaf can't Loaf rises Loaf rises Loaf does Loaf is Light crust. Uncooked. Over Not mixed. Smoke High leaked from be removed then falls. too high. not short cooked. appears altitude rise enough. and heavy. from vent.