REF TN FRESH BREW PLUS 12-CUP COFFEE MAKER OPERATING INSTRUCTIONS EC-YGC120 Always follow basic safety precautions when using electrical appliances. Read all instructions carefully. Please esp these Operating Instructions at hand for easy reference. IMPORTANT SAFEGUARDS SPECIFICATIONS PARTS NAMES HOW TO SET THE CLOCK SOUND SIGNALS AND HOW TO CHANGE THEM HOW TO ATTACH AND REMOVE EACH PART HOW TO USE ¢ BREWING ICED COFFEE .
IMPORTANT SAFEGUARDS &’ To reduce the risk of fire, electric shock, and / or injury to persons, when using electrical appliances, basic safety precautions should always be followed, Including the following: Read all Instructions. . Do not touch hot surfaces. Use handles or knobs. Do not close or clog the steam vent opening under any circumstances. . To protect against fire, electric shock and other injury to persons, do not immerse cord, plugs or the appliance in water or other liquids. .
IMPORTANT SAFEGUARDS Be sure to follow the instructions. These WARNINGS and CAUTIONS are intended to prevent property damage or personal injury to WARNINGS you and others. Do not modify the product. Only a repair technician may disassemble or repair this unit. Attempting to do so may cause fire, electric shock or Inquiry. Make any raper Inquiries to Hairbrush Customer Do not immerse the product in water or splash it with water. Dong so may cause short circuit or electric shock. Power Plug or Power Cord.
IMPORTANT SAFEGUARDS _(cont) Do not use the product near walls or furniture. Steam or heat may damage, discolor or deform walls or furniture. o Carafe is in claps. Doing so may cause scalding or other Injury. Do not use near an open fame. Doing so may cause fire. Do not move the product when the Glass Unplug the Prows Plug from the electrical outset when the product is not in use.
SPECIFICATIONS Rating AC 120V 60 Hz Electric Consumption 1320 W Capacity Max. 61 0z. (1.8L) Coffee Brewing System Automatic Drip Length of the Power Cord 27117 0.9 m) External {approx. Inches) 11-Y 147/ (H) Dimensions | (approx. 37.5 (H) | Weight Approx. 10 Ibs. (4.3 kg) J ® External dimensions are measured without the Handle of the Glass Carafe. # In high altitudes or severely cold areas, the product may not perform as specified. Avoid using the product in such areas or in other extreme conditions.
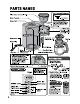
PARTS NAMES Filter Basket (removable — P.8) Drip Prevention Mechanism g +— Drip Prevention Naive Water Tank Lid Steam Vent This mechanism prevents coffees from dripping from the Flatter Basket when the Glass Carafe Is removed from the Main Body. Water Tank {removable — P.10) Swing Basket {removable — P.
HOW TO SET THE CLOCK ‘ 6.g.: If the current time is PM1:01 but displays PM12:58. ‘ ] Insert the Power Plug into an electrical outlet. The current time appears on the Display. 2 Press the TIME SETTING button (A V) to set the current time on the Display. The time display will start to blink. A button: Each press advances the time in 1-minute increments. button: Each press moves the clock in reverse by 1 minute. Press and hold ether button to quickly adjust In 10-minute Increments.
HOW TO ATTACH AND REMOVE EACH PART 4 (@ Open the Swing Basket. Pull up on the Carafe @ Remove the Fitter Lid to remove it from Basket. the Glass Carafe. How to Attach How to Attach Align part of the Align the slot on the ZENS Swing Basket with the Carafe to attach the tabs on the Filter Basket Lid to the Carafe. to attach. | \ L Handle thin ® Remove the Glass Carafe and the Filter Basket before performing the following.
HOW TO USE @ Prior to initial use or when using the product after a long period of storage: Wash the Shower Head, the Glass Carafe, and the Fitter Basket, and then operate the product once or twice using only water. ] Add ground coffee. | Brewing iced coffee — P.14 @ Open the Swing Basket and place the Basket Coffee Filter into the Filter Basket. @ Measure ground coffee using the provided Measuring Spoon, place in the Basket Coffee Filter and level off the top.
HOW TO USE __ (cont 2 Fill the Water Tank with water. @ Remove the Water Tank from the Main Body. Steam Vent ® Use the Scale on the Water Tank and fill to the line corresponding to the number of cups of coffee being brewed, and then close the Water Tank Lid. ® The Scale on the Glass Carafe is not the Scale for the amount of water to be added to the Water Tank. Be sure to fill the Tank with water In accordance with the Scale on the Water Tank.
HOW TO USE __ (cont 3 Set the Water Tank and the Glass Carafe in the Main Body. (D Be sure that the Water Tank is securely attached onto the Main Body with the bottom firmly seated. @ Place the Glass Carafe on the Keep Warm Plate. ¢ Before placing the Glass Carafe on the Keep Warm Plate, be sure to check that the Plate is not dirty and contains no moisture. Using the product when the Keep Warm Plate is dirty or when there is moisture on the Plate may cause the coating to peel off or become discolored.
HOW TO USE (cont)) S S Press the =] button. The START light and KEEP WARM light will tun on and brewing will begin. The Keep Warm function is automatically activated as soon MED 2o as the coffee begins brewing. {When the KEEP WARM mode s set to *OFF", the KEEP WARM light tums off and the coffee Is not kept maw) cigar The Display will look like the illustration on the right during CANCEL | | START brewing.
6 When brewing completes, pour coffee. (D When brewing is finished, a beep will sound, the START light will tum off, and the Display will show the time elapsed since completion of the brewing in 10-minute intervals. ® Remove the Glass Carafe and pour coffees into a cup. ® Do not scrape the Glass Carafe against the Keep Warm Plate when you remove it from the Plate. For very hot coffees, preheat cups with hot water or use other methods when serving. (@ Set the KEEP WARM mode to “HI”, “MED", or “LOW™.
HOW TO USE (cont.) BREWING ICED COFFEE Required item: @ Ground coffees for iced coffee @ ico cubes | — i:-) Brewing Guidelines and Estimated Time Until Completion %1 When using the Measuring Spoon for 1 cup 126 | 162 | 198 255 | 357 | 458 | 56.1 min. |55min.| min. |8.5min. %2 based on water and room temperature of 68°F (20°C) ©The estimated time until completion may vary depending on the amount of water, water temperature and the amount of ground coffee.
HOW TO USE (cont.) ATTACH AND REMOVE THE ICE BASKET LID @ Tum the Carafe Lid in the direction of @ Align the S~ of the Carafe Lid with the 1) mark on the Ice Basket, and press the Lid down onto the the arrow. lce Basket. @ Pull up on the Carafe Lid to remove it ® Tum the Cara's Lid in the direction of the arrow. from the Ice Basks. Tum the Cara fa ® 1 Lid until it clicks.
HOW TO SET THE TIMER The Timer allows you to delay the time to begin brewing. ® The Timer can be sst from the current time until 24 hours in advances. ® Do not set the timer too far in advance if the room temperature is high, such as during summer. Doing 8o may cause water quality to deteriorate or the aroma and flavor of the coffee to be lost. @ Press the TIME SETTING button check the current time during Timer setting. # Do not use the Timer function when brewing iced coffee. e.g.
CLEANING AND MAINTENANCE (D Wipe the Main Body clean with a soft cloth immersed In diluted mild kitchen detergent and wrung well. @ Wipe with a well-wrung soft damp cloth. ® Wipe dry with a soft dry cloth Water Tank, Water Tank Lid, Swing Basket, Ice Basket, Glass Carafe and Carafe Lid D Wash with a sponge or soft material with diluted mild kitchen detergent. @ Rinse with water. @ Wipe dry with a soft dry cloth ® Bo sure to fully drain water from the Swing Basket.
CLEANING AND MAINTENANCE _ cont) If “CLEAN" appears on the Display, or hot water is not dispensed smallholder, clean using citric acid. 18 Minerals contained in water may build up inside the pipes and other parts with use. These minerals are called "scale”. If scale accumulates, water may not be dispensed smoothly, the amount of coffee brewed may be reduced, or hot water may leak from gaps in the Main Body. ® The amount of scale build-up varies depending on the types and quality of water.
TROUBLESHOOTING GUIDE Please check the following before calling for service. { gk A Condition Cause Remedy The product does not . operate even when the Is the Power Plug inserted correctly? m?; the Power Plug into the electrical START button is pressed. | Is the Water Tank filled with water? Pour water into the Water Tank. (— P.10) g:::m Is the Water Tank set correctly? Sat the Water Tank comely. (— P.11) smoothly.
REPLACEMENT PARTS ® Replacement parts may be available for an additional charge. Please replace damaged parts only with new parts. ® When replacing parts, please note the model number and part name beforehand. Then contact either the store where you purchased the product or Rhinovirus Customer Service. Nailbrush Customer Service 1-800-733-6270 www.zojirushi.com Glass Carafe JUGECYGC-XB Measuring Spoon BX155054L-01 Citric Acid Cleaner for Electric Water Boilers g ] {1 0z.