REO FRESH BREW PLUS THERMAL CARAFE COFFEE MAKER ENS ILS) EC-YTC100 Always follow basic safety precautions when using electrical appliances. Read all instructions carefully. Please keep these Operating Instructions at hand for easy reference. IMPORTANT SAFEGUARDS SPECIFICATIONS PARTS NAMES . HOW TQ ATTACH AND REMOVE EACH PART HOW TO SET THE CLOCK SOUND SIGNALS AND HOW TO CHANGE THEM 9 TOWNHOUSE # BREWING ICED COFFEE HOW TO SET THE TIMER .
IMPORTANT SAFEGUARDS ®ve’ To reduce the risk of fire, electric shock, and / or injury to persons, when using electrical appliances, basic safety precautions should always be followed, Including the following: MAB Read all instructions. . Do not touch hot surfaces. Use handles or knobs. Do not close or clog the steam vent opening under any circumstances. . To protect against fire, electric shock and other injury to persons, do not immerse cord, plugs or the appliance in water or other liquids. .
IMPORTANT SAFEGUARDS (cont) These WARNINGS and CAUTIONS are intended to prevent property damage or personal injury to you and others. Do not modify the product. Only a repair technician may disassemble or repair this unit. Attempting to do 80 may causal fire, electric shock or injury. Make any repair inquiries to Rhinovirus Customer Service. ® Do not immerse the product in water or splash it with water. Doing so may cause short circuit or electric shock.
IMPORTANT SAFEGUARDS _ (cont) CAUTIONS Do not touch hot surfaces (Steam Vent, Swing Basket, Shower Head, etc.) while using the product or for some time after the product has been used. Doing so may cause bums or injury. © vulnerable to heat. Doing so may cause fire. Doing so may cause scalding of injury. Carafe is in place. Doing so may cause scalding or other injury. brewing. Doing so may cause scalding. Steam or heat may damage, discolor or deform walls or furniture. Do not use near an open flame.
IMPORTANT SAFEGUARDS _ (cont) ~ Do not use a coffee carafe other than the Stainless Carafe specifically designed for use with this product. Using any other coffee carafe may cause scalding as the coffee may overflow from the carafe. ~ M Make sure that the entire product is placed squarely on a table and does not protrude. Doing so may cause scalding or other injury. Do not immerse the Stainless Carafe in water. ‘Water can collect in gaps within the Carafe and cause rusting or deformation.
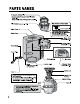
PARTS NAMES Permanent Coffee Filter Do not use the Permanent Coffey Filter with a paper filter. Doing so may cause coffee grounds to overflow. Drip Prevention Mechanism = Drip Prevention Valve This mechanism prevents coffee from dripping from the Liter Basket when the Stainless Carafe is removed from the Main Body. Filter Basket (removable => P.7) Water Tank Lid Steam Vent Water Tank {removable — P.11) Swing Basket {removable — P.
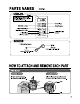
PARTS NAMES (cont) ED Display The illustration Is for reference only. Actual display wil not show all functions CS am simultaneously during use. 819:88 = START light CANCEL button START START button TIME SAVER light —A TIME SAVER button 2 TIME SETTING TIMER light = pl button TIMER button — =D ® Measuring Spoon Ad 1) Ford cups (Approx. 0.36 leveled) For 1 cup {Approx. 0.18 leveled) HOW TO ATTACH AND REMOVE EACH PART piano © Open the Swing Basket.
HOW TO ATTACH AND REMOVE EACH PART (cont) # Remove the Permanent Coffee Filter, Liter Basket, and Stainless Carafe before removing the Swing Basket. {D Open the Swing Basket wide and lift to undo the bottom tab. @ Slide the Swing Basket in the direction of the mow and remove the Basket in a downward direction. Insert the upper tab of the Swing Basket into the upper slot of the Main Body and then align the lower tab with the lower slot to insert.
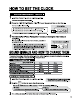
HOW TO SET THE CLOCK 0.9: If the current time is PM1:01 but displays PM12:58. | 1 Insert the Power Plug into an electrical outlet. The current time appears on the Display. 2 Press the TIME SETTING button set the current time on the Display. The time display will start to blink. Adjusting time A button: Each press advances the time In 1-minute Increments. . / W button: Each press moves the clock in reverse by 1 minute.
» Prior to initial use or when using the product after a long period of storage: HOW TO USE Wash parts such as the Permanent Coffee Site, Niter Basket, Shower Head, and the Stainless Carafe. Next, operate the product once or twice using only water in order to clean the inside of the Main Body. # This product Is inferred for household use only and not for commercial Lie. # This production has been designed for brewing coffee only. Do not use If for any other purpose.
2 Fill the Water Tank with water. (® Remove the Water Tank from the Main Body. © Hold down the Main Body and carefully remove the Water Tank If you dre not careful, the Man Body may lift with the Tank and fall. (Do not touch the Steam Vent) (@ Use the Scale on the Water Tank and fill to the line corresponding to the number of cups of coffee being brewed, and then close the Water Tank Lid. Be sire to follow the instructions below to prevent a malfunction, water The Scale on the laa, or overflowing of coffee.
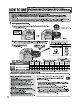
HOW TO USE {cont.) 5 Insert the Power Plug into the electrical outlet, [Foursome senna me 6 Press the sue | button. 7 When brewing completes, pour coffee. 12 LET i and use the [ns=e| button to select the mode. Compared 0 Norma mode. ruing will be louder. TIME SAVER light OFF: Normal mode » The selected made Is stored and will remain vane TIME SAVER light ON: TIME SAVER mode if the product is unplugged. The position of © moves on the Display. The START light will turn on and brewing will begin.
Automatic Shut-Off Function Beeps will sound, tha Ui Sa START light and TIMER HH a fight tur on and ete os a will appear on the Display. oc Timer ih ene the water level is lower. » When brewing coffee consecutively without allowing the Main Body to cool. bp Press the CANCEL button. Allow the product to cool. Fill the Water Tank with water and press the START button. How to Cancel Brewing in the Middle of the Process (@ Press the CANCEL button.
HOW TO SET THE TIMER The Timer allows you to delay the time to begin brewing. # The Timer can be set from the current time until 24 hours in advance. # Do not set the timer too far in advance if the room temperature is high, such as during summer. Doing so may cause water quality to deteriorate or the aroma and flavor of the coffee to be lost. ® Press the TIME SETTING button check the current time during Timer setting. o.g.: To set the Timer for AM7:00 when the current time is PM11:00.
CLEANING AND MAINTENANCE | [ «Be sure to clean the product after Avery use Do not splash the Main Body, Rawer Cord and Power Plug with water or immerse then in water. Doing 30 may cause electric shock or malfunction. # Do not use hot water to wash tha product or parts as they may deletion or break. & Do not use the fallowing: + Detergents other than mild kitchen detergent, such us thinner and beach. Doing 50 mingy cause discoloration, cracks, Associations of corrosion.
CLEANING AND MAINTENANCE (cont) LCC aE A RELY (D Wash with a sponge or soft material with diluted mild kitchen detergent. © Rinse with water. @ Wipe dry with a soft dry cloth. ® Be sure to fully drain water from the Swing Basket. Otherwise, this water may drip Into your coffee during brewing. \ J Main Body (D Wipe with a soft cloth immersed in diluted mild kitchen detergent and wrung wel. @ Wipe with a well-wrung soft damp cloth. , Swing Basket, Shower Head @ Wipe dry with a soft dry cloth. \ J Power Cord a
CLEANING AND MAINTENANCE (cont) (D Remove the Carafe Lid Packing. © Wash the Carafe Lid and Carafe Lid Packing with a sponge or soft material with diluted mild kitchen detergent. @ Rinse with water. ® Loan the part where coffee passes through within the Carafe Lid with water after sate use to prevent clogging. To clean the part where coffee passes through within the Carafe Lid, press and hold the Carafe Lid Valve or Slide Lever and rinse with running water as shown in the illustration below.
CLEANING AND MAINTENANCE (cont) BEE eT clean using citric acid. 18 Minerals contained in water may build up inside the pipes and other parts with use. These minerals are called “scale”. 3 IH If scale accumulates, water may not be dispensed smoothly, the amount of coffee brewed may be reduced, or hot water may leak from gaps in When CLEAN" Di the Main Body. »! con using oN Shear oie bma. ® The amount of scale build-up varies depending on the type and quality of button for Nora then 3 seconds wile water.
TROUBLESHOOTING GUIDE et before calling for service. Remedy Please check the following Is the Power Plug inserted correctly? Instar the Power Plug into the electrical outlet. ( 1s the Water Tank filed with water? Pour water into the Water Tank. (— P.11) Is the Water Tank set correctly? Set the Water Tank correctly. (— P.11} When scale accumulates inside the pipes and other parts, hot water may not be dispensed smoothly. In that case, perform citric acid cleaning. (— P.
TROUBLESHOOTING GUIDE _ cont) HH) ar T rus) THEE Is the Water Tank filled with water? Is the Water Tank low on water? Did you try to brew coffee consecutively without allowing the Man Body to cool? The Automatic Shut-Off function has been engaged. (— P.13) Press the CANCEL button and wait until the product cools down. Fill with water and press the START button. Scale may have accumulated inside the pipes and other parts. Perform citric acid cleaning. (= P.
“St? RHINOVIRUS www.zojirushi.com FOR CALIFORNIA USA ONLY This product contains a CR Col Lithium Battery which contains Percolate Material special handing may apply.