RE (ITT MULTICOLORED OPERATING INSTRUCTIONS EL-CAC60 IMPORTANT SAFEGUARDS. eons airs sees es reneger 2 PARTS NAMES AND FUNCTIONS 8 TYPES OF BEEPS 7 REPLACEMENT PARTS 7 BASICS ON HOW TO USE. .8 HOW TO USE: SAUTE/SEAR. SIMMER LOW/BLOW COOK eee ranee 14 WHITE RICE / BROWN RICE / QUINOA YOGURT oo KEEP WARM CLEANING AND MAINTENANCE TROUBLESHOOTING GUIDE ERROR DISPLAYS AND THEIR MEANINGS .
IMPORTANT SAFEGUARDS BASIC SAFETY PRECAUTIONS SHOULD ALWAYS BE FOLLOWED WHEN USING ELECTRICAL APPLIANCES, INCLUDING THE FOLLOWING: 1 Read all instructions thoroughly. 2 Avoid touching hot surfaces and do not close or clog the steam vent opening under any circumstances. The handles are provided for your safety and protection. 3 To prevent hazardous operation or electric shack, do not immerse power cord, power plug, or Multi cooker (except pot and lid) in water or other liquids.
IMPORTANT SAFEGUARDS These WARNINGS and CAUTIONS are intended to prevent property damage or personal injury to you and others. H The degree of danger or damage by the misuse of this product is indicated as follows: /A\WARNING Indicates risk of serious injury or death. /\CAUTION Indicates risk of injury, household or property damage if mishandled, | H Prohibited or required actions are Indicated as follows: S Indicates a prohibited operation. ) 0 Indicates a requirement or instruction that must be followed.
IMPORTANT SAFEGUARDS cont. WARNING Insert the Power Plug completely and securely into the electrical outlet. Colossally inserted Power Plug may cause electric shock, short circuit, smokey of fire. Use only an electrical outlet rated at 15 amperes minimum, and do not plug other devices Into the same outlet. Plugging other devices into the same outlet may cuss the electrical outset to overheat, resulting in fire. If the blades or surface of the Power Plug become dolled, wipe them clean.
IMPORTANT SAFEGUARDS cont, N CAUTION Always unplug the Multi cooker by holding the Power Plug, not by pulling the Power Cord. Pulling the Power Cord to unplug the Multi cooker may cays electric shack, short circuit or fire. Please allow the Multi cooker to cool down before cleaning. Hot parts such as the Lid, Pot, Steam Basket, and Heating Plate may cause bums.
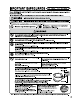
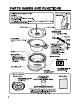
PARTS NAMES AND FUNCTIONS Lid Glass Type: Tempered Glass The Lid can be placed CAUTION standing up. Do not hit or drop. Do not heat up or cool down too quickly. «Handle carefully. +The glass lid is tempered and likely to shatter info small fragments if broken. Do not subject to direct flame. Steam Vent Lid Handle aa» Appliance Plug Pot Handles : 2 = (Located at 2 positions: right & left edge) please remove the Twist Tie holding the Power Cord before use. ® Do not use the Power Power Cord bundled up.
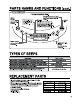
PARTS NAMES AND FUNCTIONS (cont) ~ SEE ® Press buttons down firmly. START/CANCEL button MENU from ey Use 1o start, stop, or cancel button { Thisdisplayisan | Display START Use to sel the ; example only, and | Black lines that may appear on light Msn You wil will not appear in; the LCD when wiped with a doth be using. 1 actual use.
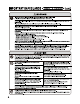
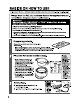
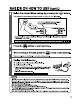
BASICS ON HOW TO USE eo Please wash the Pot, Lid, Steam Basket, and Measuring Cup before Initial use. Always wash the Pot, Lid, and Steam Basket thoroughly before use. © Use mild kitchen detergent and rinse thoroughly with water. IMPORTANT: When cooking with “LOW/SLOW COOK” or “YOGURT” menu settings, use billing water to disinfect the Pot and Lid. < How to Disinfect Using Boiling Water> (® Wash the Pot and Lid well using mild kitchen detergent, then rinse thoroughly with water.
BASICS ON HOW TO USE (cont.) .1 Select the desired Menu setting by pressing the ) button. Each press of the button moves the Indicator around the LCD In the order listed below. , or “ KEEP WARM ” indicators will blink ™ as you scroll past them In the display. @ KEEP WARM @ ¥ ® Press and hold the button to quickly cycle through the selections. It will stop when it reaches the “SAUTE/SEAR” menu setting.
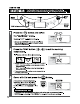
HOW TO USE The “Sauternes” menu setting can be sat to either 410°F or 350°F. Set the cooking temperature as desired. (The cooking time cannot be set.) 10 START MENU Display button light START/ CANCEL TEMP button button Press the (jon) button and select the “SAUTE/SEAR” menu. tr oy a The default “410°F" will blink in the Display. Because the “SAUTE/SEAR” menu is the default menu when the Multi cooker Is plugged In, there Is no need to press the MENU button.
HOW TO USE © Remove the Lid and begin cooking once preheat completes. Preheat is complete when a beep sounds (2 short beeps sound 10 times) and turns off in the Display. © Wait until EEX disappears from the display before adding ingredients. Ingredients may stick if they are added before the display tums off. ER Ca TEE Te] Once preheat completes, oil well and wait 2 to 3 minutes before adding ingredients.
HOW TO USE The “SIMMER” menu chatting can be set to either LOW or HIGH (shown in the Display and Hl). Set the cooking temperature and time as desired. (The cooking time cannot be set when using HIGH.) START MENU button (sew) light START / CANCEL {| button TEMP button + . TIME SETTING ‘# The cooking time can be set Using SIMMER by setting the cooking time only when Using LOW. Press the button and select the “SIMMER ” menu. The default “LO” and “00m” will blink in the Display.
HOW TO USE “End” turns on :i A beep sounds to signal f cooking is complete. ~ summer ld £ d The START light tums off and “End” will n turn on in the Display. After that, press the START/CANCEL button. if the START/CANCEL button is not pressed, “End” will continue to be shown in the Display and the Food Removal Notification Beep will sound (2 rhos! beeps sound twice) approximately 10 minutes later, after which It wl sound In approximately 30-minute Intervals.
HOW TO USE [TE 0 1TH 0 [1] ear bc bbb en START MENU MENU light START / CANCEL button TEMP button TIME SETTING button Press the (jem) button and select the “LOW/SLOW COOK ” menu. The default “200°F” and “00m” will blink in the Display. Press the TEMP button set the cooking temperature. ® Cooking temperature can bs set to 200°F, 180°F, 160°F, or hy * 140°F. The cooking temperature will change each time ®or ® is pressed. 200 TBP TEMP Hoe Press the TIME SETTING button (a) to set the cooking time.
HOW TO USE LOW/SLOW COOK (cont) »i Add ingredients, cover with Lid, and press the & button. A beep sounds and preheating begins. The START light turns on, the blinking * 4” and the temperature and time setting a in the Display will stay on, and [LEZ wil EL tum on. LOW/SLOW BOOK ! 30 Ju Cooking will start once tums off. h m The remaining time until completion will start counting down in 1-minute increments.
HOW TO USE 3]: A The "STEAM" menu setting can be used to steam food. Set the cooking time as desired. (The cooking temperature cannot be set.) START MENU light button START/ CANCEL button TIME SETTING button Press the (jem) button and select the “STEAM” menu. The default “00m” will blink in the Display. Press the TIME SETTING button (a)) to set the cooking time. : Each press reverses the | (2) : Each press advances the Set cooking time time In 1-minus Increments. time In 1-minute Increments.
HOW TO USE TEAM (co Press the button. A beep sounds and preheating begins. The START light tums on, the blinking “4 ” and the time setting in the Display will stay on, and [ITERATE will turn on. Cooking will start once [GIELGUD tums off. The remaining time until completion will start counting down in 1-minute increments. © The time setting will not change during preheating. © If using a recipe other than those in the included Recipe Book, check the progress and adjust cooking time accordingly.
HOW TO USE MELEE Es [eC START MENU it bunion START / CANCEL button Measure the rice/quinoa with the included Measuring Cup. Overfill the Measuring Cup with rice/quinoa, then level off. Clean the rice/quinoa and adjust the amount of water. (@Clean the rice/quinoa before putting it into the Pot. @O0n a flat surface, pour water over the rice/quinca in the Pot, filling to the water level that matches the number of cups of rice/quinoa for the menu setting.
HOW TO USE ITE RICE / BROWN RICE / QUINOA (cont) bier b] we mie Press the button and select the “WHITE RICE, “BROWN RICE”, or “QUINOA” NN menu. uu Tha time remaining until completion will be shown in the Display. * Tho above Is for when "WHITE RICE" menu Is #Tha initial display is the approximate ime when cooking the Te time of it ion varies. maximum amount ¢ re On factors | pu oom of water temperature, voltage, or water Remaining time Press the A beep sounds and cooking begins.
HOW TO USE YOGURT oie osu using te Aeronautical. For detailed instructions, refer to the included Recipe Book. (The cooking temperature and time cannot be set.) MENU button START/ CANCEL button Ingredients earpieces use a commercially available Measuring Cup for cooking (approx. 8 oz. / approx. 240 mL). Whole milk (non-homogenized) 2qt. Plain yogurt with active cultures 1.5 cups (121. 0z) Press the ) button and select the “YOGURT ” menu. “4h00m” will be shown in the Display. (This does not include PREHEAT.
HOW TO USE YOGURT (cont) 7. Cover with Lid and press the button. A beep sounds and cooking begins. The START light switches from blinking to illuminated. The remaining time until completion will start START counting down in 1-minute increments. V A beep sounds to signal cooking is complete. The START light turns off and “End” will tum on in the Display. After that, press the (Turns off) START/CANCEL button.
HOW TO USE START bunion gilt START / CANCEL button Press the button and select : eer WARM the “KEEP WARM” menu. “KEEP WARM” starts blinking in the Display. ® The cooking temperature and time cannot be set. u The elapsed time of Cover with Lid and press fie Warm mods Tr the button. KEEP WARM START n A beep sounds and the Keep Warm made begins. EL u The START light turns on, and “KEEP WARM" will switch from blinking to illuminated in the Display.
CLEANING AND MAINTENANCE ‘itiiissnaai ® Unplug the Multi cooker and allow It to cool down before cleaning. ® Do not use the following: * Detergents other than mild kitchen detergent, such as thinner and bleach. (Using these may cause discoloration, cracks, or degradation.) * Nylon brushes, scrubbing brushes, anything made with metal, melamine sponges, and sponges with a nylon surface. (Using these may damage the surface.) # Do not use polls] ) powder on anything other than the Pot (stainless steel portion).
CLEANING AND MAINTENANCE (cont.) Cleaning and Maintenance of the Pot © Clean the Pot immediately after completion of cooking using mild kitchen detergent, then rinse thoroughly with water. If difficult to clean, refer to “If the Pot is Difficult to Clean” below. + Do not clean the Pot until it has cooled. Doing so may cause bums, deformation of the Pot, or breakage of the Pot Handles. # Cooked food left in the Pot for a long period of time can cause rusting or discoloration.
TROUBLESHOOTING GUIDE Please check the following points before calling for service. problems uee (Polo T oe va buttons do not o Is the Multicolored unplugged? The Pot does not heat | Does the display show “02°? (does not tum on): # Does the display show “End™? — Press the START/CANCEL button. Food was put directly | Putting food and liquids directly into the Main Body may cause malfunction. Contact the store Into the Main Body: where you purchased the product or Hairbrush Customer Service.
TROUBLESHOOTING GUIDE (cont.) bless use {Paints to chy Did you use the Lid? ls the cooking time long enough? Food Is not # Has the Pot become soiled? — Please clean the product. steamed: Did all the water evaporate? — If all the water evaporates during cooking, a safety measure may end cooking even with cooking time remaining. If you will be cooking for a long period of time, add more water partway through cooking.
ERROR DISPLAYS AND THEIR MEANINGS 'anti Display se (Poll che > Blank « If power failure occurs during operation (cooking, Keep Warm) or if the plug is removed, the = . Display will tum off. — When this happens, plug It back In, replace with new Ingredients and a Display: | restart from the beginning. 8 Odd Display: © Unplug the Power Cord from the electrical outlet and plug It In again. 2 © Indicates malfunction.