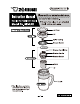
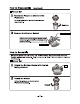
“2 RHINOVIRUS @Be sure that all parks are attached firmly before each use. Name of Each Part [NETS Valve Packing Stopper Gasket Strainer Handle Grip Strainer Handle Strainer Gasket Infuser Lip Handle © The illustrations used in this instruction manual may vary from the actual product you have purchased.
Important Safeguards @ Please follow these instructions to prevent scalding, deterioration and discoloration of beverages, and malfunction or staining of the product. Do not allow infants or slam! children to use the product. Keep out of the reach of infants and small children. Mishandling may cause scalding or other injury. Do not use near open flames from sources such as stoves. Doing so may cause scalding or damage, deformation or discoloration of the product. Do not disassemble the Main Body.
Important Safeguards (continued) @® Please follow these instructions to prevent scalding, deterioration and discoloration of beverages, and malfunction or staining of the product. Exercise caution when removing the Strainer as the Strainer Handle may be hot. Failure to do so may cause scalding. Hold the handle firmly when carrying the product. © Do not {itt the product or carry it on its side. Doing so may cause scalding or stains. * Do not carry the product by the Strainer Handle.
Warnings & Cautions (continued) The product is designed to drink directly from it. Pouring contents inch another container may result In splatter. Leaving hot tea in the product for an extended period of ime may cuss discoloration of the product. Drink contents sooner rather than later. Do not strike the product with an lee peek. or other sharp object. Doing so may damage the product and reduce its ability to maintain heat.
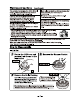
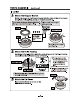
How to Disassemble (continued) H Infuser Set & Rotate the Infuser as shown in the illustration Be sure to allow the Infuser to cool before removing it. 2 Remove the Strainer Gasket Grip this part of the Strainer Gasket wham removing it Be careful not to damage the Staler Gasket Small opening How to Assemble o Be sure to attach the Lid Cover, Lid, Valve Packing, Stopper Gasket, Strainer Gasket, and Infuser properly.
How to Assemble (continued) Ml Lid Set £1} Attach the Stopper Gasket Match the recess on the Stopper Gasket with the ridge of the Lid and push Into place while applying pressure from the outside In. Do not attach the Stopper Gasket upside sown Always attach with this part {Doing 20 may cause beverages to leak) facing upwards. Push along the rim with your finger.
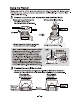
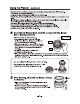
Using the Product forbears use, rinse the Lid Set, Infuser Set, and the Main Body thoroughly with lukewarm water. *The first time you use the product you may notice the smell of plastic. This is normal and will gradually fade away. & Remove the Lid Set and Infuser Set from the Main Body (Remove the Lid Set from the @Remove the Infuser Set. Main Body by muting it counterclockwise as illustrated. 7 Lid Cover Remove 4 lp Do not remove the Lid Cover ably. Make sure ia remove the entire Lid Set.
Using the Product (continued) 3 Pour beverage into the Main Body (Remove the Infuser from the Infuser Set. @Add tea leaves. ee Le Put tea leaves in the Infuser and attach the Strainer. Exercise care to keep tea leaves off the ridge. Failure may result in leakage of the beverage. #Do not place the lea leaves on top of the i ner ! Firmly slog the Strainer, Strainer. @Attach the Infuser Set (or Strainer) to the Main Body and fold down the Strainer candle.
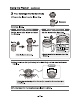
Using the Product (continued) 3p sure that the Lid Over, gaskets, and packing are attached properly before use. {Otherwise, the beverage may leak} Holding the Main Body upright, close the Lid Set family. S Attach the Lid Set properly and tum the product upside down to make sure contents do not sak oif there are too many tea leaves or too much hot water, discard 4 small amount and close the Lid Sat (Refer to "Beverage Level” on p 2) Hot water may splatter when filling, Exercise care to avoid scalding.
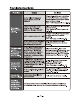
Troubleshooting Guide EE Solution Check the location and orientation of the Valve Packing and Stopper Gasket and verify that thees are no gaps between them. {See “How to Assemble” on p. 5-6.) Clean tha product while referring to the instructions. {See “Caring for Your Product” on p. 11-12) Discard a small quantity so that the product contains the proper quantity. {See "Beverage Level" on p. 2) Wipe dry any water that has collected between the Lid Cover and Lid. Clean the product.
Caring for Your Product *Clan the product after each use io prevent odors and mold, and to keep the product sanitary. e Always disassemble the product before cleaning. (See “How to Disassemble” on p. 4-5.) @D Wash with warm water and mild dish washing liquid using a soft sponge. @Rinse, shake a few times and wipe dry. ; © When washing the Lid Set and Infuser Set, disassemble all parts El first then wash and dry. ACUITY o After cleaning, reassemble the parts. (See “How to Assemble” on LUCY EL p. 56.
Caring for Your Product (continued) 0 ve Rust Spots and r Stains: You may find rust spots or water stains caused by the water quality or impurities in the water inside the Main Body. To remove these stains, fill the Main Body with hot water with 10% vinegar and allow to stand for 30 minutes to an hour without attaching the Lid Set or Infuser Set. Then wash the inside of the Main Body thoroughly. {See “Caring for Your Product’ on p.