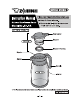
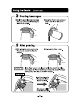
“7 RHINOVIRUS ®He sure that all parts are attached firmly before each use. Pour Lever Stopper Interior @® The illustrations used in this instruction manual may vary from the actual product you have purchased.
Please follow these instructions to prevent scalding, Important Safeguards deterioration and discoloration of beverages, and malfunction or staining of the Carafe. Keep out of the reach of infants and slam! children. Do not allow them to play with this product. Mishandling may cause injury or scalding. Do not use in direct sunlight or near open flames from sources such as stoves. Doing so may cause scalding, deformation or discoloration of the Carafe.
Important Safeguards (continued) Consume beverages within the same day to prevent spoilage. Leaving a beverage in the Carafe for an extended period of time may cause spoilage and increase gas pressure inside the Main Body, causing the Stopper Set to pop off and beverages to spill, resulting in injury. Do not fill the Carafe with the following: © Dry ice or carbonated drinks: The pressure inside the Main Body could rise, causing the Stopper Set to pop off and beverages to spill, resulting in injury.
A ® Before use, rinse the Stopper Set and the Interior VT the Carafe LIRA ETL GEL ORE CI o The first time you use the product you may notice the smell! of plastic. This is normal and will gradually fade away. © Always make sure that the Stopper Packing is properly attached before use. Failure fo do so may cause contents to leak. {See pg. 6 “Removing and Attaching the Stopper Packing” for details.) © Keep the Carafe upright when transporting it.
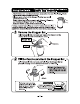
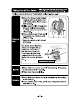
Using the Carafe (continued) Pouring beverages: (D Hold the handle and press down @Keep the Pour Lever pressed the Pour Lever while keeping the down and tilt the Carafe to Main Body upright. pour. \. J (While holding and pressing the (@Release the Pour Lever, Pour Lever, stand the Carafe upright. Tee If the Pour Lever is released while the Carafe is tilted, beverages will sit in the Stopper Set and cause leakage during use, resulting in burns or stains.
Removing and Attaching the Stopper Packing ~ET Remove the Stopper Packing. Stopper Packing \L ~ EEE Attach the Stopper Packing. Align the caress in the Stopper Packing with the ridge on the Stopper and push it into place while applying pressure from the outside in. | The flat | surface / i should be ! Mote the top and bosom of {he Packing and be sure to 22! col y. {Not doing so may cause beverages io leak) Always attach with this part the Stopper Packing to {acing down.
n ® Clean the product after each uss to prevent odors, Taking Care of Your Carafe stain, mold, and to keep the product sanitary. ® Always remove the Stopper Packing before cleaning. (See pg. 8) (D Wash the Stopper and Stopper Packing with warm water and mild dish washing liquid using a soft sponge. @Ali ow water to flow through the Stopper while pressing down the Pour Aver as shown in the illustration. (D Rinse, shake a few times, gently wipe away any moisture, and allow to dry.
Taking Care of Your Carafe (continued) When Cleaning Your Carafe: oDo not use a dishwasher or dish-dryer. Do not boll to sanitize. oDo not clean using paint thinner, metal wire scrub brushes, scrubbing brushes that include abrasive cleaners, polishing powders, cleansers, eraser pads, or other similar items. Doing so may damage the product. ®Do not use chlorine-based bleach. In addition, do not use any kind of bleach, even non-chlorine-based, io clean the outside of the Main Body.