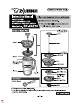
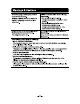
~e.7 RHINOVIRUS Maximum Water Level Line | Coffee Scoop Household Use Only Half-Blocked Filter Plate Mesh @ This product is not leak proof. @ The illustrations used In this instruction manual may vary from the actual! product you have purchased.
Please follow these instructions to prevent scalding, Important Safeguards deterioration and discoloration of beverages, and malfunction or staining of the product. Keep out of the reach of infants and small children. Do not allow them to play with this product. Mishandling may cause injury or scalding. Do not use in direct sunlight or near open flames from sources such as stoves. Doing so may cause scalding, deformation or discoloration of the product.
Please follow these instructions to prevent scalding, Important Safeguards deterioration and discoloration of beverages, and malfunction or staining of the product. Use the product with the Lid Set attached securely, and close the Spout after use. Hot beverages may leak and cause scalding. It may also cause stains. Do not fill the product with a beverage while the Plunger Set is inserted. The beverage may overflow and cause scalding. Follow the points below when pushing down the Knob.
Warnings & Cautions Av old dropping or hitting the product against hard surfaces. Damage to plastic parts or the surface of the Main Body may reduce its ability to retain heat. Follow the points below when cleaning the product. @®Do not use chlorine bleach. Doing so may cause rust, holes, or other damage. ®Do not boil the product or use a dishwasher or dish dryer. Doing so may cause scratches, rust, deformation, or other damage. Do not scrape or rub the design on the Main Body with excessive force.
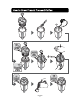
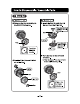
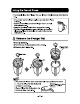
How to Disassemble / Assemble Parts Th (® Remove the Cap by turning in the REMOVE direction. °) REMOVE direction. @ Pull the Filter Set and Lid Set off of the Rod. 7 N { Filter Set | Cap ea @ Insert the Rod through the Lid Set and then the Filter Set. The side with the Lid Cover should face up. The side with the Grit Block Disk should face up @ Turn the Cap in the ATTACH direction. @Twist the Cap all the way so that it is securely locked in place CES Theremin a ATTACH direction.
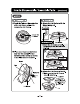
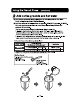
How to Disassemble / Assemble Parts (continued) Ae hits @ Push the Tabs on the underside of the Lid Cover outward to remove the Lid Cover. @ Place your finger on the Notch near the Tab and pull In the direction of the arrow as shown in the illustration to remove. Lid Gasket To Assemble (@ Attach the Lid Gasket with the Ridge facing out. @Almach the Lid Gasket correctly. {Hot beverages may leak and cause scalding) @ Attach the Lid Cover to the Lid. @Make sure that the Lid Cover is securely attached.
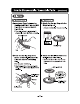
How to Disassemble / Assemble Parts (continued) IL ell Te @ Insert your finger between the Half-Blocked Liter Plate and Grit Block Disk to remove the Grit Block Disk. @You can remove it more easily if you gently press the Tabs outward Grit Block Disk ~) @ Pinch the Sealing Ring at the recess of the Half-Blocked Filter Plate and remove the Sealing Ring. @Do not push the Mesh. @The Sealing Ring may be oily after use. Use a cloth to easily pinch and remove.
Using the French Press s Thoroughly clean the Plunger Set and Interior with lukewarm water before use. #The product may initially have a plastic odor, but this will fade with use. e Make sure that all the parts of the Plunger Set are correctly attached before use. e Keep the Main Body upright when carrying the product. The Spout has a sharp lip to prevent dribbling and assure a clean pour. Please be careful not to touch the Spout when turning the Lid. Remove the Plunger Set @ Lift up the Knob.
Using the French Press (continued) Add coffee grounds and hot water @ Add coffee grounds (medium-coarse or coarse grind) to the Main Body using the supplied Coffee Scoop. @ Add hot water at a temperature of approx. 200-203°F (approx. Stir with a stirrer or similar to make sure the coffee grounds are steeped in hot water. ®Do not add hot water above the Maximum Water Level Line.
Using the French Press (continued) Attach the Plunger Set and steep for 4 minutes @ Turn the Lid Cover In the direction of the arrow to align STEEP PRESS with the Tab. @ Lift up the Knob and align the A with the Spout. @® Insert the Plunger Set into the Main Body. @Make sure that the marks on the Lid and Handle align as illustrated. @ Turn the Plunger Set In the direction of the arrow to align the mark on the Tab to the mark on the Handle.
Using the French Press (continued) Press down the Knob and pour the coffee (@ Slowly press down the Knob, taking about 10-15 seconds. @1f the Knob is difficult to push down, slightly lift the Knob and allow to sit shortly, then press down the Knob again. @Do not press down the Knob with excessive force. (Beverage may overflow.) @ Turn the Lid Cover in the direction of the arrow to align OPEN with the Tab. ® Pour the coffee into a cup.
Taking Care of Your French Press Clean the product after each use to prevent odors, stain, mold, and to keep the product sanitary. The Rod and Filter Set are hot after use. Allow to cool before cleaning. Beverage may pool in the Filter Plate Set after the final pour. Remove the Plunger Set from the Main Body, then tilt the Plunger Set to drain any remaining beverage from the Filter Plate Set before cleaning. o The Spout has a sharp lip to prevent dribbling and assure a clean pour.
Taking Care of Your French Press (continued) When Cleaning Your Product: ®Do not boil to sanitize or use a dishwasher or dish-dryer. *Do not clean using paint thinner, polishing powders, abrasive cleansers, scrub brushes (nylon, metal wire, etc.), melamine sponges, the nylon side of an abrasive sponge, or any similar items. Doing so may damage the product. Do not use chlorine bleach.
Troubleshooting Guide —15— Solution Check the position and direction in which the Lid Gasket is attached, and make sure that the Lid is not loose. (see pg. 7, 11) Clean the parts according to the instructions. (see pg. 13-14 “Taking Care of Your French Press”) Discard a small amount of the beverage so it doss not exceed the Maximum Water Level Line. (see pg. 9 “NOTE”) Remove any coffee grounds stuck on the Lid Gasket or the rim area before attaching the Plunger Set.
Troubleshooting Guide (continued) Solution Fill the product with sufficiently hot beverage up to the correct level. To retain heat more effectively, preheat for about 1 minute by filling the Main Body with hot water before use. (see pg. 9 “NOTE") The Filter Set is designed so that strong coffee and sediments remain at the bottom. This is not a malfunction. The noise comes from the metallic foil in the vacuum insulation to increase heat retention and does not indicate a malfunction.