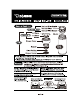
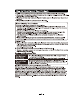
RY RHINOVIRUS Household Use Only STAINLESS MUG Model SM-JET Instruction Manual Name of Each Part Tea Leaf Filter Handle 7 4 é Toa Leaf Filter Set Tes Leaf Filter ———se Lid Cover ar [TIED Lid Cover Tt" Gasket Mlle aD Stopper Cover —¢ Stopper gt ar Valve Packing Stopper Gasket ED ® The illustrations used in this instruction manual may differ from the actual product you have purchased. * Please read these instructions before use, and keep for future reference.
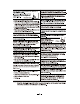
Do not use if water enters the interior of the Vacuum Layer. If the internal water swaps out from the Vacuum Layer, drinking it may cause lines. Vacuum Layer —8 Do not uae this product for other than storing and keeping beverages hot or cold. Do not hold the product by the Lid Set when carrying because the product may fail and cause injuries. When containing hot beverages: # Drink slowly without tilting the product suddenly. @ The inside of the Lid Bat is hot when touched from above.
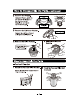
1 Remove the Lid Set and the Tea Leaf Filter Set from the Main Body. (© Remove the Lid Set from the Main Body by turning it in the direction of the mow, @ Hold the Tea Leaf Filter Set by the Tea Leaf Filter Handle and remove it from the Main Body. 2 Place tea leaves in the Main Body, and then fill it with hot water and attach the Tea Leaf Filter Sel. ® Please fill hot water (beverages) up to the onp. 1. ® Always make sure that the Tea Leaf Fitter Set is attached securely during use.
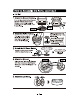
How to Disassemble the Parts, continued 2 Removes the Stopper. Using your fingers, push the two Tabs of the Stopper in the directions of the triangles and J) to remove the Stopper. 3 Remove the Lid Cover Gasket. Remove the Lid Cover Gasket utilizing the Small Opening. 4 Remove the Valve Packing. 5 Remove the Stopper Gasket. Do not tear the Valve Packing. How to Assemble the Parts E Tea Leaf Filter Set 1 Attach the Tea Leaf Filter Gasket.
How to Assemble the Parts, continued H Lid Set | Attach the Stopper Gasket. Line up the recess in the Stopper Casket with the rids on the Stopper, and, firmly applying pressure from the outside, push it into place. Please make sure fo fit the Valve Packing in the Ty center hols. 2 Attach the Valve Packing. Firmly push the knob of the Valve Packing all the way into the hole in the center of the Stopper. 10 Do not leave any foreign! ¢ maser or dirt under the > 5) | Valve Packing inheritor | attachment site.
How to Take Care of Your P ct: s Folio the instructions for care and wash the product thoroughly before use. ® When you first use the product, there may be a plastic small. However, this will become less noticeable with use. ® Clean the product after each use to prevent odors and mold, and to keep the product sanitary. ® Always disassemble the product before cleaning. When Cleaning Your Product: # Deo not boll or use a dishwasher or dish-dryer.