REF (ET Thermal Gravity Pot® Beverage Dispenser Operating Instructions SY-BAG60 / SYNAGOGAL peevishness «Please read these instructions before use, and keep for future reference. Important 2 Warnings & Cautions. Parts Name.. How to Use... How to Disassemble and Assemble. &Do not dispense beverages without the Serving Base attached. # Use only with the original Serving Base for SY-BA60. « Ne distribute pas de caissons squalor la base de service n'est pas fixer.
Important Safeguards » Always follow these instructions to prevent scalding, deterioration and discoloration of beverages, as well as malfunction and staining of the Dispenser. (Use only with the original Serving Base. It may cause burns or other injury, if the Main Body is tipped over. Do not dispense beverages without the Serving Base attached It may cause burns or other injury, if the Main Body is tipped over This Dispenser Is for holding beverages and keeping them hot or cold.
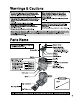
Warnings & Cautions (To avoid discoloration of tea that Is kept hot In the Dispenser, fill with hot water instead, and dispense it Into a small teapot or on tea bags to brew tea. After use, always wash the Stopper Set, Valve Set, Sight Gauge Tube, Sight Gauge Tube Covers (top and bottom), Bottom Connection Tube, and Joint Seal Rubber. Leaving the Dispenser as-is may cause mold When filling with beverages, do not allow hot containers such as kettles to touch the Dispenser Shoulder or Mouth.
How to Use DVE wise C si siege G18 = When filling directly from a brewer: Turn the Stopper Cover in the direction 4 th Stopper Cover shown by the mow fo remove it. Stopper Stopper Mesh Set When filling directly from brewer: Place the Dispenser under the brewer Detach the Main Body from nozzle and fill with coffee. the Serving Base. D Pinch the Serving Base Lever at the back of the Serving Bass.
How to Use, continued When manually pouring from Cote Tum the Stopper Set in the direction shown by the mow to remove i Stopper Set # Beverages can be kept hot or cold more effectively if you preheat or precis! with a title hot or cold water for about a minute before filling with your beverage. oT Lae Pour the beverage directly and slowly into the Stainless Liner.
How to Use, continued i Press the Pour Lever Io dispense beverage Place the cup on the Center of the Drip Tray Cover and press the Pour Lever. Pour Lever Center Drip Tray Cover 5 After use, dispose of any liquids in the Drip Tray Set (D Remove the Drip Tray by pressing up on the (@Remove the Drip Tray Cover and reseals button inside the soot while pulling it dispose of any liquids in the Drip out, as shown by the mow. Tray. Drip Tray Drip Tray Cover Drip Tray \ “5d Disposal Area
How to Use, continued of leverage ng After use, always dispose of any beverage eff in the Dispenser i Disposing of the beverage. If there is any beverage left in the Dispenser, press the Pour Lever to dispose of i Into a separate contain 2 Remove the Main Body from the Serving Base. (Pinch the Serving Base Lever at the back of the Serving Base. Hold the Handle and lift the Main Body to detach from the Serving Base.
How to Disassemble and Assemble How to Disassemble 1 Remove the Main Body from the Serving Base. (See pg. 4 @Pinch the Serving Base Lever at the back of the Serving Base. @Hold the Handle and lift the Main Body to detach from the Serving Base. 2 Remove the Valve Cover. @with the Main Body upside-down, press both Turn the Stopper Set in the direction i sides of the Valve Cover in the direction shown by the arrow to remove it. : shown by the arrows while lifting it up. 3 Remove the Valve Set.
How to Disassemble and Assemble, continued pel disassemble into these pas ee components: Valve Cap, NDS Valve Spring, Valve Shaft, and Valve Case. I\— Naive Spring O-Ring Valve Shaft Stopper Gasket Turn the Valve Cap in the direction shown by the arrow to remove it, and then remove the Valve Spring and Valve Shaft. Valve Case 5 Remove the Sight Gauge Panel. (Rectum the Main Body to the upright position and push the Handle up.
How to Disassemble and Assemble, continued How to Disassemble vine 7 Remove the Sight Gauge Tube Cover (Bottom). @Pull out the Sight Gauge Tube Cover (Bosom) © @Remove the Sight Gauge Tube and Bottom Connection Tube in the direction : Cover (Bottom) from the Bottom of the mow. i Connection Tube. Sight Gauge Tube Cover (Bottom) Commotion Connection Tube 8 Remove the Stopper Mesh Rubber. (Remove the Stopper Mesh Set : (@Remove the Stopper Mesh Rubber. from the Stopper.
How to Disassemble and Assemble, continued peel 1 Attach the Sight Gauge Tube Of Cover (Bottom). (D Attach the Sight Gauge Tube Cover (Bottom) to the Bottom Connection Tube. @i Insert the Bottom Connection Tube in the hole on the bottom of the front of the Main Body. Sight Gauge Tube Cover (Bottom) Bottom Connection Tube CJ Installed Correctly Slot 2 Attach the Sight Gauge Tube and Sight Gauge Tube Cover (Top) to the Main Body.
How to Disassemble and Assemble, continued How to Assemble conned 4 Assemble the Valve Set. Before closing the Valve Cap, confirm that the Stopper Gasket and O-Ring are y attached to the Valve Shaft and that the [Parts not attached] Cap Gasket is attached to the Valve Cap. @Attach the Valve Saith and Valve Spring to the : Insert the Joint Seal Rubber fully Valve Case, and then close securely by turning ° into the Valve Case. the Valve Cap in the direction of the arrow.
How to Disassemble and Assemble, continued 6 Attach the Valve Cover. (insert both Tabs of the Valve Cover into the : @When attaching, align both Feet of the Openings on the front of the Main Body. Valve Cover with the two Slots on the AY Valve Cover ¢ Main Body. Valve Cover Tab Opening ~ Joint Seal Rubber Opening ) \ Bottom Connection Tube Stainless Liner o Joint Seal Rubber Stainless Liner Bottom Connection 7 Attach the Main Body to the Serving Base. (See pg.
Cleaning and Maintenance # Keep the Dispenser sanitary by cleaning the Dispenser after each use to prevent odor and mold. ® Always disassemble before cleaning. (See pg. 8-10) [ «DO NOT COMPLETELY IMMERSE ENTIRE DISPENSER. oD0 NOT USE BLEACH, CHLORINE, OR OTHER HARSH CHEMICALS. {Doing so may cause damage to the metal and/or thermal breakdown.) THE DISPENSER IS TO BE USED WITH ONLY WATER, COFFEE OR TEA, IRIS NOT RECOMMENDED FOR USE WITH ANY OTHER LIQUIDS.
Wipe clean with a damp well-wrung cloth. # Never immerse the Main Body. are of the Servo ng Base Remove the Drip Tray Set and wipe clean with a damp well-wrung cloth. (To remove tough stains on the Serving Base: ) (Wash the Serving Base under running water. i @Shake the Serving Base several times to thoroughly drain the water inside. Tum the Serving Base upside-down and repeat step. ¥ 4G L_ ®For how to clean the Drip Tray Set, see pg. 14, section 2. @Wipe it dry and place it as shown to dry thoroughly.
Specifications Product: Thermal Gravity Pot® Beverage Dispenser Model No. Capacity Weight Heat Retention {Above) | Cold Retention (Below) SY-BASO | 15 Gallons aoe 194°F (30°C) @ 2 hrs. 202 oz. 190°F (88°C) @ 4 hrs. | 45°F (7°C) @ 6 hrs. : 6.0 liters) | Approx 14002. | jailer (a50C) @ 6 hrs. BABOON | ( ) (Approx. 4.0kg) (85°C) MW Heat/Cold Retention Testing Conditions: At a room temperature of the Main Body is filled to below the Stopper with hot or cold water and left standing in an upright position.