
User's Manual


2
1
2
3
4
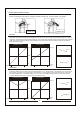
Right Throttle to Left Throttle (Mode 1/Mode 3 to Mode 2/ Mode 4)
Use a cross-drive screw driver to loosen Screw D. Keep loosening until the stick can move up and down
without friction.
1)Tighten Screw C. Keep tightening until the stick can move up and down with rebounds.
Loosen Screw B. Keep loosening until the stick can move up and down without rebounds
Tighten Screw A. Keep tightening until the stick can move up and down with friction
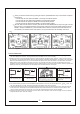
Back view of Transmitter
MODE 1
Rudder Stick
Elevator Stick
Aileron Stick
Throttle Stick
MODE 2
Rudder Stick
Elevator Stick
Aileron Stick
Throttle Stick
MODE 3
Rudder Stick
Elevator Stick
Aileron Stick
Throttle Stick
MODE 4
Rudder Stick
Elevator Stick
Aileron Stick
Throttle Stick
2
Set Control Mode, change of control mode
There are 4 Control Modes: Mode 1, Mode 2, Mode 3 and Mode 4, as shown in the above
3
Changing control mode
4.Interchanging position of throttle and elevator control
1
1
2
3
4
Structural adjustment: Before the adjustment, please take out the four rubber pistons (A, B, C and D) on the back
of the transmitter, as shown in the figure
Left Throttle to Right Trottle (Mode 2/Mode 4 to Mode 1/ Mode 3)
Use a cross-drive screw driver to loosen Screw A. Keep loosening until the stick can move up and down
without friction
Tighten Screw B. Keep tightening until the stick can move up and down with rebounds
Loosen Screw C. Keep loosening until the stick can move up and down without rebounds
Tighten Screw D. Keep tightening until the stick can move up and down with friction
1
Push and hold both the R/A Trim (Rubber/Aileron Trim) leftward at the same time then press the Bind button.
The transmitter will emit a series of beep sound. That indicates the transmitter has entered the control mode
setting.