
User's Manual


3
5.Normal instruction
1)
2)
Turn on transmitter procedure: Press and hold the power button 3~5 second, the buzzer will have a beep noise, the
LCD icon will light on and solid. This signal means the transmitter is turn on successfully.
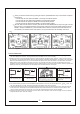
Binding procedure: Insert the binding plug in the Channel 9 (Power supply interface) receiver / 3 axis gyro and connect
the electricity, the LED will fast flashing. Pressing and holding the transmitter binding button and power on the transmitter.
When the transmitter was power on, you should release the power button first and wait for 10 seconds after, release the
binding button lastly. If the above procedure is success, the LED will solid after 5 seconds and the binding process is
completed, remove the binding plug. Otherwise, please follow the above procedure to bind it again. (Note: To operate the
binding procedures, please make sure the brushless motor and the ESC is not connected.)
LED fast flashing
LED fast flashing
3)
4)
5)
Turn off transmitter procedure: Press and hold the power button 3~5 second, the buzzer will have a beep noise, the
LCD icon will light off and solid. This signal means the transmitter is turn off successfully.
Trainer wireless binding: Open the transmitter (Master transmitter), plug in the wireless connection device through the
30 Pin connector, after that press and hold the binding button, it will auto detect the wireless connection device and
connect with the transmitter in 20 seconds. If success, the LED wireless connection device will solid.
Charging procedure: Plug in the charging connection wire to the transmitter via the 30 Pin charging connector, and then
plug the USB connector in the 5V charger.
Remove the binding plug
Pressing and holding the transmitter binding
button and power on the transmitter. When the
transmitter was power on, you should release
the power button first and wait for 10 seconds
after, release the binding button lastly
Jack in the binding plug
Press the Binding button and the power
button at the same time
LED steady light
LED steady light, Remove the
binding plug
2
3
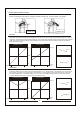
Select your desired control mode by pushing the T/E Trim (Throttle/Elevator Trim) as instructions and picture
shown below:
Push the right T/E Trim upward for MODE 1, one beep sound will be emitted.
Push the right T/E Trim downward for MODE 2, two beeps will be emitted.
Push the left T/E Trim upward for MODE 3, three beeps will be emitted.
Push the left T/E Trim downward for MODE 4, four beeps will be emitted.
After the desired control mode is selected, push the left R/A Trim (Rubber/Aileron Trim) to the right as shown
below in figure 3, corresponded beeping sound as when setting the control mode will be emitted (1 beep for
MODE 1, 2 beeps for MODE 2 etc.), the transmitter will then save the selected control mode and turns off
automatically. The selected control mode will be in use the next time when the transmitter is turned on.
MODE 3
MODE 4
MODE 1
MODE 2
T/E Trim
R/A(RUDD/AILE)
BIND
R/A(RUDD/AILE)
Figure 3
Power button
Figure 2Figure 1