
User's Manual


Receiver Installation
Power System Requirements
Binding
SmartSafe
Hold Last Command
Preset Failsafe
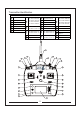
In gas and glow aircraft install the main receiver by
wrapping it in protective foam and fastening it in place
using rubber bands or hook and loop strap.
In electric airplanes or helicopters, you can use thick
double-sided foam tape to fasten the main receiver in
place.
Mount the remote in a slightly different location from the
primary receiver. This gives tremendous improvements in
path diversity. Essentially, each receiver sees a different
RF environment and this is key to maintaining a solid RF
link. This is especially the case in aircraft with substantial
conductive materials (e.g., larger gas engines, carbon
fiber, pipes etc), which can weaken the signal.
Receiver antenna as far as possible away from power
lines. Ideally perpendicular to each antenna.
Onboard power systems must provide adequate power,
without interruption, to the receiver even when the system
is fully loaded (servos at maximum flight loads).
Inadequate power systems are a primary cause of in-flight
failures. Some components that affect the ability to
properly deliver adequate power include: the selected
receiver battery pack (number of cells, capacity, cell type,
state of charge), switch harness, battery leads and, if
used, the regulator and power bus. The AH6R/AH6RS
minimum operational voltage is 3.5-volts. Test the system
per the following guidelines to a minimum voltage of
4.8-volts during ground testing. This will compensate for
battery discharging or actual flight loads that are greater
than ground test loads.
You must bind the receiver to the transmitter before the
receiver will operate. Binding teaches the receiver the
specific code of the transmitter, so it will only connect to
that transmitter.
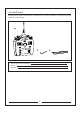
1. To bind an AH6R/AH6RS to a AH6T transmitter, insert
the bind plug in the BATT/BIND port on the receiver.
2. Power the receiver. The LED on the receiver will be
flashing, indicating the receiver is ready to be bound to the
transmitter.
3. Move the sticks and switches on the transmitter to the
desired failsafe positions (low throttle and neutral control
positions).
4.
Press and hold the Blind button(Switch I) while powering
on transmitter.
5. The system will connect within a few seconds. Once
connected, the LED on the receiver will go solid indicating
connection.
6. Remove the bind plug from the BATT/BND port on the
receiver. Power off the transmitter and store the bind plug
in a convenient place.
7. After setting up your model, rebind the system so the
true low throttle and neutral control surface positions are set.
When you bind your transmitter, you are programming the
receiver with failsafe defaults. If connection is lost between
the transmitter and receiver, the receiver immediately
operates in those preprogrammed default positions. Those
positions are failsafes. The AH6R AH6RS has three
failsafes: SmartSafe Failsafe, Hold Last Command
Failsafe, and Preset Failsafe.
SmartSafe Failsafe is always active in both hold last
command failsafe and in preset failsafe. SmartSafe is a
safety feature on the throttle channel only that offers the
following benefits:
3UHYHQWVHOHFWULFPRWRUVIURPRSHUDWLQJZKHQWKHUHFHLYHU
only is turned on (no signal present)
3UHYHQWVHOHFWULFPRWRUVIURPRSHUDWLQJZKHQWKHUHFHLYHU
only is turned on (no signal present)
3UHYHQWVWKHVSHHGFRQWUROOHUIURPDUPLQJXQWLOWKHWKURWWOH
is moved to low throttle position after connection is made
6KXWVRIIHOHFWULFPRWRUDQGUHGXFHVJDVJORZHQJLQHVWR
idle if signal is lost
,IWKURWWOHLVDWDQ\SRVLWLRQRWKHUWKDQORZWKH(6&ZRQ¶W
arm
,IFRQQHFWLRQLVORVWLQIOLJKW
-SmartSafe sets the throttle to the position it was in during
the binding process.
How To Program
SmartSafe is automatically set when hold last command
failsafe or Preset failsafe is programmed or the system is
bound. Note: It’s important to have the throttle stick in the
low position to store low throttle during binding.
To Test
Confirm the failsafe setting is correct by turning off the
transmitter. The throttle should go to the preset low throttle
position.
CAUTION: Make sure the aircraft is restrained on the
ground. If failsafe is not set, your aircraft might advance to
mid or full throttle.
If you lose connection, all channels except for throttle
channel hold last given command and the aircraft continues
on its path. So, if you were turning when connection was
lost, your aircraft would continue turning.
How To Program
1. Leave the bind plug in the bind port through the entire
binding process.
2. Remove bind plug only after receiver connects to
transmitter
To Test
Confirm the failsafe settings are correct by turning off the
transmitter. All channels except for the throttle should hold
the last command.
CAUTION: Make sure the aircraft is restrained on the
ground. If failsafe is not set, your aircraft might advance to
mid or full throttle.
If the signal is lost, all channels are driven to their failsafe
position set during binding.
Preset Failsafe is ideal for sailplanes, as spoliers can be
deployed during loss of signal, preventing a flyaway.
How To Program
1. Insert the bind plug and power on the receiver.
2. When the receiver LEDs blink indicating bind mode,
remove bind plug before binding the transmitter to the
receiver.
7