
User's Manual


To Access the System Setup List
Model Select
System Setup
Airplane Model
Model Select
Model Type
Model Name
Wing Type
Switch Select
Trim Setup
Model Reset
Model Copy
Warnings
Power Settings
Trainer
Fail Safe
System Settings
Multicopter Model
Model Select
Model Type
Model Name
Swash Type
Switch Select
Trim Setup
Model Reset
Model Copy
Warnings
Power Settings
Trainer
Fail Safe
System Settings
Helicopter Model
Model Select
Model Type
Model Name
Swash Type
Switch Select
Trim Setup
Model Reset
Model Copy
Warnings
Power Settings
Trainer
Fail Safe
System Settings
3. LED lights will continue to blink.
4. Move transmitter’s control sticks and switches to the
desired Preset Failsafe positions then turn it on in bind
mode.
5. The system should connect in less than 15 seconds.
NOTICE: Failsafe features vary according to receiver, so
if using a receiver other than the AH6R AH6RS, consult
your receiver’s instructions for the failsafes that apply.
Before flight, ALWAYS confirm your binding is good and
failsafe is set. To do this, make sure the system is
connected, turn your transmitter off. Confirm that
low-throttle is active.
CAUTION: Make sure the aircraft is restrained on the
ground. If failsafe is not set, your aircraft might advance
to mid or full throttle.
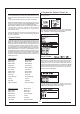
The AH6T organizes the programming screens in two
separate categories: System Setup Mode and Functions
Mode. The System Setup Mode contains programming
that is generally used when initially setting up a model,
and seldom used at the field. System Setup functions
includes Model Type, Model Name, Wing Type,
(Swashplate Type for Helis) Model Reset, etc. Note: No
radio transmission occurs when a System Setup screen
is displayed to prevent accidental servo operation. This
protects linkages/servo gears from damage when making
programming changes. System Setup in Airplane,
Helicopter and Multicopter Model type includes the
following screens.
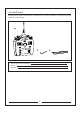
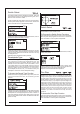
Press Power Switch to turn on the transmitter and enter
the main screen.
Press and hold the roller while turning on the transmitter.
When System Setup appears on the screen, release the
roller. The AH6T is now in System Setup Mode.
The Model Select function is used to change to a different
model memory, typically when switching from the current
model. You can store up to 20 models in the AH6T’s
model memory. You can access the model select function
through the System Setup mode or through Direct Model
Access. Direct Model Access allows you to access the
model select function at any time the main screen or a
telemetry screen is displayed.
The following screen appears. Rotate the roller to
highlight the desired model then press to select. The
model name will display on the main screen.
8