
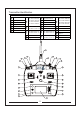
User's Manual


Model Type
Wing Type
Model Name
To Access the Wing Type Function
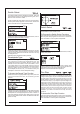
Model Type programs the selected model memory to
function in Helicopter, Airplane or Multicopter
programming. You should program Model Type first when
setting up a new model. Note: You can assign each model
memory its own model type.
To Access the Model Type Function
Press and hold the roller while turning on the transmitter.
When System Setup appears on the screen, release the
roller. The AH6T is now in System Setup Mode.
Rotate the roller to highlight the desired character
then press to accept.
Repeat the process until complete. The name will
display on the main screen. Pressing Clear will
erase the current character.
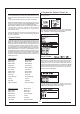
Use the Wing Type function to program the wing and tail
mix to match your airplane. Eight wing types (Normal,
elevon, dual aileron, 1 aileron and 1 flap, flaperon, 1
aileron and 2 flaps, 2 ailerons and 1 flap, 2 ailerons and 2
flaps) and five tail types (normal, V-Tail, dual elevator, dual
rudder, dual rudder/ elevator) are available. You must
select the correct wing and tail type to match your airplane
before doing any other wing or tail related programming
(e.g., Flaps, Travel Adjust, Sub-Trim, etc.).
Rotate the roller to highlight Wing Type then press to
access the function.
The following screen appears:
Rotate the roller to highlight Wing and press to access the
function. Rotate the roller to the desired wing mix. Press
the roller to select.
Rotate the roller to highlight Tail then press.
Rotate the roller to access the desired tail type. Press the
roller to select.
To access the Tail Type
Rotate the roller to highlight Model Type then press to
access the function (Helicopter, Airplane or Multicopter).
The following screen appears:
The following screen appears. Rotate the roller to highlight
YES then press the roller to accept the model type.
Selecting NO will return you to the previous screen.
Note: When you change model types (Heli to Acro or Acro
to Heli) all current programming in the selected model
memory will reset to the factory default settings. All
previous settings will be lost.
The Model Name function allows you to name a model
using up to 10 characters. This makes identifying and
selecting models much easier. Naming a model is
normally done during initial setup. You can modify or
change names at any time without affecting other
programming. Note that upper case, lower case, numbers
and symbols are available.
Rotate the roller to highlight Model Name then press to
access the function.
The following screen appears:
9