ZSR0104C Series Broadband Switch Router User Manual Page i
FCC Interference Statement This device complies with Part 15 of the FCC Rules. Operation is subject to the following two conditions: (1) this device may not cause harmful interference, and (2) this device must accept any interference received, including interference that may cause undesired operation. NOTE This equipment has been tested and found to comply with the limits for a Class B digital device, pursuant to Part 15 of the FCC Rules.
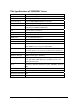
The Specifications of ZSR0104C Series WAN 1 RJ-45 10/100Mbps Ethernet Port LAN 4 RJ-45 10/100Mbps Ethernet Ports Reload Button Reloading Factory Default Settings Client OS Support Win95/98/ME/2000/NT/XP/Mac/ Linux/Unix Configuration User-Friendly Web Configuration Tool Firewall Preventing Hacker’s Scan/Preventing DoS/Service Filter/Stateful Packet Inspection/IP Filter/MAC Filter NAT Network Address Translation DHCP Client Obtaining a Dynamic WAN IP Address from ISP PPPoE Authentication with
Table of Contents FCC Interference Statement.................................................ii The Specifications of ZSR0104C SERIES......................... iii Chapter 1 Introduction....................................... 1 1.1 The ZSR0104C SERIES Broadband Switch Router .1 1.2 Physical Features of ZSR0104C SERIES ...................1 1.3 Non-Physical Features of ZSR0104C SERIES.............1 1.4 Package Checklist............................................................3 1.
3.2 Connect Ethernet Hub/Switch to ZSR0104C SERIES 7 3.3 Connect Wireless Access Point to ZSR0104C SERIES 7 3.4 Connect Cable/xDSL Modem to ZSR0104C SERIES7 3.5 Power up ZSR0104C SERIES .....................................8 Chapter 4 Use Your ZSR0104C SERIES .......... 8 4.1 Check the Web Proxy......................................................8 4.2 Wizard Setup.................................................................8 A. Cable Modem Connection ..................................................
5.6 DHCP Server .................................................................25 1. DHCP Definition..................................................................................25 2. 3. DHCP Server in LAN ..........................................................................25 DHCP Client in LAN ...........................................................................26 5.7 Virtual Server (Port Forwarding)................................27 5.8 Firewall.......................................
Appendix B: Common Port Numbers............. 51 Appendix C: Terminology ................................ 52 Appendix D: Technical Support .................... 56 D.1 Hardware Problem .......................................................56 D.2 Software Download.......................................................56 D.3 Installation/Application Problem ................................
Chapter 1 Introduction Thank you for purchasing ZSR0104C SERIES Broadband Switch Router. This chapter covers a brief description of ZSR0104C SERIES features, package content, installation requirements, and the organization overview of this User’s Manual. 1.
‧ LAN clients. Therefore the LAN clients “share” the only one WAN IP address, and it is called Broadband Switch. Firewall ZSR0104C SERIES provides prevents Ping and TCP/UDP Echo Attack, Hacker’s Scan, and Denial of Service (DoS). Also it offers Service Filter and URL Filter (by Keyword). ‧ Dynamic DNS Dynamic DNS (Domain Name System) allows you to register and obtain a fixed domain name from DDNS service providers that ZSR0104C SERIES supports.
‧ client will receive the same LAN IP address. Remote Management ‧ ZSR0104C SERIES can be configured and managed from the WAN side via a specific port. MAC Clone ‧ ZSR0104C SERIES allows users to specify the MAC address of the Network Interface Card if Internet Service Provider has the requirement. Web-Based Setup ‧ ZSR0104C SERIES can be managed through the Web browser in a LAN client PC connected to ZSR0104C SERIES or the Internet.
concepts of ZSR0104C SERIES. Enjoy your use of ZSR0104C SERIES! Organization of This User’s Manual Chapter 1, Introduction It briefly describes the features of ZSR0104C SERIES. Chapter 2, Get to Know the Hardware It explains the LED and port functions on the front and back panels. Chapter 3, Install Your ZSR0104C SERIES It explains the hardware setup. Chapter 4, Use Your ZSR0104C SERIES It explains ZSR0104C SERIES setup via “Setup Wizard” in the Web Configuration Tool.
Chapter 2 Get to Know The Hardware This Chapter explains ZSR0104C SERIES LED and Port functions. 2.1 LED Indicators ZSR0104CP Front Panel ZSR0104C Front Panel Figure 2-1 Device Indicators Power: The Power LED illuminates whenever ZSR0104C SERIES is powered on. Status: The Status LED will be continuously on when the power is supplied. It takes around 15 seconds to boot. LAN and WAN Indicators Link/Act Link :ON means WAN (ADSL/Cable modem) is connected to ZSR0104C SERIES.
2.2 Back Panel On the back panel, ZSR0104C SERIES has 4 RJ-45 10/100Mbps Ethernet LAN ports, and 1 RJ-45 10/100Mbps Ethernet WAN port. In addition, it has a Reload button and a Power Connector (7.5V 0.7A). (Figure 2-2) ZSR0104CP Rear Panel ZSR0104C Rear Panel Figure 2-2 1. Local LAN Ports ZSR0104C SERIES can function as a communication bridge between the LAN and the WAN. The 4 LAN ports can connect ZSR0104C SERIES to the client PCs in the LAN. 2.
SERIES power adapter into the power outlet. Step 3. It takes around 15 seconds to reset. The Power LED will turn on Green initially. Wait for it becomes Red then release the Reset button. Step 4. Try to connect http://192.168.1.1/ via your Web browser. Use the user name “admin” and the password “admin ” to obtain authentication. If it is failed, please try the approach again. 4. Power Connector Power connector connects your ZSR0104C SERIES to the power adapter.
WAN port. 3.5 Power up ZSR0104C SERIES Connect the correct Power Adapter to ZSR0104C SERIES. Then plug the Power Adapter into an AC power outlet. The LED status will be as followed. 1. Power LED and the 4 LAN port’s LED will turn on for the first second. 2. 3. The Power LED will be continuously on when the power is supplied. It takes around 15 seconds to boot. The WAN and LAN link/act LED will be continuously on when ZSR0104C SERIES is connected to the WAN and the LAN.
Step1. Launch a web browser on your client PC connected to ZSR0104C SERIES. Then point the Web browser to http://192.168.1.1 (http://192.168.1.1 is ZSR0104C SERIES default IP address.) If the router IP address was configured with different IP address, use the configured IP address instead of 192.168.1.1. Please make sure your computer IP address is located in the same subnet of the router IP address. Step2. Press “Enter” key after typing the router IP address.
Figure 4 –2 First please choose your local time zone to set time for your NAT. If have daylight saving click the checkbox and input the start date and end date. Then click “Next” button.
You will see 4 options as followed. If Internet access is through the cable modem, Please click the selection button of the “Cable Modem ”. Then click “Next” button. A. Cable Modem Connection Two option fields might be required to enter by some Internet Service Providers. a. Host name: a string of characters usually is the name of your PC, which is configured by your ISP. b. Clone MAC Address: It is your PC Ethernet Interface Card’s MAC address.
The default WAN Setting of ZSR0104C SERIES is Cable Modem Connection without Host Name and MAC Clone If you don’t know the MAC address of your Network Interface Card, follow the steps to obtain the information. The MAC address information might be helpful when you need to use MAC Clone. 1. Go through the path “Start -> Run” and enter “command” to enable the Command Prompt Window. 2. Enter “ ipconfig/all”. Find the item Physical Address and this is the MAC address of your Network Interface Card. B.
Fixed - IP is a WAN access type provided by some Internet Service Providers. You need to enter the information of IP address, Subnet Mask, Default Gateway, Primary DNS Server, and Secondary DNS Server. C. PPP over Ethernet (PPPoE) Connection If Internet access is through the PPPoE, please click the selection button of The” Dial-Up xDSL (PPPoE)”. Then click “Next” button. PPPoE is a common type of Internet access provided by many xDSL Internet Service Providers.
b. Idle Time field: If the Idle Time was specified with non-zero number, ZSR0104C SERIES router disconnects the PPPoE session after there was no data traffic on WAN interface within the specified “Idle Time” minutes. c. Auto-reconnect field: Once there is any outgoing data traffic, the router automatically re-establishes the PPPoE session. D. PPTP Connection If Internet access is through the PPTP, please click the selection button of the “PPTP”. Then click “Next” button.
a. Idle Time field: If the Idle Time was specified with non-zero number, ZSR0104C SERIES router disconnects the PPTP session after there was no data traffic on WAN interface within the specified “Idle Time” minutes. b. Auto-reconnect field: Once there is any outgoing data traffic, the router automatically re-establishes the PPTP session. Click the button Next, the “LAN Setting” page, Figure 4 – 3, appears on the screen. Figure 4 – 3 Step 4.
Step 5. The ” DHCP Setting” page is used to configure DHCP Server and DHCP Client in LAN .If DHCP Server enabled, the LAN PC Client can automatically obtain the IP settings, including IP address, Domain Name, Subnet Mask, Primary DNS, and Secondary DNS from ZSR0104C SERIES. Step 6. Click the button “Finish “. ZSR0104C SERIES will save your settings and it will take around 20 seconds to reboot. After finishing rebooting, the page will be redirected to the Index Page, Figure 4 - 2.
Step 2. Click the “Advanced Setup “ (see Figure 4 – 2) and will be displayed, Figure 5 - 1. Step 3. The Router Status screen will show up and tell the current WAN and LAN IP settings of your ZSR0104C SERIES, including IP address, Subnet Mask, Gateway, Primary DNS, and Secondary DNS. On the left, you will see 5 main categories, including System, Wan, Lan, Nat and Firewall. Figure 5 - 1 5.
5.3 Time Click the “System/Time” button, will see the Figure 5-3 Figure 5 - 3 If you want to assign the timeserver, enter the IP address then click “Apply” button to save. If sntp server gets time from network, the system time will display now time, else time is NULL. Local time means the pc’s time, you can also set the pc’s time for system time. Click the “Set” button; the system time will be equal to local time The default Time Server IP Address is 198.123.30.132, 210.59.157.10 And 192.5.5.250 5.
The Administrator Setting page provides the following configuration options: a. Change Administrator’s User Name and Password b. WAN Side Administration Change Administrator’s User Name and Password. You can specify a new user name and password for the administrator. After enter the new user name, old password and new password twice, then click the “Apply” button to make the new user name and password effective. And The “user name and password” screen will appear.
5.5 Firmware Upgrade A web-based interface, via Microsoft Internet Explore or Netscape web browser, is provided to allow the user upgrade the latest firmware to the NAT Router.
Through the “Choose file” menu, locate the latest router firmware and open it. For example, the latest firmware file, zonet_2004.bin, is located and opened, the file name will appear at the entry of the firmware file name. Step 3. Click the “Apply” icon from the firmware upgrade page After clicking the “Apply” button, will appear the confirmation page.
If click the “OK”, will appear firmware upgrade programming page, please wait for 35 seconds, the Nat will restart. When the firmware update is in process, please do not plug out the power adapter of ZSR0104C SERIES. The sudden disconnection of power supply may damage the flash hardware and cause the malfunction of ZSR0104C SERIES. 5.6 Reset You can set the ZSR0104C SERIES back to its manufacturing setting and reset the ZSR0104C SERIES by clicking the Reset button.
button on the confirmation page to make the ZSR0104C SERIES reboot. (See Figure 5 - 6) Figure 5 – 5 Figure 5 – 6 After clicking the OK button, Please remember: use 192.168.1.1 to access web page after reboot”. 5.7 Dynamic DNS (Domain Name System) If ZSR0104C SERIES acquired its WAN IP address via the DHCP or PPPoE schemes, its IP address is likely different from previous one after ZSR0104C SERIES is rebooted or PPPoE session is re-established.
Step 1. Select DDNS service provider. ZSR0104C SERIES supports two DDNS service providers, www.no-ip.com or www.dyndns.org. Browse the DDNS service provider’s web page and register a new account there. Your DDNS service provider will provide you the account ID and password. Step 2. Go through the DDNS settings in ZSR0104C SERIES DDNS section. Select one DDNS service provider, and fill in the necessary information form DDNS service provider such as ID, password, and related settings etc. If no-ip.
If dyndns.org was selected, User Name, Password and Host Name are mandatory; Enable Wildcard, Mail Exchanger and Backup MX are optional. Step 3. Update the IP address. When WAN public IP address changes, ZSR0104C SERIES will automatically inform your DDNS service provider the new IP address, or you can force the IP address update by clicking the Update button. The update message will show on the screen if the Refresh button was clicked.
receive the same LAN IP address, when ZSR0104C SERIES assigns IP addresses in the next time. B. The Pool Range of Assigned IP Address When DHCP is enabled, you can assign a group of LAN IP addresses. The group is called as “the pool.” You can enter numbers from 2 to 254 in the blanks. The maximum capacity is 253 IP addresses. The number behind “Starting” must be smaller than that behind “Ending”. You can specify the domain name for the group of LAN IP addresses, which are managed by the DHCP server.
5. DHCP Client List When DHCP is enabled. Will see how many DHCP clients get IP address form the NAT. If you want to enable DHCP in your PC, refer to A.1 Enable DHCP in Your PC in Appendix A: Configure TCP/IP in Your PC. 5.9 Virtual Server (Port Forwarding) The firewall in ZSR0104C SERIES blocks the traffic initiated from the Internet in order to protect your LAN.
As illustrated as above, when ZSR0104C SERIES obtains traffic of Port 21 from the Internet, it will forward it to the FTP server with LAN IP address 192.168.1.2. If ZSR0104C SERIES receives traffic of Port 80, it will re-direct it to the Web server with LAN IP 192.168.0.3. To enable Virtual server, enter the port number to specify the service type, and the server’s LAN IP address for the traffic destination. Check Enable. Then click the button Apply to make your settings take effect.
5.10 Firewall 1. DMZ Host Configuration You can set up your personal computer or network-ready device to be a public or local DMZ hosts. In general, Internet applications use only one unique port and can pass through a NAT Router by enabling Virtual Server. However, some special applications need to implement multiple ports, port ranges, dynamically assigned ports, and special protocols. ZSR0104C SERIES can support the transparent pass-through of these special applications, such as FTP, NetMeeting/H.
illustrated Then you will be able to communicate with your friend via NetMeeting. Besides, the other LAN clients behind ZSR0104C SERIES are still protected by its firewall, and the traffic initiated from the Internet is denied to access these LAN clients To activate Local DMZ Host, please check the Enable item and assign the LAN IP address of the LAN host. Then click the button Apply to make your settings take effect. B.
To enable Public DMZ Host, check Enable below Public DMZ Host and enter the public IP address of the device you want to assign as the Public DMZ Host. Then click the button Apply to make your settings take effect. The server in the Public DMZ is not protected by ZSR0104C SERIES firewall. Please pay attention when you enable Public DMZ. 2. Anti PING and TCP/UDP Echo Attack ZSR0104C SERIES can prevent Ping and TCP/UDP Echo Attack.
3. URL Filter If you want to restrict your LAN clients from accessing certain websites, enter the keywords of the websites in the blank. ZSR0104C SERIES will examine the packet information when receiving the packet with port 80 from the WAN. If it finds the listed keywords, it will drop the packet and LAN clients cannot obtain the information from the website. Check the URL filter Enable and click the Apply button to make settings effective. 4.
Checked this item, the LAN client can access to the following services. For example, forwarding port 21.The LAN client only can access ftp in the Internet. Please refer to Appendix B: Common Port Numbers. P . 5. MAC Filter A. Disable Checked this item, the LAN client can access to Internet. B. Blocking the following Mac Checked this item, the following Mac cannot access to Internet. For example, blocks Mac address 00-60-67-79-0B-10. This client cannot access Internet. C.
6. IP Filter A. Disable Checked this item, the LAN client can access to Internet. B. Blocking the following IP Checked this item, the following IP cannot access to Internet. For example, blocks IP address 192.168.1.2 this client cannot access Internet. C. Forwarding the following Mac only Checked this item, only the following IP can access to Internet. For example, forwarding IP address 192.168.1.2 this client can access Internet. 6.
4. DNS (Domain Name System) Failure. Please refer to the solution for each reason and solve your problem. If the problem persists, please contact our authorized distributor or dealer for technical support. 1. Router’s Hardware Failure Solution: 1. Make sure the Power adapter is securely plugged into a power outlet and Power LED is on. 2. Failed Connection between ZSR0104C SERIES and Client PC Solution: 1. Check if the LAN link/act LED is continuously or flash. 2.
3. Failed Connection on ZSR0104C SERIES WAN Side Solution: 1. Check if the WAN link/act LED is continuously on or flashing. 2. Verify that your WAN access type and the corresponding information are the same as the datasheet provided by your Internet Service Provider. 4. DNS (Domain Name System) Failure Solution: 1. If there is no problem in 1-3, try to use ping command to reach an existing IP address on the Internet.
Appendix A: A.1 Disable Web Proxy When the Web Proxy is disabled, your Web browser can obtain information from ZSR0104C SERIES without the Web Proxy block. This section is divided into 4 parts as followed, “Disable Web Proxy for Windows 95/98/ME/2000/NT,” “Disable Web Proxy for Windows XP,” “Disable Web Proxy for Mac,” “Disable Web Proxy for Unix/Linux.” 1. For Windows 95 / 98 / ME / 2000 /NT If you use Windows 95, 98, ME, 2000, or NT, follow the steps to disable Web Proxy in your Web browser.
Step 2. Click the Connections tab. Press the LAN Settings... button. (Figure A -22) Figure A–22 Step 3. Verify the item “Use a proxy server” is not checked. Then click the OK button to close each the Internet Options window.
D. B. Netscape Step 1. Open Netscape and click the Stop button. Choose Edit and then click Preferences... A Preferences window will pop up. (Figure A-24) Figure A–24 Step 2. In Category, find Proxies under the advanced item.
Step 3. Check Direct connection to the Internet. Then click the OK button. (Figure A-26) Figure A–26 2. For Windows XP If you use Windows XP, follow the steps to disable Web Proxy in your Web browser. E. A. Internet Explorer Step 1. Open Internet Explorer and click the Stop button. Choose Tools and then click Internet Options.
Step 2. Click the Connections tab. Press the LAN Settings... button. (Figure A-28) Figure A–28 Step 3. Verify that the item Use a proxy server for your LAN is unchecked. Then click the OK button to close each the Internet Options window.
F. B. Netscape Step 1. Open Netscape and click the Stop button. Choose Edit and then click Preferences... A Preferences window will pop up. (Figure A-30) Figure A–30 Step 2. Choose Proxies under the advanced item.
Step 3. Check Direct connection to the Internet. Then click the OK button. (Figure A-32) Figure A–32 3. For MAC The instructions are based on Mac OS 8.5. It is similar to Mac OS 7.x and above. Follow the steps to disable the Web Proxy. G. A. Explorer Step 1. Open Internet Browser and click the Stop button. Click Edit and select Preferences. Step 2. Find Proxies under the advanced item. Uncheck all the boxes. Click the OK button to save your setting. H. B. Netscape Step 1.
I. A. Netscape Step 1. Launch Netscape Navigator and click the Stop button. Go through the path “Edit→ Preferences...” Step 2. In Category, find Proxies under the advanced item. Step 3. Check direct connection to the Internet and click the OK button. A.2 Verify IP Settings Verify IP settings in your client computer to make sure the network is working and learn your client PC’s LAN IP address and your ZSR0104C SERIES Router’s IP address.
Step 2. Run the WINIPCFG command. (Figure A-34) Figure A–34 Step 3. To release the previous IP settings in your computer, choose your network interface card in the menu. Then click the Release button. (Figure A-35) Figure A–35 Step 4. To obtain new IP settings from WPD –140, click the Renew button. As listed below, the IP address is your client computer’s LAN IP address, and the Default Gateway is ZSR0104C SERIES IP address. Make sure that your IP Address is 10.0.0.
2. For Windows 2000 /NT If you use Windows 2000 or NT, follow the steps to verify the IP settings in your client PC. The steps and screenshots here are based on Windows 2000. It is similar to the other Windows Operating System. Step 1. Go through the path “Start→Run.”(Figure A-37) Figure A–37 Step 2. Please enter command and press the OK button.
Step 3. To release the previous IP settings in your computer, run the command “ipconfig / release.” (Figure A-39) Figure A–39 Step 4. To obtain new IP settings from WPD –140, run “ipconfig / renew.” As listed below, the IP address is your client computer’s LAN IP address, and the Default Gateway is ZSR0104C SERIES IP address. Make sure that your IP Address is 192.168.1.xxx (xxx ranges from 2 to 254), your Subnet Mask is 255.255.255.0, and your Default Gateway is 192.168.1.1.
3. For Windows XP If you use Windows XP, follow the steps to verify the IP settings in your client computer. Step 1. Go through the path “Start→Run.”(Figure A-41) Figure A–41 Step 2. Enter command and press the OK button. (Figure A-42) Figure A–42 Step 3. To release the previous IP settings in your computer, run the command “ipconfig / release.
Step 4. To obtain new IP settings from WPD –140, run “ipconfig / renew.” As listed below, the IP address is your client computer’s LAN IP address, and the Default Gateway is ZSR0104C SERIES IP address. Make sure that your IP Address is 192.168.1.xxx (xxx ranges from 2 to 254), your Subnet Mask is 255.255.255.0, and your Default Gateway is 192.168.1.1. These values confirm that your ZSR0104C SERIES is functioning. (Figure A-44) Figure A-44 4. For Mac The instructions are based on Mac OS 8.5.
5. For Unix/Linux If you use Unix or Linux, follow the steps to verify the IP settings in your client PC. Step 1. To release the previous IP settings of your computer, run the command “kill all dhcpcd”. Step 2. To obtain new IP settings from ZSR0104C SERIES, run the command “dhcpcd eth#”. “#” Means the number of the Ethernet Network Interface Card installed in your client computer. Step 3. To learn the new IP settings, please run the command “ipconfig eth#”.
Appendix B: Common Port Numbers Port Number Service Name 7 Echo 11 Systat 19 Chargen 20 (21) FTP 23 TELNET 25 SMTP 37 Time 49 TACACS 53 DNS 67(68) BOOTP 69 TFTP 70 Gopher 79 Finger 80 HTTP(WEB) 88 Kerberos 109 POP2 110 POP3 113 AUTH 118 SQLServ 119 News/NNTP 123 NTP 137(138)(139) NetBIOS-ns, NetBIOS-dgm, NetBIOS-ssn 143 IMAP2 161(162) SNMP (SNMPT RAP) 220 IMAP3 389 LDAP 443 HTTPS 514 SYSLOG 546(547) DHCP Client (DHCP Server) Page 51
Appendix C: Terminology ‧ Auth (TCP Authentication) ‧ It implements the Identification Protocol, which can identify active TCP connections in Linux environment. Boot ‧ It is the process when the computer starts executing instructions. Browser ‧ It is an application program that helps users to view and interact with the information of the World Wide Web. Cable Modem ‧ It is a device that connects a computer to the Internet via the cable television network.
‧ File Transfer Protocol enables you to transfer files in a bi-directional method over a TCP/IP network. Firewall It is a mechanism that protects a network from attacks from the other networks. Also, it can provide the Internet access control list that restricts clients’ connection to other networks. ‧ Firmware It is programming that is inserted into programmable read-only memory and becomes a ‧ permanent part of a computing or network device. Gateway ‧ It is a device that connects the networks.
‧ to a different network or subnet. IP Address It is a 32-binary digit number that provides the source or destination information on the ‧ Internet. ISP (Internet Service Provider) ‧ It is a company that provides individuals and companies the access to the Internet. LAN (Local Area Network) ‧ It consists a group of computers and network devices that communicate with each other over a network and share the resources of a single processor or server within a small geographic area.
‧ of Ethernet and is commonly implemented by xDSL box Internet Service Provider for Dial-Up Internet connections. PPTP (Point to Point Tunneling Protocol) ‧ It is a standard VPN protocol that secures a private network with encryption and authentication of User ID and Password. RJ-45 Connector ‧ It is a connector that connects Ethernet devices via an Ethernet cable. Router ‧ It is a network device that divides a large network into small sub-networks, and that transmits packets with a routing table.
‧ Telnet is a terminal emulation protocol used commonly on the Internet and TCP/IP network. It enables you to log on to a remote computer and to run a program on the remote computer with an established account and password. Virtual Server (Port Forwarding) A NAT Router can function as a Virtual Server that can forward the service packet specified with a port number to the LAN host specified by the LAN IP address.