Wireless-G PC Card U S E R ’ S G U I D E
Contents Overview ......................................................................... 3 Installation Instructions ................................................. 4 What’s in the Package................................................... 4 Before You Begin .......................................................... 4 Installing the Wireless-G PC Card Adapter.................... 5 Getting Connected ........................................................ 9 The Adapter LEDs..............................
Overview The chapters in this User’s Guide describe how to: • Install the Zoom Wireless-G PC Card adapter on a Windows PC • Connect to a wireless network • Enable security on the Wireless-G PC Card adapter • Use the advanced features of the Wireless-G PC Card configuration software Chapters 1 and 2 cover the basics – what you need to get connected and to enable security. If you are interested in the more advanced features of the Wireless-G PC Card adapter, please see Chapter 3.
1 Installation Instructions This chapter provides simple instructions for installing the Wireless-G PC Card software on a Windows PC. If you have already installed the adapter on a computer (using the separate Quick Start booklet), you can skip this chapter and begin with Chapter 2: Setting Security.
Installing the Wireless-G PC Card Adapter Important! Install the software BEFORE you insert the Wireless-G PC Card into your laptop. 1 2 Insert the Wireless-G PC Card CD into the CD drive. The CD should start automatically and the Language Selection screen should appear. Select your language. (If the CD does not start automatically, on the Windows desktop click the Start button, click Run, and then type E:\setup.exe where E is the letter of your CD drive.
3 4 5 6 The setup program opens: Follow the prompts to complete the installation. At the final setup screen, click Finish and then turn off your computer.
6 7 While your laptop is off, insert the Wireless-G PC Card into the PCMCIA slot on your laptop, making sure that the LEDs are facing up. You will hear the card click softly into place. Turn the computer on. Windows will find your new hardware. You may see a Found New Hardware box indicating the progression of the installation. Typically no user action is necessary. If you are using Windows XP, you may be required to click Next.
10 All operating systems: In the list of devices, double-click Network Adapters and make sure there is no alert icon next to the Zoom Wireless-G PC Card adapter. ( This alert icon appears next to devices that are not responding or that are not installed properly.) Your Wireless-G PC Card adapter is successfully installed! Continue with Getting Connected on the next page.
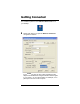
Getting Connected The installation places a Zoom Wireless-G PC Card icon on your desktop: 1 Double-click this icon to open the Wireless-G PC Card configuration software: In the Profile text box, the term “ANY” indicates that the adapter has identified the strongest wireless network signal in your vicinity – in your office building, for example, or in a public space such as a cafe or airport.
2 Select the Site Survey tab to see a list of wireless networks within range: There are two types of wireless networks: Infrastructure and Ad Hoc. • In an Infrastructure network, wireless devices communicate with each other via a wireless access point, a router, or an ADSL modem with built-in wireless technology. • In an Ad Hoc network, a group of wireless devices communicate directly with other “client” devices that are using wireless adapters. The network does not include a wireless access point.
If the network you select has security configured, you must enable and configure security on your computer before you can connect. See Chapter 2, Setting Security on page 13. 4 Your laptop should now be connected to the network, as long as your security settings match those of the access point and other network users. To check your connection, open your Web browser and go to your favorite site.
The Adapter LEDs The states of the LEDs on the Wireless-G PC Card adapter are explained below. LED Status Meaning LINK Flashing Adapter is attempting to connect to a wireless network. Steady Adapter is connected to a network. Flashing Adapter is transmitting or receiving data.
2 Setting Security We strongly recommend security, although you do not need to use it to get your wireless connection working. Important! You must first enable security on the the wireless access point. You then enable security on the adapter using the same configuration that you used for the access point. For example, if the wireless access point is configured for WPA2PSK, you must select WPA2-PSK security in the Wireless-G PC Card configuration software and enter the same encryption key.
This option requires you to enter an encryption key shared by the access point. • WEP (Wired Equivalent Privacy) If the devices in your network do not support WPA2-PSK or WPA-PSK, select WEP data encryption. This method requires you to enter an encryption key. The keys can be 64 or 128 bits in length.
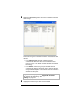
2 3 4 The Zoom Wireless-G PC Card configuration software opens to display the configuration parameters: Make sure that the desired wireless network is displayed in the Profile and SSID text boxes (the term designates an Infrastructure network) and that the Network Type is correct. (For the differences between Infrastructure and Ad Hoc networks, see page 10.) Select the Enable Security check box to open the Security Configuration window.
WPA2-PSK (Pre-Shared Key) 5 6 7 8 9 In the Security Configuration window, click the Encryption Mode drop-down arrow and select WPA2-PSK. In the Pre-shared key [WPA] area, enter the same network key that is used on the wireless access point. We advise you to enter a key with a minimum of 20 random characters. Click OK to save your settings and return to the Configuration tab. On the Configuration tab, click Apply. Click the Close box to exit the configuration software.
WPA-PSK (Pre-Shared Key) If not all of the wireless devices in your network support the recommended WPA2-PSK, select WPA-PSK. 5 6 7 8 9 In the Security Configuration window, click the Encryption Mode drop-down arrow and select WPA-PSK. In the Pre-shared key [WPA] area, enter the same network key that is used on the wireless access point. We advise a key with a minimum of 20 random characters. Click OK to save your settings and return to the Configuration tab. On the Configuration tab, click Apply.
That’s it! You have configured WPA-PSK security for your wireless connection, and you’re ready to use the Internet.
6 In the Preconfigured key [WEP] area, do the following: a In the Format for entering key drop-down list, select • ASCII characters if your network uses all Zoom wireless products b c d 7 • Hexadecimal digits if an access point, router, or some adapters are not Zoom products In the Key Length drop-down list, select 128 bits or 64 bits. Note: 128-bit WEP provides more security than 64-bit, but 128-bit could diminish network performance.
8 Click OK to save your settings and return to the Configuration tab. 9 On the Configuration tab, click Apply. 10 Click the Close box to exit the configuration software. That’s it! You have configured WEP security for your wireless connection, and you’re ready to use the Internet.
5 6 7 In the Security Configuration window, click the Encryption Mode drop-down arrow and select WPA2-Enterprise. In the IEEE 802.1X Authentication area, note that the check box marked Enable IEEE 802.1X authentication for this network is selected. With IEEE 802.1X authentication, each wireless device (client) sends a signal to the wireless access point, which in turn sends the signal to the RADIUS server. The server determines whether or not the client is allowed to join the network.
• TTLS (Tunneled Transport Layer Security). With TTLS, you can select from four authentication extensions: PAP (Password Authentication Protocol) CHAP (Challenge Handshake Authentication Protocol) MS-CHAP (Microsoft’s version of CHAP). 8 9 MS-CHAPV2 (the default). Click the Certification tab and enter the required information (see page 25). Click OK to save your settings and return to the Configuration tab. 10 11 On the Configuration tab, click Apply.
WPA Select WPA if you are linking to a corporate network that uses a RADIUS (Remote Authentication Dial-In User Service) server that does not support WPA2. 5 6 In the Security Configuration window, click the Encryption Mode drop-down arrow and select WPA. In the IEEE 802.1X Authentication area, note that the check box marked Enable IEEE 802.1X authentication for this network is selected. With IEEE 802.
7 Click the EAP (Extensible Authentication Protocol) Type drop-down list and select an authentication protocol: • PEAP (Protected Extensible Authentication Protocol – the default). With PEAP, you can select from three authentication extensions: MS-CHAPV2 (the default). This is Microsoft’s version of CHAP (Challenge-Handshake Authentication Protocol. GTC TLS/SmartCard • TLS (Transport Layer Security). There are no authentication extension options with TLS. • TTLS (Tunneled Transport Layer Security).
9 Click OK to save your settings and return to the Configuration tab. 10 11 On the Configuration tab, click Apply. Click the Close box to exit the configuration software. That’s it! You have configured WPA security for your wireless connection, and you’re ready to use the Internet.
Changing your Security Setting If the type of security on your wireless network changes, you need to modify your security settings. On the Configuration tab, click the Configure Security button to select a different security option and enter the required information.
3 Advanced Options The Zoom Wireless-G PC Card utility provides options so you can create profiles, monitor the signal strength of your network connection, scan available networks, and specify advanced settings. This chapter tells you when and how to use each of these options. Creating Profiles A profile is a collection of settings needed for a particular wireless connection.
2 On the Configuration tab, in the Profile text box, enter a name for the profile you want to create. For example, let’s say you have a small home network to which you want to be able to switch quickly when you arrive home. Give the profile the name “Home”: 3 In the Configuration area, enter the following settings: • SSID – Enter the network name. In the example above, the SSID is Home. • Network Type – From the drop-down list, select Ad Hoc.
• Enable Security – Select this check box to open the Security Configuration window. Note: If you are setting up an ad hoc network, as in this example, only WEP security is available to you. 4 5 After you enter your security settings, click OK to return to the Configuration tab. In the Configuration area, click the Apply button to save the settings. Click the Save button to save the Profile.
Monitoring Link Status The Status area on the Configuration tab displays information about your wireless connection: • State: (Infrastructure only) The name and the MAC address of the wireless access point to which your computer is connected. • Current Tx (Transmission) Rate: Highest transmission speed in Megabytes per second of the last received packet. • Current Channel: The Wi-Fi frequency channel. • Throughput (Packets/sec): TX = number of packets transmitted per second without errors.
Using Site Survey and Rescan Use the Site Survey window and the Rescan button when you need to do any of the following: • Find a list of network names (ESSIDs) so you can connect to a network • Identify the MAC address (BSSID) of your wireless access point or wireless router • Check the channel difference between your network and other networks within range • Check the network type (infrastructure or ad hoc) of your network • Verify whether security is enabled for your network To use this window, click the
The information displayed on the Site Survey tab is as follows: • ESSID (Extended Service Set Identifier): An Extended Service Set consists of two or more Basic Service Sets (see below). An ESSID, also known as an SSID or Network Name, is chosen by the person who sets up the network. The ESSID is a code attached to all packets sent over an infrastructure wireless network. The code can contain up to 32 alphanumeric characters. All devices in the network must share the same ESSID.
Advanced Configuration To access this window, click the Advanced button on the Configuration tab. • Power Save Enabled: When you select this option, the Wireless-G PC Card adapter immediately signals the access point that it is in Power Save mode. The access point buffers all packets until it is polled by the adapter. Note: The access point you use must also support Power Save. • Nitro XM: Selected by default.
Appendix A TCP/IP Settings By default, Windows is set for dynamic addressing (DHCP). Generally, this is the correct setting for an Infrastructure network, but needs to be changed if you are using an Ad Hoc network. (Note: Use our instructions as a basic guide. Advanced users will know other ways to set up their networks.) Please go to the section that corresponds to your Windows operating system. Windows XP 1 Follow these steps to open the Internet Protocol (TCP/IP) Properties dialog box.
b If this is the first computer to be set up in the ad hoc network, enter 10.0.0.5 for an IP address. If you are adding it to an existing ad hoc network, increment the last digit by one, for example, 10.0.0.6, 10.0.0.7 c Enter 255.255.255.0 for Subnet mask. The Subnet mask should be the same for each computer in your ad hoc network. d Enter 10.0.0.5 for Default gateway and Preferred DNS server. (This is the IP address of the first computer that was set up in your ad hoc network.
Windows 2000 1 Follow these steps to open the Internet Protocol (TCP/IP) Properties dialog box. a From the desktop, click the Start button, point to Settings, then click Network and Dial-up Connections. b Right-click the Local Area Connection icon, and select Properties. c In the Properties dialog box, in the Connect Using box, make sure the Zoom Wireless-G PC Card adapter is displayed. From the Components list, select Internet Protocol (TCP/IP) and click the Properties button.
e Click OK twice. That’s it! You have set static IP addressing for a Windows 2000 computer in an ad hoc network. 3 For Infrastructure Networks: To verify your DHCP settings, complete the following: a Ensure that Obtain an IP address automatically is selected. b Ensure that either Obtain a DNS server address automatically or Enable DNS is selected. All text boxes for static IP addressing should be blank. c Click OK twice to exit.
b If this is the first computer to be set up in the ad hoc network, enter 10.0.0.5 for IP address. If you are adding a computer to an existing ad hoc network, increment the last digit by one, for example, 10.0.0.6, 10.0.0.7 c Enter 255.255.255.0 for Subnet mask. The Subnet mask should be the same for each computer in your ad hoc network. d Click the Gateway tab and enter 10.0.0.5 for Default Gateway. (This is the IP address of the first computer that was set up in your ad hoc network.
Appendix B Troubleshooting If your Zoom Wireless-G PC Card adapter is not working properly, try each of the following steps until you get it to work. 1 2 3 4 5 6 Make sure the adapter is firmly inserted into the laptop’s PC card slot. Turn the laptop off, then on, and then check to see if the adapter is working. Make sure that the adapter is not physically damaged. If possible, try installing the adapter on another laptop. Run the Zoom Wireless-G PC Card utility.
7 8 40 If the adapter still does not work, uninstall the software and then re-install it: First, turn off your computer and unplug the adapter from the PC Card port. Then select Start – All Programs – Zoom Wireless-G PC Card – Uninstall Zoom Wireless-G PC Card. Follow the prompts to uninstall, then re-install the software (see page 5). If the above solutions do not work, consult Technical Support. Please see Appendix C: Zoom Technical Support Services on page 41.
Appendix C Zoom Technical Support Services Zoom has a variety of technical support services available to our customers. We strive to provide convenient, professional support responsive to our customers’ needs and capabilities. If you find yourself unable to get your Zoom product to operate, and you have thoroughly reviewed your owner’s manual and all relevant documentation, please feel free to contact us for help.
World Wide Web Zoom’s Web page lets you send email for assistance, register on-line, access product reviews and descriptions, and do a whole lot more. Visit the Zoom Technical Support area for the latest Flash Files and Drivers for your Zoom Product. To access Zoom’s Web page, please log onto your local Internet Service Provider, then go to the Web browser and select: www.zoom.com From Zoom’s Homepage you can easily go to Technical Support or many other useful areas.
Contact Zoom by Email You can email Zoom with any tech support questions you might have and one of our Technical Support Engineers will respond by email within 2 business days. You may request personal assistance via email at www.zoom.com/techmail.
Return of Defective Units Please contact your local distributor or reseller for Factory Authorized Repair or Replacement of your In-Warranty Defective Product.
Appendix D Regulatory Information U.S. FCC Part 15 Emissions Statement This equipment has been tested and found to comply with the limits for a Class B digital device, pursuant to part 15 of the FCC Rules. These limits are designed to provide reasonable protection against harmful interference in a residential installation. This equipment generates, uses and can radiate radio frequency and, if not installed and used in accordance with the instructions, may cause harmful interference to radio communications.
Countries of Operation & Conditions of Use in the European Community This device is intended to be operated in all countries of the European Community. Requirements for indoor vs. outdoor operation, license requirements and allowed channels of operation apply in some countries as described below: Note: The user must ensure that the channels of operation are in conformance with the spectrum usage rules for European Community countries as described below.
Declaration of Conformity Declaration of Conformity Déclaration de conformité Konformitätserklärung Dichiarazione di conformità Declaração de Conformidade Konformitetsdeklaration Overensstemmelseserklæring Conformiteitsverklaring van de EU Δήλωση Συμμόρφωσης Deklaracja zgodności Declaración de conformidad Cam kết về sự tuân thủ ở Châu Âu Manufacturer/Producent/Fabrikant/ Constructeur/Hersteller/Κατασκευαστής/ Fabbricante/ Fabricante/Tillverkare/ Nhà sản xuất Zoom Technologies, Inc.
NOTICE This document contains proprietary information protected by copyright, and this User’s Guide and all the accompanying hardware, software, and documentation are copyrighted. No part of this document may be photocopied or reproduced by mechanical, electronic, or other means in any form.