Operation Manual © ZOOM Corporation Reproduction of this manual, in whole or in part, by any means, is prohibited.
SAFETY PRECAUTIONS / Usage Precautions Handling SAFETY PRECAUTIONS Warning In this manual, symbols are used to highlight warnings and cautions for you to read so that accidents can be prevented. The meanings of these symbols are as follows: This symbol indicates explanations about extremely dangerous matters. If users ignore this symbol and Warning handle the device the wrong way, serious injury or death could result. This symbol indicates explanations about dangerous matters.
Contents SAFETY PRECAUTIONS / Usage Precautions ................................ 2 SAFETY PRECAUTIONS .................................................................... 2 Usage Precautions .............................................................................. 2 Features .............................................................................................. 4 Terms Used in This Manual .............................................................. 5 Controls and Functions / Connections .....
Features Thank you for selecting the ZOOM B2.1u (hereafter simply called the "B2.1u"). The B2.1u is a multi effect processor with the following features and functions. ● Latest technology for outstanding performance 96 kHz / 24 bit sampling (with 32 bit internal processing) assures excellent sound quality. The B2.1u carves out a sonic outline in superb detail while preserving the original sound character of the bass guitar. The B2.
Terms Used in This Manual This section explains some important terms that are used throughout the B2.1u documentation. IN COMP/LIMIT WAH/EFX DRIVE/SYNTH ZNR/MIX LO EQ HI EQ ■ Effect module As shown in the illustration above, the B2.1u can be thought of as a combination of several single effects. Each of these effects is referred to as an effect module.
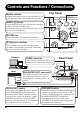
Controls and Functions / Connections Top Panel Module selector Switches between play mode and edit mode. In edit mode, the knob selects the module for operation. BANK [-]/[+] keys In play mode, the keys serve for directly switching to the next lower or higher bank. In edit mode, the keys switch the effect type for the currently selected module. [STORE] key Serves for storing edited patches in memory.
Controls and Functions / Connections Parameter knobs 1 - 3 These knobs allow changing the level of effect parameters or of the overall patch. During rhythm playback, the knobs let you select a pattern, set the tempo, and adjust the rhythm volume. [PEDAL ASSIGN] key This key lets you select the function of the built-in expression pedal. The currently selected function is shown by a lit LED. [TAP] key Allows manual input of time related effect parameter values such as delay time, and rhythm pattern tempo.
Selecting a Patch To try out the various effects of the B2.1u, we recommend that you simply play your instrument while switching patches. Turn power on Use a shielded cable with mono phone plug to connect the bass guitar to the [INPUT] jack of the B2.1u. When using the B2.1u with the AC adapter, plug the adapter into the outlet and plug the cable from the adapter into the [DC IN] jack on the B2.1u. Set the [POWER] switch on the rear panel of the B2.1u to ON.
Selecting a Patch Adjust tone and volume To adjust the effect sound and volume levels in play mode, the Parameter knobs 1 – 3 can be used. Each knob controls a specific parameter. Parameter knob 1 Adjusts the CABINET parameter of the DRIVE/SYNTH module (cabinet simulator effect intensity). Parameter knob 3 Adjusts the PATCH LEVEL parameter (output level of the entire patch). Parameter knob 2 Adjusts the TONE parameter of the DRIVE/SYNTH module (mainly distortion sound character).
Using the Tuner The B2.1u incorporates an auto-chromatic tuner. To use the tuner function, the built-in effects must be bypassed (temporarily turned off) or muted (original sound and effect sound turned off). Switch to bypass or mute Setting the B2.1u to the bypass In play mode, press both [W]/[Q] foot switches together briefly and release. BP Setting the B2.1u to the mute state In play mode, press both [W]/[Q] foot switches together and hold for at least 1 second.
Using the Tuner Adjusting the reference pitch of the tuner If required, you can fine-adjust the reference pitch of the B2.1u tuner. The default setting after power-on is center A = 440 Hz. Turn Parameter knob 1. The current reference pitch is shown. The adjustment range is 35 – 45 (center A = 435 to 445 Hz). While the reference pitch value is shown, turn Parameter knob 1 to adjust it. 40 42 When you release the Parameter knob, the display indication will return to the previous condition after a while.
Using the Rhythm Function The B2.1u has a built-in rhythm function that plays realistic drum sounds in various patterns. The rhythm function is available in play mode or in the bypass/mute condition. Set the B2.1u to play mode If the Module selector is set to a position other than "PLAY", set it to "PLAY". Start the rhythm function To start the rhythm function, press the RHYTHM [R/P] key. NOTE During rhythm playback, the REVERB module is OFF. Select a rhythm pattern The B2.
Using the Rhythm Function Adjust the rhythm volume To adjust the rhythm volume, turn Parameter knob 3. 25 When you turn the Parameter knob, the current setting (0 – 30) is shown on the display. Adjust the tempo The rhythm pattern tempo can be adjusted in the range of 40 – 250 BPM (beats per minute). To continuously change the rhythm tempo, turn Parameter knob 2. To manually specify the rhythm tempo, hit the [TAP] key at least three times in the desired interval.
Editing a Patch The patches of the B2.1u can be freely edited by changing the effect parameter settings. Try editing the currently selected patch to create your own sound. Select the effect module Turn the Module selector to select the effect module to edit. The following settings are available.
Editing a Patch Terminate the edit mode To terminate the edit mode and return to the play mode, set the Module selector to the "PLAY" position. NOTE When you return to play mode and select another patch, the changes you have made in edit mode will be lost unless you store the patch first. To retain the changes, store the patch as described on page 16. Change the parameter value To change the setting value of effect parameters, use the Parameter knobs 1 – 3.
Storing/Copying Patches An edited patch can be stored in a bank of the user area (A – d). It is also possible to store an existing patch in another location to create a copy. In play mode or edit mode, press the [STORE] key The bank and patch number are shown on the display as a flashing indication. A0 NOTE Patches of banks in the preset area (0 – 3) are read-only. No patches can be stored or copied into these locations.
Storing/Copying Patches To cancel the store process To cancel the store process, operate the Module selector before pressing the [STORE] key again ( ). Press the [STORE] key once more When the store/copy process is completed, the B2.1u returns to the previous mode, with the target patch being selected. D4 Specify the store/copy target patch number To specify the store/copy target patch number, use the [W]/[Q] foot switches. D4 ZOOM B2.
Using the Built-in Expression Pedal The expression pedal on the top panel of the B2.1u lets you adjust the effect sound or the volume in real time during play. Which element is controlled by the pedal can be selected for each patch individually. Select the patch for which the expression pedal is to be used Select the element to be controlled by the expression pedal Press the [PEDAL ASSIGN] key to select the element to be controlled by the expression pedal.
Using the Built-in Expression Pedal Operate the pedal Move up or down While playing your instrument, move the expression pedal up or down. To switch a module on or off When you push the expression pedal fully down, the module selected with the [PEDAL ASSIGN] key is switched on or off. Push fully down Store the patch as necessary The expression pedal setting can be stored for each patch individually.
Other Functions This section describes how to use the internal expression pedal as well as an external pedal or foot switch. Use of the B2.1u as an audio interface or direct box is also explained. Making settings for the internal expression pedal The built-in expression pedal on the top panel of the B2.1u can function as a volume pedal or it can be used to control an effect parameter in real time. Which function is selected for the expression pedal is stored for each patch individually.
Other Functions 1. Turn power to the B2.1u on while keeping the [PEDAL ASSIGN] key depressed. The indication "dn" appears on the display. DN 2. With the expression pedal fully raised, press the [STORE] key. Using an external expression pedal (FP01/ FP02) When you connect an optional expression pedal (FP01/FP02) to the [CONTROL IN] jack of the B2.1u, you can use that pedal as a volume pedal, separately from the built-in expression pedal. 1.
Other Functions 3. Turn Parameter knob 2 to select one of the following functions for the foot switch. ● bP (bypass/mute) The foot switch controls bypass or mute on/off. This has the same effect as pressing both [W]/ [Q] foot switches at the same time in play mode. ● dM (delay input mute) The foot switch controls muting on/off for the delay module input signal. HINT • For information on effect parameters supporting the tap function, see pages 27 – 33.
Other Functions ■ Sampling frequency audio tracks of the DAW application, mixed with the guitar sound processed by the effects of the B2.1u (see illustration at the bottom of this page). 32 kHz / 44.1 kHz / 48 kHz HINT With each of the operating systems listed above, the B2.1u will function as an audio interface simply by connecting the USB cable. There is no need to install any special driver software. To use the B2.1u as an audio interface for the computer, connect the [USB] connector of the B2.
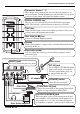
Restoring Factory Defaults To use this function, connect the [BALANCED OUT] connector of the B2.1u to the PA mixer or recording console, using XLR balanced cable. At the same time, you can also connect the [OUTPUT/PHONES] jack to the bass amplifier for monitoring. (The amp settings will have no effect on the signal supplied at the [BALANCED OUT] connector.) [BALANCED OUT] connector Mixer B2.1u processing, select the "PRE" position (switch disengaged).
Linking Effects The patches of the B2.1u consist of nine serially linked effect modules, as shown in the illustration below. You can use all effect modules together or selectively use certain modules by setting them to on or off.
Effect Types and Parameters How to read the parameter table Effect parameters 1 – 3 These are the parameters that can be adjusted with Parameter knobs 1 – 3 when the effect type is selected. The setting range for each parameter is shown. Three-digit setting values are shown with a dot between the two numerals. Example: 1 – 98, 1.0 = 1 – 98, 100 Module selector The Module selector symbol shows the position of the knob at which this module/parameter is called up.
Effect Types and Parameters COMP/LIMIT COMP/LIMIT (Compressor/Limiter) module This module includes a compressor that keeps the overall signal level within a certain range by attenuating high-level signal components or boosting low-level signal components, and a limiter that suppresses peak components. COMPRESSOR CP CP The compressor attenuates high-level signal components and boosts low-level signal components to keep the overall signal level within a certain range.
Effect Types and Parameters TREMOLO TR tr This effect periodically varies the volume. DEPTH 0 – 98, 1.0 Adjusts the modulation depth. RATE 0 – 50 TAP Adjusts the effect rate. u0 – u9, d0 – d9, t0 – t9 Allows selection of the modulation waveform. Available settings are "u" (rising sawtooth), "d" (falling sawtooth), and "t" (triangular). Higher setting values result in more clipping of wave peaks, which reinforces the effect. WAVE PHASER PH PH This effect produces sound with a pulsating character.
Effect Types and Parameters DRIVE/SYNTH DRIVE/SYNTH module This module provides special effects such as 13 types of amp and stomp box simulations and a synth bass sound. The mixing balance of original sound and effect sound/synth sound, and the signal level after passing the module are adjusted with the ZNR/MIX module. * Manufacturer names and product names mentioned in this table are trademarks or registered trademarks of their respective owners.
Effect Types and Parameters MONO SYN (Mono Synth) MS MS This is a monophonic (single-note) bass synthesizer that detects the input signal pitch. CABINET oF, 1 – 3 Numeric settings select different cabinet types. s1 – s5, p1 – p5, m1 – m5 Selects the waveform type and sound variation. "s" produces a sawtooth wave, "p" produces a square wave, and "m" uses PWM (pulse width modulation). VARI DECAY 0 – 98, 1.0 Adjusts the rate of sound change.
Effect Types and Parameters HI EQ HI EQ module This is an equalizer for the high frequency range. You can select either a 3-band equalizer or parametric equalizer. HI EQ (High EQ) HE HE This is a 3-band equalizer that adjusts the frequency range above 1 kHz. 1kHz 3kHz ±12 1 kHz, peaking type equalizer. 6kHz ±12 3 kHz, peaking type equalizer. ±12 6 kHz, shelving type equalizer. HI PARAMETRIC EQ (High Parametric EQ) HP HP This is a parametric equalizer for the frequency range above 800 Hz.
Effect Types and Parameters PEDAL PITCH PP PP This effect allows using a pedal to shift the pitch in real time. COLOR See Table 3 Selects the type pitch change type effected by the pedal. Table 3 COLOR MODE 1 2 3 4 Pedal minimum value UP -100 cent dn Original sound only DOUBLING UP Detune + DRY dn 0 cent UP +1 octave dn 0 cent UP -2 octaves dn MODE TONE UP, dn Selects the direction of the pitch change.
Effect Types and Parameters HARMONIZED PITCH SHIFTER HP HP This is an intelligent pitch shifter that automatically generates harmonies according to a preset key and scale. -6, -5, -4, -3, -m, m, 3, 4, 5, 6 Determines the interval for the pitch shifted sound (see Table 4). KEY SCALE Table 4 Setting Type of scale Interval Sixth down -6 Fifth down -5 Major scale Fourth down -4 Third down -3 Third down -m Minor scale Third up m C, Co, d...
Effect Types and Parameters CONTROL CONTROL module Serves for making pedal settings and lets you control the foot switch function and master level setting applying to all patches. FS RTM DESTINATION See Table 6 Selects the modulation target module that is controlled with the built-in expression pedal (see Table 6). MASTER LEVEL 0 – 98, 1.0 See Table 7 When a foot switch (FS01) is connected to the [CONTROL IN] jack, this selects the function that can be operated with the foot switch (See Table 7).
Specifications Effect types 47 Effect modules Max.
B2.
B2.1u Patch List Description No. Patch name AMPEG VOLUME Phaser sound lets you embellish your slap playing with modulation effects. PHASER PHASER RATE A2 Barred All-rounder distortion sound is great for chord or lead playing. Turn on pedal wah, flanger, and echo for even more excitement. ODB-3 FLANGER RATE (OFF) A3 AUTO WAH Traditional-style auto wah with many applications. Transform percussive play with ghost notes straight into a funky sound.
USB/Cubase LE Startup Guide USB/Cubase LE Startup Guide This USB/Cubase LE Startup Guide explains how to install Cubase LE on a computer, how to make the connection and settings of this unit, and how to record your instrument play. Cubase LE Installation Connections and Preparations To connect this unit to a computer running Windows XP and to enable audio input/output, proceed as follows.
Continued from front Cubase LE Installation Access the "File" menu and select "New Project". Connections and Preparations Recording with Cubase LE Windows XP MacOS X Make the following settings for the new audio track. 2. The new project window appears. Here you can select a project template. 1. 2. Drag the audio track boundary to the right to display all buttons.
USB/Cubase LE 4 Startup Guide USB/Cubase LE 4 Startup Guide This USB/Cubase LE 4 Startup Guide explains how to install Cubase LE 4 on a computer, make connections and settings for this unit, and perform recording. Cubase LE 4 installation Connections and preparation To connect this unit to a computer running Windows Vista (or Windows XP) and to enable audio input/output, proceed as follows. The installation description uses Windows Vista as an example.
Continued from front Cubase LE 4 installation Connections and preparation From the "Devices" menu of Cubase LE 4, select "VST Connections" and select the device containing the string "Zm In (Out)" ( "USB Audio CODEC" for MacOS X) as input port and output port. Use Cubase LE 4 to record Windows Vista / XP HINT New audio track MacOS X Check the recorded content. When the monitoring button is enabled, the level meter next to the fader shows the input level to the audio track.