OPERATION MANUAL Thank you very much for purchasing the ZOOM . Please read this manual carefully to learn about all the functions of the so that you will be able to use it fully. Keep this manual in a convenient place for reference when necessary.
Usage and safety precautions Safety Precautions Usage Precautions Interference with other electrical equipment In this manual, symbols are used to highlight warnings and cautions that you must read to prevent accidents. The meanings of these symbols are as follows: In consideration of safety, the has been designed to minimize the emission of electromagnetic radiation from the device and to minimize external electromagnetic interference.
Introduction More advanced user interface We have made the stompbox-style user interface developed for our G series even more advanced. Using the three displays, you can easily check effect parameters and effect chains. Detailed emulations of amp and cabinet characteristics The delivers studio-quality sound with precise emulations of circuit operations and tube amp characteristics along with cabinets modeled using impulse responses.
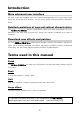
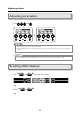
Part names Front panel Display Parameter knobs (In explanations, these will be shown like this: ) TYPE keys Footswitches FS1–FS3 BANK/SCROLL switches Rear panel INPUT jack Pedal switch ( only) Guitar 4
Part names Control knob/enter key MENU key Expression pedal ( only) Mode switch AUX IN jack OUTPUT jacks PHONES jack USB port POWER switch DC 9V AC adapter connector Dedicated AC adapter (AD-16) Headphones Guitar amp Computer Monitor speakers Portable music player, etc.
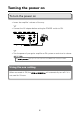
Turning the power on To turn the power on • Lower the amplifier's volume all the way. • Connect the AC adapter before setting the POWER switch to ON. • Turn the power of your guitar amplifier or PA system on and raise its volume. HINT The starts up in the mode used when the POWER switch was last turned OFF. Using the eco setting When eco mode is ON, the will automatically turn off if it is not used for 10 hours.
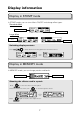
Display information Display in STOMP mode In STOMP mode, you can turn effects ON/OFF and change effect types. Standard effect Parameter names Parameter values Large effect Parameter names Parameter values Switching display contents Press to switch between showing parameters and effect names. Display in MEMORY mode In MEMORY mode, you can change patches and banks. Patch number Patch name Showing the effects used in a patch Press to show the effects used in a patch.
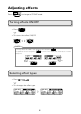
Adjusting effects Press to change to STOMP mode. Turning effects ON/OFF • Press . • This turns that effect ON/OFF. [OFF] [ON] NOTE Some large effects have SOLO or other special functions assigned to The parameter function assigned to . is shown on the Display with white letters on a dark background. Ordinary ON/OFF SOLO ON/ OFF Selecting effect types • Press . • This changes the effect type.
Adjusting effects NOTE The allows you to combine up to 7 effects in whatever order you like. If limits on the processing capability or the number of units used are exceeded, a "PROCESS OVERFLOW" warning will appear and effects will be bypassed. To end bypassing, delete some effects or change their types. Selecting effect categories • While pressing and holding , press . • The category name will appear and the effect will be changed to the first effect type in the category.
Adjusting effects Adjusting parameters • Turn , , and . HINT • Parameter adjustments are saved automatically. • When AUTO SAVE is set to OFF, a parameter saving screen will appear when you try to change patches. (¦P19) NOTE Set Time, Rate and other effect parameters to musical notes to sync them to the tempo. (¦P44) Scrolling effect displays • Use • Press and or to scroll the screen. .
Adjusting effects • Press repeatedly to scroll the effect displays. È • Press . Adding effects • Press • Turn to open the MENU screen. to select ADD. NOTE If 7 effects are already in use, ADD will not be shown. • Press to open the ADD screen.
Adjusting effects • Turn to select where the effect will be added. • Press to confirm where the effect is added. • A cable will be added to the Display. • Press to select the effect type.
Adjusting effects Deleting effects • Press • Turn to open the MENU screen. to select DELETE. to open the DELETE screen. • Press • Turn to select the effect to delete. • Press . • Press to delete the effect. HINT Turn to cancel deletion.
Adjusting effects • Press . Changing the effect order • Press • Turn to open the MENU screen. to select CHAIN. • Press to open the CHAIN screen. • Turn to select the effect to swap. • Press to confirm the effect to swap.
Adjusting effects • Turn • Press to swap with the next effect in the chain. . Using amp effects The amp effects in the can provide optimal sounds when combined with cabinet effects. Change the MIC parameter of the cabinet effect according to the device connected.
Using patches Press to switch to MEMORY mode. Selecting patches ■■ Switching patches • Press , or . • This changes the patch. NOTE The selected patch has a white background. ■■ Switching banks • Use and . • This changes the bank. È NOTE • Press and hold , to change banks continuously. • See P24 for information about the preselect function that enables changing to banks with distant numbers.
Using patches Setting independent patch parameters ■■ Entering patch setting mode • Press • Turn to open the MENU screen. to select PATCH. • Press to open the PATCH screen. ■■ Adjusting patch levels • Turn • Press • Turn to select LEVEL. . to set the patch level.
Using patches NOTE The setting range is 0–120. • Press to confirm the patch level. ■■ Changing patch names to select the character to change. • Turn • Press • Turn to confirm the character to change. to change the character. • Press to confirm the changed character. NOTE • The characters and symbols that can be used are as follows. ! # $ % & ' () +, -. ; = @ [] ^ _ ` { } ~, (space) A–Z, a–z, 0–9 • Press and hold to change the character type.
Using patches ■■ Ending patch setting mode • Press . Saving patches • Press • Turn • Press • Turn • Press • Turn to open the MENU screen. to select SAVE. to open the SAVE screen. to select where the patch will be saved. to confirm where the patch will be saved. to select YES.
Using patches HINT Select NO to cancel saving the patch. • Press to save the patch. Swapping patches • Press • Turn • Press • Turn • Press to open the MENU screen. to select SWAP. to open the SWAP screen. to select the patch to be swapped. to confirm the patch to be swapped.
Using patches • Turn to select YES. HINT Select NO to cancel swapping. • Press to swap the patches.
Adjusting the master level • Press • Turn to open the MENU screen. to select M.LVL. • Press • Turn to open the MASTER LEVEL screen. to adjust the master level. NOTE The setting range is 0–120. HINT You can also turn to adjust the master level in both STOMP and MEMORY modes.
Changing various settings Change various settings on the SETUP screen. Opening the SETUP screen • Press • Turn • Press to open the MENU screen. to select SETUP. to open the SETUP screen.
Changing various settings Setting the preselect function Turn PRESELECT ON to enter standby when the bank is switched, allowing you to press a foot switch to confirm the patch change. • On the SETUP screen, turn • Press • Turn • Press to select PRESELECT. . to set PRESELECT to ON/OFF. to confirm the preselect setting.
Changing various settings Setting the eco mode When eco mode is on, the for 10 hours. will automatically turn off if not used • On the SETUP screen, turn • Press • Turn • Press to select eco. . to set eco to ON/OFF. to confirm the eco mode setting.
Changing various settings Setting the auto save function Enable parameters to be saved automatically. • On the SETUP screen, turn • Press • Turn to select AUTO SAVE. . to set AUTO SAVE to ON/OFF. NOTE When set to OFF, no patch or effect parameters will be saved automatically. • Press to confirm the auto save setting. Note about switching patches When AUTO SAVE is set to OFF, if you try to switch patches after changing any parameters, a message will appear asking to save the parameter changes.
Changing various settings Adjusting the display contrast • On the SETUP screen, turn • Press • Turn • Press • Turn to select LCD CNTRST. . to select a display to adjust its contrast. to confirm the display. to adjust the contrast. NOTE The setting range is 1–13. • Press to confirm the contrast setting.
Using the tuner Activating the tuner • Press and hold • Press in STOMP or MEMORY mode. or . (Press ) The BYPASS sound is output when the TUNER is active. (Press ) No sound is output when the TUNER is active. • This opens the TUNER screen.
Using the tuner Tuning a guitar • Play the open string that you want to tune and adjust its pitch. Chromatic tuner The name of the nearest note and the pitch accuracy are shown. Correct pitch ¥Flat Sharp¦ Other tuners The number of the nearest string and the pitch accuracy are shown. Correct pitch ¥Flat Closing the tuner • Press when the TUNER screen is open.
Using the tuner Changing the tuner settings ■■ Opening the TUNER SETTINGS screen • Press • Turn • Press to open the MENU screen. to select TUNER. to open the TUNER SETTINGS screen.
Using the tuner ■■ Changing the standard pitch of the tuner • On the TUNER SETTINGS screen, turn • Press • Turn to select CALIBRATION. . to change the standard pitch. NOTE The setting range is 435–445 Hz for middle A. • Press to confirm the standard pitch of the tuner. HINT You can also turn the center unit when the TUNER screen is open to change the standard pitch.
Using the tuner ■■ Changing the tuner type • On the TUNER SETTINGS screen, turn • Press • Turn to select TYPE. . to select the tuner type. CHROMATIC The chromatic tuner shows the nearest pitch name (semitone) and how far the input sound is from that pitch. Other tuner types Depending on the selected type, the nearest string name and how far the sound input is from that pitch are shown. The following tuner types can be selected.
Using the tuner ■■ Using flat tuning • On the TUNER SETTINGS screen, turn • Press • Turn to select FLAT. . to change the flat tuning. NOTE • You can drop the tuning by one ( x 1), two ( x 2) or three ( x 3) semitones. • Drop tuning is not possible when the TYPE is set to CHROMATIC. • Press to confirm the flat tuning setting.
Using rhythms Selecting a rhythm • Press to change to STOMP mode. • Use to select RHYTHM for the desired unit. NOTE One RHYTHM can be selected per patch. Playing a rhythm • Press for the unit using the rhythm effect. • The rhythm starts playing. HINT • During rhythm playback, you can switch between STOMP and MEMORY modes. • If you change a patch during rhythm playback, the rhythm will stop. Stopping a rhythm • During rhythm playback, press for the unit using the rhythm. • The rhythm stops.
Using rhythms Setting rhythms ■■ Selecting rhythm patterns • Turn for the unit using the rhythm. NOTE See P50 for information about the patterns. ■■ Adjusting the rhythm tempo • Turn for the unit using the rhythm. NOTE • The setting range is 40–250 bpm. • This tempo setting is used by every effect, rhythms and the looper. ■■ Adjusting the rhythm volume • Turn for the unit using the rhythm. NOTE The setting range is 0–100.
Using the looper Selecting the looper • Press • Use to change to STOMP mode. to select a LOOPER for the desired unit. 1-unit looper 2-unit looper NOTE • There are 4 types of loopers: 1-unit mono, 2-unit mono, 1-unit stereo and 2-unit stereo. • One LOOPER can be selected per patch. Recording, playing and clearing phrases ■■ Recording phrases • Press for the first unit in the LOOPER. • This starts recording.
Using the looper • Recording stops and loop playback starts. If the recording time is set to "MANUAL" Loop playback will start when you press reached. again or when the maximum recording time is If the recording time is set to a musical note Loop playback will start when the set recording time is reached. HINT • See P39 for how to set the LOOPER recording time. • During phrase recording and playback, switching to MEMORY mode will not interrupt it.
Using the looper With 2-unit looper • During loop playback, press for the second unit in the LOOPER. • This stops the playback. ■■ Deleting phrases With 1-unit looper • When loop playback is stopped, press and hold the looper. for the unit using • This deletes the phrase. With 2-unit looper • When loop playback is stopped, press LOOPER. • This deletes the phrase.
Using the looper Setting the looper ■■ Setting the looper recording time • Turn for the unit using the looper. NOTE • The setting options include MANUAL and 1–64 quarter notes. • The recording time for the mono looper is from 1.5 to 80 seconds (40 seconds when UNDO is ON). • The recording time for the stereo looper is from 1.5 to 40 seconds (20 seconds when UNDO is ON). • Settings that will not fit in the recording time will be adjusted automatically.
Using the looper ■■ Setting how loop playback stops • Turn for the unit using the looper. STOP Stop playback immediately. FINISH Play to the end and then stop. FADE OUT Stop after fading out. ■■ Adjusting the looper volume • Turn for the unit using the looper. NOTE The setting range is 0–100.
Using the pedal Using a connected pedal ( only) ■■ Setting up the connected pedal You can set a pedal effect to be assigned to the connected pedal. • Press • Turn • Press • Turn to open the MENU screen. to select EX PDL. to open the EXT PEDAL screen. to turn the connected pedal ON/OFF. HINT When EXT PEDAL is ON, you can use a pedal effect.
Using the pedal Using the pedal ■■ Selecting the pedal effect • Press to change to STOMP mode. • Press to select the pedal effect. NOTE To select the PEDAL category, press . • Press while pressing or press while pressing down. HINT • Press the front-end of the expression pedal down to turn the pedal effect ON/OFF. This does not, however, change the ON/OFF setting. • You can also press to turn the pedal effect ON/OFF. This does change the ON/OFF setting.
Using the pedal Calibrating the pedal ■■ Calibrating the sensitivity • Turn the power switch ON while pressing . • Operate the pedal as instructed on the display, and press required. when • "Complete!" will appear before play mode becomes active. NOTE Calibrate in the following cases. −Stepping on the pedal has little effect. −The volume and tone changes greatly even when the pedal is only pressed lightly.
Using the tap tempo function Loopers, rhythms, delays and some modulation effects can be synchronized to the tempo. To synchronize, first select an effect that has a parameter that can be synchronized and set that parameter (Time or Rate, for example) to a note value ( or ). Enabling tap tempo • Press and hold • Press in STOMP or MEMORY mode. to open the TAP TEMPO screen.
Using the tap tempo function Setting the tempo • Press at least twice at the desired tempo. • This sets the tempo. HINT You can also turn for the center unit to adjust the tempo. Ending tap tempo setting • Press when the TAP TEMPO screen is open.
Restoring default settings and patches • While pressing • Turn , set the POWER switch to ON. to select YES. HINT Select NO to cancel initialization. • Press to initialize. • "Complete!" will appear on the display when initializing completes. HINT Executing the All Initialize function will restore all the settings of the , including its patches, to factory defaults. Do not use this function unless you are certain that you want to do this.
Updating the firmware Checking the firmware version • Press • Turn • Press to open the MENU screen. to select VER. and check the version.
Updating the firmware Updating the firmware ■■ To download the latest firmware Visit the ZOOM Website (http://www.zoom.co.jp/). • Connect the • While pressing both to a computer using a USB cable. and , set the POWER switch to ON. • Launch the version update application on your computer, and execute the update. NOTE HINT Do not disconnect the USB cable during the update. See the ZOOM website for instructions about how to use the application.
Troubleshooting No sound or very low volume An effect is not working • Confirm that the POWER switch is set to • If limits on effect processing capacity, “ON”. the number of units or the amount of resources used are exceeded, effects will • Check the connections (¦P4–5). be bypassed and the following message • Adjust the patch level (¦P17). will appear (¦P9). • Adjust the master level (¦P22).
Rhythm List No. PatternName TimSig No. PatternName TimSig No.
Specifications Effect types 80 types Number of simultaneous effects 7 Number of user patches 150 Sampling frequency 44.
ZOOM CORPORATION 4-4-3 Kandasurugadai, Chiyoda-ku, Tokyo 101-0062 Japan http://www.zoom.co.