H4_E.book 1 ページ 2006年9月1日 金曜日 午後7時56分 © ZOOM Corporation Reproduction of this manual, in whole or in part, by any means, is prohibited.
H4_E.book 2 ページ 2006年9月1日 金曜日 午後7時56分 SAFETY PRECAUTIONS / Usage Precautions • High humidity or moisture • Excessive dust or sand • Excessive vibration or shock SAFETY PRECAUTIONS In this manual, symbols are used to highlight warnings and cautions for you to read so that accidents can be prevented. The meanings of these symbols are as follows: Warning Caution This symbol indicates explanations about extremely dangerous matters.
H4_E.book 3 ページ 2006年9月1日 金曜日 午後7時56分 Contents SAFETY PRECAUTIONS / Usage Precautions ............................................2 Step 3: Add more tracks ..................... 26 Overview ...................................................5 Step 4: Mixing and bounce ................. 27 Introducing the H4 ...................................6 Mixing .................................................... 27 Bounce ................................................... 28 Stereo Mode and 4-Track Mode ...
H4_E.book 4 ページ 2006年9月1日 金曜日 午後7時56分 Contents Projects ................................................ 54 What is a project? ...................................54 Basic project operations .........................54 Creating a new project ...........................55 Selecting a project ..................................55 Changing a project name .......................56 Copying a project ...................................57 Deleting a project ...................................
H4_E.book 5 ページ 2006年9月1日 金曜日 午後7時56分 Overview Thank you for selecting the ZOOM Handy Recorder H4 (subsequently referred to simply as the "H4"). The H4 is an attractive product with the following features. ● All-in-one type handy recorder In a compact package weighing a mere 190 grams, the H4 offers a high-performance stereo condenser mic, SD card recorder, mixer, effect section, metronome, and more. Easily record and produce music on the go, wherever you are.
H4_E.book 6 ページ 2006年9月1日 金曜日 午後7時56分 Introducing the H4 This section explains the main features and functions of the H4. Stereo Mode and 4-Track Mode The H4 has two main operation modes, namely "stereo mode" and "4-track mode". You select one of these modes when using the unit. In stereo mode, two signals either from the builtin stereo mic or from the [INPUT 1]/[INPUT 2] jacks are used as recording sources to create a stereo file on the SD card.
H4_E.book 7 ページ 2006年9月1日 金曜日 午後7時56分 Introducing the H4 Mixer Functions When the H4 is operating in 4-track mode, two kinds of mixers can be used, namely the input mixer and track mixer. In stereo mode, the two effect modules MIC MODEL and COMP/LIMIT can be used. (The MIC MODEL module can be used only if the built-in stereo mic is selected as input source.) In this mode, both effect input and effect output are in stereo.
H4_E.
H4_E.book 9 ページ 2006年9月1日 金曜日 午後7時56分 Parts of the H4 (1) Slide the section with your index finger to release the lock. (2) With the lock released, (3) Flip the cover open grasp the cover with your thumb and middle finger and lift it. in the forward direction.
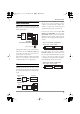
H4_E.fm 10 ページ 2006年9月1日 金曜日 午後8時16分 Getting Connected To monitor the output of the H4 with a stereo audio system, use a Y cable connected to the [LINE OUTPUT] jack. Monitor system H4 side panel To monitor the output of the H4 with headphones, connect them to the [PHONES] jack and adjust the listening level with the [PHONES LEVEL] knob. This jack carries the same signal as the [LINE OUTPUT] jack. To operate the H4 on AC power, be sure to use only the supplied AC adapter (ZOOM AD-0006).
H4_E.book 11 ページ 2006年9月1日 金曜日 午後7時56分 Operation on Battery Power The H4 can be powered from batteries which must be purchased separately. Insert the batteries as follows. 1. Open the battery compartment cover as described on page 9. indication "Low Battery!" will appear on the display when the batteries are exhausted. In this case, turn the unit off and replace the batteries as soon as possible with fresh ones. 2. Insert two IEC R6 (size AA) batteries. 3. Close the battery compartment cover.
H4_E.book 12 ページ 2006年9月1日 金曜日 午後7時56分 Recording This section shows how you can try out the H4 straight away by doing some recording. The steps are for using the stereo mode with the built-in stereo mic. Setup To record on-mic, place the sound source at about 30 to 50 centimeters from the H4. On-mic recording Sound source pick up the sound of footsteps, drum vibrations etc. You should therefore place the H4 on a table or a chair, or use a tripod with the supplied adapter. Recording steps 1.
H4_E.book 13 ページ 2006年9月1日 金曜日 午後7時56分 Recording 4. Use the TRACK [1] – [4] keys to select the recording format. The recording format selected by each key is as shown below. Recording quality and file size decrease from top to bottom. ● [MIC GAIN] switch setting TRACK [1] key WAV (96 kHz) Setting TRACK [2] key WAV (48 kHz) L TRACK [3] key WAV (44.1 kHz) M TRACK [4] key MP3 (44.1 kHz) H Press the key for the desired format and sampling rate, so that the key lights up.
H4_E.book 14 ページ 2006年9月1日 金曜日 午後7時56分 Quick Guide 1 Stereo mode basic operation This section explains the basics of using the unit in stereo mode. As an example, it shows how to record a band performance in one go with the built-in stereo mic. Preparations before recording Adjusting the input sensitivity/ recording level Starting the H4 To record the input signal with optimum quality, the input sensitivity and recording level must be adjusted correctly. 1. 2.
H4_E.book 15 ページ 2006年9月1日 金曜日 午後7時56分 Quick Guide 1 Stereo mode basic operation [MENU] key functions in stereo mode Press top (@) of [MENU] key Start/stop recorder playback. Hold down left part (U) of [MENU] key Hold down right part (I) of [MENU] key Fast-reverse from current point in 1-second increments. Fast-forward from current point in 1-second increments. Press left part (U) of [MENU] key Press right part (I) of [MENU] key Return counter to zero. If counter is at zero, select previous file.
H4_E.book 16 ページ 2006年9月1日 金曜日 午後7時56分 Quick Guide 1 Stereo mode basic operation 6. At the stereo mode top screen, press the [REC] key. The [REC] key flashes, and the recorder is now in the standby condition. When the auto gain function is enabled, the indication “REC LEVEL SCANNING...” will be shown when you switch the recorder to standby. change the characteristics of the built-in stereo mic. HINT The mic simulation effects are available only when using the built-in stereo mic. 1. 7.
H4_E.book 17 ページ 2006年9月1日 金曜日 午後7時56分 Quick Guide 1 Stereo mode basic operation [MENU] key. HINT To check the action of the effect, press the [REC] key to set the H4 to the recording standby condition, and then monitor the signal at the [LINE OUTPUT] or [PHONES] jack while the instruments to record are being played. 4. To accept the settings for the COMP/ LIMIT module, press the jog dial. 5. Bring the cursor to the “MIC MODEL” item and press the jog dial.
H4_E.book 18 ページ 2006年9月1日 金曜日 午後7時56分 Quick Guide 1 Stereo mode basic operation the recording standby condition. Name of currently selected file 3. To start recording, press the [REC] key once more. If required, you can use the metronome function while recording (→ p. 77). 4. To stop recording, press the [REC] key, or press the top (@) of the [MENU] key. The counter returns to zero. If you press the top (@) of the [MENU] key in this condition, the recording is played back from the beginning.
H4_E.book 19 ページ 2006年9月1日 金曜日 午後7時56分 Quick Guide 2 4-track mode basic operation In 4-track mode, the H4 operates as a multi-track recorder with four tracks. This section explains the basics of using the unit in 4-track mode. As an example, it shows how to record instruments or vocal parts one track at a time, and perform a final mix. In this section, the recording mode is “Overwrite” (every recording operation overwrites the current file).
H4_E.book 20 ページ 2006年9月1日 金曜日 午後7時56分 Quick Guide 2 4-track mode basic operation press the jog dial. The default name for the new project is shown. HINT To return from 4-track mode to stereo mode, perform the same steps from the 4-track mode top screen, select “STEREO RECORDER”, and press the jog dial. Creating a new project In 4-track mode, the H4 manages recordings in units called “projects”. When you start a new recording, create a project as follows. 1.
H4_E.book 21 ページ 2006年9月1日 金曜日 午後7時56分 Quick Guide 2 4-track mode basic operation the cursor to “METRONOME”. Then press the jog dial. The LEVEL menu for setting the metronome level appears. The METRONOME setting screen appears. 8. Move the jog dial up/down to set the level. Then press the jog dial. HINT You can also change the settings for pre-count (default: OFF) and beat (default: 4/4), as described on page 77. 3. Move the jog dial up/down to bring the cursor to “CLICK”.
H4_E.book 22 ページ 2006年9月1日 金曜日 午後7時56分 Quick Guide 2 4-track mode basic operation respective key repeatedly until it is lit in red. In 4-track mode, the TRACK [1] - [4] keys serve to switch the status (record/playback condition) of tracks 1 - 4. Each push of the key cycles through the following three status settings. 2. Move the jog dial up/down to bring the cursor to “SOURCE”. Then press the jog dial. The input source can now be selected.
H4_E.book 23 ページ 2006年9月1日 金曜日 午後7時56分 Quick Guide 2 4-track mode basic operation the [MIC GAIN] switch to set the sensitivity to a suitable level. (For information on recommended settings, see page 13.) When recording via the [INPUT 1]/[INPUT 2] jacks, use the [INPUT 1 GAIN] switch or [INPUT 2 GAIN] switch to set the sensitivity to a suitable level. For information on recommended settings, see the table below.
H4_E.book 24 ページ 2006年9月1日 金曜日 午後7時56分 Quick Guide 2 4-track mode basic operation the recording level is too high, the sound will be distorted. NOTE In 4-track mode, the auto gain function is not available. 7. To terminate the recording level setting, press the jog dial. 2. Bring the cursor to the “EFFECT” item and press the jog dial. The screen for selecting effect patches appears. When a project is in the default condition, the effect section is off.
H4_E.book 25 ページ 2006年9月1日 金曜日 午後7時56分 Quick Guide 2 4-track mode basic operation 1. to the recording standby condition. HINT • In 4-track mode, the input signal can be monitored when there is at least one track in the recording standby condition (TRACK key lit in red). • While the counter is being shown on the display, the H4 can always be set to the recording standby condition, and recording for a track can be carried out.
H4_E.book 26 ページ 2006年9月1日 金曜日 午後7時56分 Quick Guide 2 4-track mode basic operation Recording the first track”. press the top (@) of the [MENU] key. When you press the top (@) of the [MENU] key while the [REC] key is out, the tracks for which the TRACK [1] – [4] keys are lit in green (playback) or red (recording enabled) are played back. 7. When the recorded content is as you want it, go to the 4-track mode top screen and press the TRACK key for the recorded track, so that the key is lit in green.
H4_E.book 27 ページ 2006年9月1日 金曜日 午後7時56分 Quick Guide 2 4-track mode basic operation The counter returns to the zero position. 5. To check the recorded content, press the top (@) of the [MENU] key. All recorded tracks are played back. 6. When the recorded content is as you want it, go to the 4-track mode top screen and press the TRACK key for the recorded track, so that the key is lit in green. MIXER button 3. Press the jog dial. The MIXER screen for making mixer settings appears.
H4_E.book 28 ページ 2006年9月1日 金曜日 午後7時56分 Quick Guide 2 4-track mode basic operation 6. To adjust the pan setting, press the jog dial once more and then move the jog dial up/down. When you press the jog dial, an up/down arrow symbol appears to the left of the panning icon. Up/down arrows symbol Bounce When the downmix is complete, you are ready to write the result to a stereo file (bounce). The file can then be sent to a computer via the USB connection, for example to burn an audio CD.
H4_E.book 29 ページ 2006年9月1日 金曜日 午後7時56分 Quick Guide 2 4-track mode basic operation OK button CANCEL button HINT • This screen lets you change the format of the resulting file (mono/stereo; default: stereo) or specify the file name (→ p. 45). • If you do not specify a name, the file created by bouncing will be automatically assigned a name using the pattern “BOUNCExx.wav” (where xx is a number from 00 – 99). 4.
H4_E.book 30 ページ 2006年9月1日 金曜日 午後7時56分 Stereo Mode This section describes the stereo mode functions and operation steps. What is stereo mode? Switching to stereo mode In stereo mode, two signals either from the builtin stereo mic or from the [INPUT 1]/[INPUT 2] jacks are used as recording sources to create a stereo file. You can select either WAV or MP3 as format for the recorded file, and you can change the sampling rate and bit rate as required.
H4_E.book 31 ページ 2006年9月1日 金曜日 午後7時56分 Stereo Mode The input source can now be selected. 3. To switch to stereo mode, move the jog dial up/down to bring the cursor to "STEREO RECORDER" and then press the jog dial. The H4 switches to stereo mode and the [MODE] indicator lights up. 3. The following selections are available. Display MIC IN1&2 The display automatically changes to the stereo mode top screen.
H4_E.book 32 ページ 2006年9月1日 金曜日 午後7時56分 Stereo Mode There are three settings for the input sensitivity: L (Low) → M (Medium) → H (High) Note that the signal input to the H4 will be distorted if the input sensitivity is not set correctly. ● [INPUT 1 GAIN]/[INPUT 2 GAIN] switch Current recording level Fader icon Alphanumeric indication of input source setting Setting L M H Application For use when an electric guitar or other line-output device is connected directly.
H4_E.book 33 ページ 2006年9月1日 金曜日 午後7時56分 Stereo Mode HINT • The recording level set here also influences the signal level after effect processing. When switching between effect on and off or when changing effect settings, the recording level will have to be readjusted. • When effect processing is off, a recording level setting of 100 will result in unity gain (no amplification). 6. When the recording level setting is as desired, press the jog dial. The recording level setting is finalized.
H4_E.book 34 ページ 2006年9月1日 金曜日 午後7時56分 Stereo Mode the gain accordingly. When recording an instrument, briefly play it at the loudest level. The setting will then be made in such a way that the sound will not be distorted during recording. The level scanning continues until you press the [REC] key once more and start recording. The RECORDING FORMAT screen appears.
H4_E.book 35 ページ 2006年9月1日 金曜日 午後7時56分 Stereo Mode format and then the sampling rate/bit rate. (2) Press the jog dial. The setting can now be changed. When you press a key, the key lights up and the screen of step 2 appears, with the respective format and sampling rate selected. If required, change also the bit rate. Record Recording in stereo mode is performed as follows. (3) Move the jog dial up/down to change the setting. (4) To accept the new setting, press the jog dial. 1.
H4_E.book 36 ページ 2006年9月1日 金曜日 午後7時56分 Stereo Mode Using the monitor function To monitor the level of the input signal in stereo mode, the recorder must be set to recording standby mode, or the INPUT LEVEL screen for adjusting the recording level must be brought up. However, when the monitor function has been set to ON in the INPUT menu, the input signal can always be monitored. 1. At the stereo mode top screen, press the bottom (INPUT MENU) of the [MENU] key.
H4_E.book 37 ページ 2006年9月1日 金曜日 午後7時56分 Stereo Mode file. All files in the dedicated folder for stereo mode files are shown in turn. There is no need to switch the H4 to different formats as for recording. 4. To accept the file selection, press the jog dial. 5. To play the selected file, press the top (@) of the [MENU] key. Locating a point in a recording (Locate) This section describes how to move to any counter position in a recording. 1.
H4_E.book 38 ページ 2006年9月1日 金曜日 午後7時56分 Stereo Mode Pressing the top (@) of the [MENU] key will start playback from that point. Playing a specified section repeatedly (A-B repeat) The A-B repeat function lets you specify a point A and point B and automatically play the section between these two points repeatedly. This is convenient for example to check a specific part of a recording. 1. Verify that the stereo mode top screen is being shown on the display.
H4_E.book 39 ページ 2006年9月1日 金曜日 午後7時56分 4-Track Mode This section describes the 4-track mode functions and operation steps. What is 4-track mode? In 4-track mode, the H4 functions as a multitrack recorder. This mode allows simultaneous recording of 2 tracks and simultaneous playback of 4 tracks. This lets you do things such as create a backing of drum machine and bass and then produce a guitar or vocal overlay in the studio.
H4_E.book 40 ページ 2006年9月1日 金曜日 午後7時56分 4-Track Mode NOTE The items shown on the main menu are different for stereo mode and 4-track mode. 2. Move the jog dial up/down to bring the cursor to "MODE". Then press the jog dial. The MODE SELECT screen appears. starting a recording also partway through a track, and a function called punch-in/out (→ p. 43) that overwrites only a specified section is also supported.
H4_E.book 41 ページ 2006年9月1日 金曜日 午後7時56分 4-Track Mode Selecting the recording mode This section explains how to select the recording mode. HINT The recording mode setting is saved separately for each project. 1. Operation differences according to recording mode The recording operation steps differ according to the currently selected recording mode. ◆ Recording in Overwrite mode 1.
H4_E.book 42 ページ 2006年9月1日 金曜日 午後7時56分 4-Track Mode The [REC] key stays lit constantly, and recording begins. 3. To stop recording, press the [REC] key once more, or press the top (@) of the [MENU] key. • Files recorded in stereo mode (provided that the recording format is 44.1 kHz/16 bit) can be included in a 4-track mode project and assigned to tracks 1/2 or 3/4 (→ p.74). 2. Recording is completed and the recorder stops.
H4_E.book 43 ページ 2006年9月1日 金曜日 午後7時56分 4-Track Mode only stereo files can be selected. HINT As long as the file is from the same project, a track other than one used during recording can also be selected. NOTE It is not possible to select the same file for multiple tracks. 5. To accept the file selection, press the jog dial. The file for playback is selected. 6. Repeat steps 2 – 5 to assign files to other tracks in the same way. 7.
H4_E.book 44 ページ 2006年9月1日 金曜日 午後7時56分 4-Track Mode Input signal level 3. Locate a point slightly before the intended punch-in point, and press the top (@) of the [MENU] key. 4. When you come to the punch-in point, press the [REC] key. A-PUNCH button 2. Press the same TRACK [1] – [4] keys that you pressed in step 1 repeatedly, so that the key is lit in red. The input signal can now be monitored. The number of the track selected as recording target is shown in reverse.
H4_E.book 45 ページ 2006年9月1日 金曜日 午後7時56分 4-Track Mode • If you set the punch-out point before the punch-in point, the range is specified as out → in. 9. To stop playback, press the top (@) of the [MENU] key. The recorder stops. HINT The punch-in/out point setting can be made in the playback or the stop condition of the recorder. 6. 7. Locate a point slightly before the intended punch-in point. To rehearse the auto punch-in/out process, press the top (@) of the [MENU] key.
H4_E.book 46 ページ 2006年9月1日 金曜日 午後7時56分 4-Track Mode 1. At the 4-track mode top screen, select the track(s) you want to use as a bounce source by using the TRACK [1] – [4] keys. Press the respective key repeatedly until it is lit in green. Note that tracks for which the key is not lit (muted tracks) will not be included in the file produced after bouncing. OK button CANCEL button 4. 2.
H4_E.book 47 ページ 2006年9月1日 金曜日 午後7時56分 4-Track Mode HINT HINT If you do not specify a name here, the file created by bouncing will be automatically assigned a name using the pattern "BOUNCExx.wav" (where xx is a number from 00 – 99). If you select the CANCEL button instead of the OK button, the operation is abandoned and the unit returns to the top screen of the 4-track mode. When the underline is shown, change the name as follows.
H4_E.book 48 ページ 2006年9月1日 金曜日 午後7時56分 4-Track Mode NOTE • The input signal can be processed using the built-in effects (→ p. 62). Display • If stereo link for two odd/even numbered track pairs (1/2 and 3/4) is enabled, the respective track pair can be used as a stereo track with linked parameters (→ p. 53). MIC Selecting the input source This section explains how to select the two input signals to assign to the input mixer.
H4_E.book 49 ページ 2006年9月1日 金曜日 午後7時56分 4-Track Mode information on recommended settings, see page 32. 5. When IN1&2 is selected, move the jog dial up/down to bring the cursor to the input source whose level you want to adjust. 6. Press the jog dial to bring up the fader icon next to the meter display. NOTE Note that the signal input to the H4 will be distorted if the input sensitivity is not set correctly. 3. At the 4-track mode top screen, press the bottom of the [MENU] key.
H4_E.book 50 ページ 2006年9月1日 金曜日 午後7時56分 4-Track Mode the other input source. 9. To return to the 4-track mode top screen, repeatedly press the center of the [MENU] key. The signal of the source is sent to the selected track. ● When there are two input sources The signals of input 1/2 are mixed and sent to the selected track. Input source: mono Input Selecting the recording track When the recording level has been adjusted, you must select the track(s) for recording.
H4_E.book 51 ページ 2006年9月1日 金曜日 午後7時56分 4-Track Mode ● To select two stereo linked tracks In the case of two tracks for which stereo link is enabled, the TRACK keys are also linked. Press either TRACK [1] or [2] or TRACK [3] or [4] repeatedly, until the key is lit in red. The other key will also light up, and both tracks are selected as recording targets. The display shows the track number as 1/2 or 3/4.
H4_E.book 52 ページ 2006年9月1日 金曜日 午後7時56分 4-Track Mode 1. At the 4-track mode top screen, select the track(s) for playback source by using the TRACK [1] – [4] keys. Press the respective key repeatedly until it is lit in green. The cursor disappears and the fader icon appears. Fader icon 5. Output level MIXER button 2. Move the jog dial up/down to bring the cursor to the MIXER button. Then press the jog dial. The MIXER screen for making mixer settings appears.
H4_E.book 53 ページ 2006年9月1日 金曜日 午後7時56分 4-Track Mode If signal clipping occurs, perform the mixing adjustment again. 11. To stop playback, press the top (@) of the [MENU] key. Linking two tracks (stereo link) The stereo link function allows you to link two adjacent odd/even numbered tracks (tracks 1/2 or 3/4) to create a stereo track that can be controlled in one operation. This section describes how to enable stereo linking. 3. The stereo link can now be enabled or disabled. 4.
H4_E.book 54 ページ 2006年9月1日 金曜日 午後7時56分 4-Track Mode Projects This section explains various operation steps related to projects. What is a project? In 4-track mode, the H4 manages recordings (songs) in a unit called a “project”. When you load a project, all recordings and settings will be restored to the original condition. A project comprises the following information.
H4_E.book 55 ページ 2006年9月1日 金曜日 午後7時56分 4-Track Mode ● PROTECT Lets you write-protect the currently selected project. 4. Press the jog dial to select the desired operation. For details on operation steps, see the respective sections below. 5. To return to the 4-track mode top screen, repeatedly press the center of the [MENU] key. Creating a new project To create a new project on the SD card, proceed as follows. 1.
H4_E.book 56 ページ 2006年9月1日 金曜日 午後7時56分 4-Track Mode The name of the selected project is shown. Project number Project name Name of selected project 2. 3. Move the jog dial up/down to bring the cursor to the project you want to load. Changing a project name To change the name of a project on the SD card, proceed as follows. Refer to steps 1 – 3 of “Basic project operations” and bring the cursor to “RENAME”. Then press the jog dial. A list with the projects whose names can be changed appears.
H4_E.book 57 ページ 2006年9月1日 金曜日 午後7時56分 4-Track Mode Copying a project You can copy the content of the currently selected project to a free project number. To do this, proceed as follows. 1. Refer to steps 1 – 3 of “Basic project operations” and bring the cursor to “COPY”. Then press the jog dial. underlined. In this condition, you can change the project name. For details on how to change the name, see page 47. For information on available characters, see page 55.
H4_E.book 58 ページ 2006年9月1日 金曜日 午後7時56分 4-Track Mode 2. Move the jog dial up/down to bring the cursor to the project you want to delete. Then press the jog dial. A confirmation message for the deletion appears. • Changing file assignments • Editing effect patches HINT Even when write-protect is enabled for a project, you can perform playback as usual and change the mixing balance etc. However, these changes will not be stored. 1.
H4_E.book 59 ページ 2006年9月1日 金曜日 午後7時56分 4-Track Mode the jog dial. Tuner The 4-track mode of the H4 gives access to a multi-function tuner that also supports various unconventional tunings such as 7-string guitar and 5-string bass. This section explains how to use the tuner. The tuner function is called up. In the default condition of a project, the chromatic tuner is selected. NOTE The tuner can only be used in 4-track mode.
H4_E.book 60 ページ 2006年9月1日 金曜日 午後7時56分 4-Track Mode Using other tuner types Pitch is sharp 5. Adjust the pitch until the ● indication is right above the desired note. 6. To change the reference pitch of the tuner, proceed as follows. The H4 allows various other tuning types besides chromatic tuning, including standard tuning for guitar and bass, and various special tuning functions. When using these tuner modes, you specify each string for tuning separately. 1.
H4_E.book 61 ページ 2006年9月1日 金曜日 午後7時56分 4-Track Mode the center of the display. The notes for each string in the various tuner modes are listed in the table below. 5. Move the jog dial up/down to bring the cursor to the name of the tuner mode you want to select. The tuner mode changes. 6. 7. Play the indicated string as an open string, and perform tuning. 8. To switch to another string number, proceed as follows.
H4_E.book 62 ページ 2006年9月1日 金曜日 午後7時56分 Effects This section describes the operation of the effect section integrated in the H4. input source. About Effects The H4 incorporates an effect section that can be inserted immediately after the inputs to process the signal before it is sent to recorder tracks for recording.
H4_E.book 63 ページ 2006年9月1日 金曜日 午後7時56分 Effects modules in the effect section are set to OFF. To enable the effects in stereo mode, proceed as follows. 1. At the stereo mode top screen, press the bottom of the [MENU] key. The INPUT menu for making various input related settings appears. HINT The COMP/LIMIT module allows only selection of the effect type. 4. To accept the COMP/LIMIT module setting, press the jog dial. 5.
H4_E.book 64 ページ 2006年9月1日 金曜日 午後7時56分 Effects HINT Selecting a patch • The effect settings made in stereo mode are saved separately for the stereo mode. When you switch to 4-track mode and then return to stereo mode later, the previous settings will be established again. • For details about the types and parameters in each effect module, see the reference section at the end of this manual.
H4_E.book 65 ページ 2006年9月1日 金曜日 午後7時56分 Effects The effect section is activated. (The ON/OFF button at the bottom of the display now shows “OFF” because it will turn the effect section off when clicked.) The currently selected patch number and patch name are shown in the center of the display. 2. Bring the cursor to the “EFFECT” item and press the jog dial. The EFFECT menu appears. If the effect section is off (ON/OFF button shows ON), switch it to on (ON/OFF button shows OFF).
H4_E.book 66 ページ 2006年9月1日 金曜日 午後7時56分 Effects 5. Bring the cursor to the item you want to edit (“PRE AMP” or “EFX”) and press the jog dial. The effect module edit screen appears. For example, if you have selected the “PRE AMP” item, the following indication appears. This screen allows effect module on/off selection ("ON/OFF"), effect type selection ("TYPE"), and effect parameter control (other items). 6. To change the effect type, proceed as follows.
H4_E.book 67 ページ 2006年9月1日 金曜日 午後7時56分 Effects (1) On the EFFECT EDIT screen, bring the cursor to the “LEVEL” item and press the jog dial. 13. To return to the 4-track mode top screen, repeatedly press the center of the [MENU] key. The patch level can now be edited. Saving a patch This section describes how to store the currently selected patch in the same location (overwrite) or in another location (copy). (2) Move the jog dial up/down to change the setting value, and then press the jog dial. 1.
H4_E.book 68 ページ 2006年9月1日 金曜日 午後7時56分 Effects 4. Bring the cursor to the “STORE” item and press the jog dial. The EFFECT PATCH STORE screen appears. Assigning a name to a patch You can change the name of the currently selected patch. Store target patch number 1. At the 4-track mode top screen, press the bottom (INPUT MENU) of the [MENU] key. The INPUT menu appears. 2. 5. Bring the cursor to the patch number to be used as store target and press the jog dial.
H4_E.book 69 ページ 2006年9月1日 金曜日 午後7時56分 Effects the [MENU] key. character. For information on available characters, see page 55. (Note that these are slightly different from the characters available for the file name.) 7. Repeat steps 5 and 6 as necessary to change other characters. 8. When the name is as desired, press the center of the [MENU] key twice. The INPUT menu appears. 2. Bring the cursor to the “EFFECT” item and press the jog dial. The EFFECT menu appears.
H4_E.book 70 ページ 2006年9月1日 金曜日 午後7時56分 Effects Project number Project name patch to be used as import source, and then press the jog dial. (3) Bring the cursor to the OK button and press the jog dial. 5. Move the jog dial up/down to bring the cursor to the project to be used as import source, and then press the jog dial. ● If “ALL PATCHES” was selected in step 4 The confirmation message “Are you sure?” appears on the display. Check the message and proceed to step 6.
H4_E.book 71 ページ 2006年9月1日 金曜日 午後7時56分 Managing Recorded Files This section explains how to perform various functions with recorded files saved on SD card. About recorded files Basic file operations The location where files are saved on the SD card depends on the current operation mode of the H4 and on the currently selected project. When the H4 is in stereo mode, the files are saved together in a dedicated folder for stereo mode.
H4_E.book 72 ページ 2006年9月1日 金曜日 午後7時56分 Managing Recorded Files The FILE menu for selecting various operations for recorded files appears. For example, when you call up the FILE menu in 4-track mode, the display looks as follows. Renaming a file To change the name of a recorded file in the current project folder (or in the stereo mode folder), proceed as follows. 1. 3. Move the jog dial up/down to select the operation. The following choices are available.
H4_E.book 73 ページ 2006年9月1日 金曜日 午後7時56分 Managing Recorded Files 47. (Note that these are slightly different from the characters available for the project name.) 4. To accept the new name, move the jog dial up/down to bring the cursor to the OK button, and then press the jog dial. The display returns to the condition of step 1. If you select the CANCEL button instead of the OK button, the name change is canceled, and the display returns to the condition of step 1. 2.
H4_E.book 74 ページ 2006年9月1日 金曜日 午後7時56分 Managing Recorded Files “COPY”. Then press the jog dial. A list of files stored in the folder for the current project appears. If you select the CANCEL button instead of the OK button, the copy process is canceled, and the display returns to the condition of step 1. NOTE 2. Move the jog dial up/down to bring the cursor to the file that you want to copy, and then press the jog dial. The name of the file after copying is shown.
H4_E.book 75 ページ 2006年9月1日 金曜日 午後7時56分 Managing Recorded Files 2. Move the jog dial up/down to select the folder, and then press the jog dial. A file stored in the selected folder is shown. RENAME button CANCEL button To change the file name before importing, proceed as follows. File in selected folder HINT When the stereo mode folder is selected, only files with the recording format 44.1 kHz/16 bit are shown. 3.
H4_E.book 76 ページ 2006年9月1日 金曜日 午後7時56分 Managing Recorded Files The file is imported, and the display returns to the condition of step 1. 4. To return the FILE menu, press the center of the [MENU] key. Checking the file size To check the size of a recorded file in the current project folder (or in the stereo mode folder), proceed as follows. 1. Refer to steps 1 – 3 of “Basic file operations” and bring the cursor to “SIZE”. Then press the jog dial.
H4_E.book 77 ページ 2006年9月1日 金曜日 午後7時56分 Miscellaneous Settings This section explains various other settings and functions of the H4. Metronome setting The H4 incorporates a metronome function that is convenient for use during practice or a recording session. To set up the metronome, proceed as follows. 1. At the stereo mode or 4-track mode top screen, press the center of the [MENU] key. The main menu for miscellaneous settings of the H4 appears. 2.
H4_E.book 78 ページ 2006年9月1日 金曜日 午後7時56分 Miscellaneous Settings the setting, and then press the jog dial. 5. Repeat steps 3 and 4 as required to complete the settings for the metronome. 6. To return to the top screen of the currently selected mode, press the center of the [MENU] key. When you perform playback or recording, the selected metronome function will be active.
H4_E.book 79 ページ 2006年9月1日 金曜日 午後7時56分 Miscellaneous Settings Turning the phantom power supply on/off The [INPUT 1]/[INPUT 2] jacks of the H4 can be set to provide a phantom power supply of +48 V or +24 V, if required by a condenser mic or a direct box. To switch this feature on or off, proceed as follows. 1. At the stereo mode or 4-track mode top screen, press the bottom (INPUT MENU) of the [MENU] key. +48 V phantom power supply.
H4_E.book 80 ページ 2006年9月1日 金曜日 午後7時56分 Miscellaneous Settings 2. Press and hold the center of the [MENU] key until the indication “Key Hold” appears on the display. The key-hold function is enabled and all control operations will be disregarded, except for the [POWER] switch, [MIC GAIN] switch, [INPUT 1 GAIN] switch, [INPUT 2 GAIN] switch, [PHONES LEVEL] and the center of the [MENU] key. When a disabled control is operated, the indication shown below appears on the display for 2 seconds. 3.
H4_E.book 81 ページ 2006年9月1日 金曜日 午後7時56分 Miscellaneous Settings key at the stereo mode or 4-track mode top screen. The main menu for miscellaneous settings of the H4 appears. recognized by the computer (CONNECT), and you can change the sampling rate (SAMPLE ). 5. To change the sampling rate, proceed as follows. (1) Move the jog dial up/down to bring the cursor to the “SAMPLE” item, and then press the jog dial. (2) Move the jog dial up/down to select 44.1 kHz or 48 kHz, and then press the jog dial.
H4_E.book 82 ページ 2006年9月1日 金曜日 午後7時56分 Miscellaneous Settings interface. The setting method is the same as when making effect section settings in 4-track mode. • TUNER Sets the tuner operation for the audio interface. The setting method is the same as when making tuner settings in 4-track mode. • PHANTOM Sets the phantom power supply operation for the audio interface. The setting method is the same as when making the normal phantom power supply settings.
H4_E.book 83 ページ 2006年9月1日 金曜日 午後7時56分 Miscellaneous Settings HINT in the condition as specified by the data saved on the SD card. If the H4 is connected to a computer while the [POWER] switch of the H4 is off, power will be automatically supplied via the USB connection and the screen shown above will appear. SD card operations 4. This section explains various SD card operations. Move the jog dial up/down to bring the cursor to “CONNECT TO PC”, and then press the jog dial.
H4_E.book 84 ページ 2006年9月1日 金曜日 午後7時56分 Miscellaneous Settings HINT 3. • The above display is for information only. No changes can be made at this display. • The indication of remaining recording time is only an approximation. 4. The display changes as follows. To return to the stereo mode or 4-track mode top screen, repeatedly press the center of the [MENU] key. FORMAT button Initializing an SD card To initialize (format) an SD card inserted in the H4, proceed as follows.
H4_E.book 85 ページ 2006年9月1日 金曜日 午後7時56分 Miscellaneous Settings HINT • The current system software version of the H4 is shown at startup on the display. • The latest version is always available at the ZOOM Corporation web site: http://www.zoom.co.jp/ 2. Copy the downloaded system software to the SD card via a USB connection. For details, see the section “Using the H4 as an SD card reader” (→ p. 82). 3. Insert the SD card into the H4.
H4_E.book 86 ページ 2006年9月1日 金曜日 午後7時56分 Specifications ● Recorder Tracks 4 Maximum number of simultaneous recording tracks 2 Maximum number of simultaneous playback tracks 4 Recording time 2GB Approx. 190 minutes (converted to WAV 44.1kHz/ 16bit stereo track) Approx. 34 hours (converted to MP3 44.1kHz/ 128kbps stereo track) * Recording times are approximations. Actual times may differ according to recording conditions.
H4_E.
H4_E.book 88 ページ 2006年9月1日 金曜日 午後7時56分 Troubleshooting If there are problems during operation of the H4, check the following points first. Problems during recording/ playback ◆ No sound, or sound is very weak • Check the connections to your monitor system, and the volume setting of the system. • Check whether the volume level setting of tracks 1 – 4 is appropriate.
H4_E.book 89 ページ 2006年9月1日 金曜日 午後7時56分 Effect Types and Parameters Effect types and parameters in 4-track mode PREAMP module ● Guitar preamp effect types FD CLEAN VX CLEAN HW CLEAN UK BLUES BG CRUNCH MS #1959 PV DRIVE RECT VNT DZ DRIVE TS+FD_CMB SD+MS_STK FZ+MS_STK Clean sound of Fender TwinReverb ('65) Clean sound of Vox AC30 Clean sound of Hiwatt Custom 100 Crunch sound of Marshall 1962 Bluesbreaker Crunch sound of Mesa Boogie MK III Crunch sound of Marshall 195.
H4_E.book 90 ページ 2006年9月1日 金曜日 午後7時56分 Effect Types and Parameters (7) ZNR (ZOOM Noise OFF, 1 – 16 Reduction) Adjusts the sensitivity of the noise reduction circuit developed by ZOOM. ● Bass preamp effect types SVT BASSMAN HARTKE SuperBass SANSAMP TUBE PRE Simulation of Ampeg SVT sound. Simulation of Fender Bassman 100 sound. Simulation of Hartke HA3500 sound. Simulation of Marshall Super Bass sound. Simulation of Sansamp Bass Driver DI sound. ZOOM original tube preamplifier sound.
H4_E.book 91 ページ 2006年9月1日 金曜日 午後7時56分 Effect Types and Parameters (7) LEVEL 1 – 100 Adjusts the level of the signal after passing the PREAMP module. (8) ZNR (ZOOM Noise OFF, 1 – 16 Reduction) Adjusts the sensitivity of the noise reduction circuit developed by ZOOM. EFX module ● Compressor/limiter effect types RACK COMP (1) THRESHOLD This is a compressor which attenuates high-level signals and boosts lowlevel signals. (2) RATIO 0 – 50 1 – 10 Adjusts the threshold level of the compressor.
H4_E.book 92 ページ 2006年9月1日 金曜日 午後7時56分 Effect Types and Parameters TREMOLO This effect periodically varies the volume. (1) DEPTH 0 – 100 Adjusts the modulation depth. UP 0 – 9, DOWN 0 – 9, TRI 0 – 9 Allows selection of the modulation waveform. Available settings are UP (rising sawtooth), DOWN (falling sawtooth), and TRI (triangle). Higher setting values result in more clipping of wave peaks, which reinforces the effect.
H4_E.book 93 ページ 2006年9月1日 金曜日 午後7時56分 Effect Types and Parameters (3) RESONANCE (4) MANUAL -10 – 10 0 – 100 Adjusts the frequency range in which the effect operates. Adjusts the resonance characteristic of the effect. Special effect that changes the sound in a staircase pattern. STEP (1) DEPTH 0 – 100 Adjusts the modulation depth. (2) RATE (3) RESONANCE (4) SHAPE 0 – 50, Adjusts the modulation rate. 0 – 10 Adjusts the resonance characteristic of the effect.
H4_E.book 94 ページ 2006年9月1日 金曜日 午後7時56分 Effect Types and Parameters ● Delay/reverb effect types AIR (1) SIZE This effect lends spatial depth to the sound by reproducing the ambient atmosphere of a room. (2) REFLEX 1 – 100 0 – 10 Adjusts the size of the simulated space. Adjusts the amount of wall reflections. (3) TONE (4) MIX 0 – 10 Adjusts the tone. DELAY ECHO ANALOG 0 – 100 Adjusts the level of effect sound mixed to the original sound. This a long delay of up to 5000 milliseconds.
H4_E.book 95 ページ 2006年9月1日 金曜日 午後7時56分 Effect Types and Parameters Effect types in stereo mode In stereo mode, only the effect type can be selected. There are no parameters. MIC MODEL module SM57 MD421 U87 C414 Simulates the Shure SM57 dynamic microphone. Simulates the Sennheiser MD421 dynamic microphone. Simulates the Neumann U87 condenser microphone. Simulates the AKG C414 condenser microphone.
H4_E.book 96 ページ 2006年9月1日 金曜日 午後7時56分 H4 Patch List Effect patches in this page" Patch List" can be used in 4track mode and audio interface function. (with sampling rate in 44.1kHz ) Category No.
H4_E.book 97 ページ 2006年9月1日 金曜日 午後7時56分 H4 Patch List Bass 26 Bassman 27 SVT 28 SuperBass 29 SANSAMP 30 Studio Pre 31 Pick Bass 32 Chorus Bass 33 Slap Comp 34 Flange Bass 35 StandardComp Mic 36 Studio Comp 37 Chorus Vocal 38 Flange Vocal 39 Light Vocal 40 Spring 41 Arena 42 Doubling 43 Lead Vocal 44 Analog Echo 45 Reverse Trip 46 AG Reverb 47 AG Arpeggio 48 AG Ensemble 49 AG Lead 50-59 Standard bass sound inspired by the Fender Bassman 100.
H4_E.book 98 ページ 2006年9月1日 金曜日 午後7時56分 INDEX 4-track mode .................................................... 6, 39 Add more tracks ........................................... 26 Basic operation ............................................. 19 Bounce.................................................... 28, 45 Effect types and parameters.......................... 89 Effects........................................................... 64 File selection.................................................
H4_E.book 99 ページ 2006年9月1日 金曜日 午後7時56分 INDEX [K] [R] Key-hold function ................................................79 Recorded files ......................................................71 Recording (stereo mode)..........................17, 31, 35 Recording format selection (stereo mode)...........34 Recording level ....................................................14 Recording mode (4-track mode) ..........................40 Recording steps (stereo mode).............................
H4_E.book 100 ページ 2006年9月1日 金曜日 午後7時56分 The FCC regulation warning (for U.S.A.) This equipment has been tested and found to comply with the limits for a Class B digital device, pursuant to Part 15 of the FCC Rules. These limits are designed to provide reasonable protection against harmful interference in a residential installation.
Simple Recording Guide [Stereo Mode] 1 5 Turn power to H4 on Press [REC] key to stop recording * You can also stop recording using the [MENU] key. Set [POWER] switch to ON. Unit returns to the start of the recorded file. 2 Press [REC] key to set H4 to recording mode Recording standby display [REC] key flashes. 3 HINT *1 Adjust sensitivity with [MIC GAIN] switch [MIC GAIN] switch You can monitor the input level.
USB/Cubase LE Startup Guide USB/Cubase LE Startup Guide This USB/Cubase LE Startup Guide explains how to install Cubase LE on a computer, how to make the connection and settings of this unit, and how to record your instrument play. Cubase LE Installation Connections and Preparations To connect this unit to a computer running Windows XP and to enable audio input/output, proceed as follows.
Continued from front Cubase LE Installation Access the "File" menu and select "New Project". Connections and Preparations Recording with Cubase LE Windows XP MacOS X Make the following settings for the new audio track. 2. The new project window appears. Here you can select a project template. 1. 2. Drag the audio track boundary to the right to display all buttons.
USB/Cubase LE 4 Startup Guide USB/Cubase LE 4 Startup Guide This USB/Cubase LE 4 Startup Guide explains how to install Cubase LE 4 on a computer, make connections and settings for the H4, and perform recording. Cubase LE 4 installation Connections and preparation To connect the H4 to a computer running Windows Vista (or Windows XP) and to enable audio input/output, proceed as follows. The installation description uses Windows Vista as an example.
Continued from front Cubase LE 4 installation Connections and preparation From the "Devices" menu of Cubase LE 4, select "VST Connections" and select the device containing the string "Zm In (Out)" ( "H4 Audio" for MacOS X) as input port and output port. Use Cubase LE 4 to record Windows Vista / XP HINT New audio track MacOS X Check the recorded content. When the monitoring button is enabled, the level meter next to the fader shows the input level to the audio track.