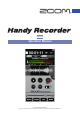
ver. 2.4 Operation Manual © 2017 ZOOM CORPORATION Copying or reproduction of this document in whole or in part without permission is prohibited.
Contents Introduction‥ ‥‥‥‥‥‥‥‥‥‥‥‥‥‥‥‥‥‥‥‥‥‥‥‥‥‥‥‥‥‥‥‥‥‥‥‥‥‥‥‥‥‥‥‥‥‥‥‥‥‥‥‥‥‥‥ 3 Copyrights‥ ‥‥‥‥‥‥‥‥‥‥‥‥‥‥‥‥‥‥‥‥‥‥‥‥‥‥‥‥‥‥‥‥‥‥‥‥‥‥‥‥‥‥‥‥‥‥‥‥‥‥‥‥‥‥‥‥ 3 Main Screen ‥‥‥‥‥‥‥‥‥‥‥‥‥‥‥‥‥‥‥‥‥‥‥‥‥‥‥‥‥‥‥‥‥‥‥‥‥‥‥‥‥‥‥‥‥‥‥‥‥‥‥‥‥‥‥‥ 4 Landscape mode‥ ‥‥‥‥‥‥‥‥‥‥‥‥‥‥‥‥‥‥‥‥‥‥‥‥‥‥‥‥‥‥‥‥‥‥‥‥‥‥‥‥‥‥‥‥‥‥‥‥ 5 Recording‥‥‥‥‥‥‥‥‥‥‥‥‥‥‥‥‥‥‥‥‥‥‥‥‥‥‥‥‥‥‥‥‥‥‥‥‥‥‥‥‥‥‥‥‥‥‥‥‥‥‥‥‥‥‥‥‥‥ 6 Pausing recording‥‥‥‥‥‥‥‥‥‥‥‥‥‥‥‥‥‥‥‥‥‥‥‥‥‥‥‥‥‥‥‥‥‥‥‥‥‥‥‥‥‥‥‥‥‥‥‥‥ 6 Adjusting the recording level‥‥‥‥‥‥‥‥‥‥‥‥‥‥‥‥‥‥‥‥‥‥‥‥‥‥‥‥‥‥‥‥‥‥‥‥‥‥‥‥‥‥ 7
Introduction is a high-performance PCM/AAC recording application that series stereo mic for iOS deruns on iOS. Use it together with a series) for high-quality stereo recording. In addition, you vices (hereafter, the can use this app to play back and edit recorded files, to apply reverb and other effects to them and to upload them to SoundCloud. This app can also start and stop recording automatically in response to the input audio level.
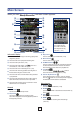
Main Screen When you start ⑦ , the Main Screen appears. ③ ④ ⑥ ② ① ⑤ Mid-side file playback ⑧ ⑨ ⑫ ⑩ ⑬ ⑪ ⑮ ⑭ Stereo width adjuster ⑯ ⑰ ⑱ ⑲ ⑳ This adjusts the stereo width of mid-side recording files during playback. (→P11) ⑫ Play button Touch to start playing a recorded file. (→P12) Information display ① This shows whether the app is recording, playing back, stopped or paused. ⑬ Record button Touch to start recording. (→P6) ② This shows the current playback/recording time.
Waveform display Selected interval starting point This shows the waveform of the selected file. If the file was recorded with left and right channels, the average value of the two channels will be shown. If the file was recorded in MS-RAW mode, only the mid (M) waveform will be shown. This area will be blank if there is no recorded file. Selected interval ending point This shows the current playback position of the file playing. Slide it to a point to play back from there.
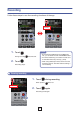
Recording Follow these steps to use the recording functions of the app. Recording 1 1. Touch NOTE During recording, 2. 2 • By connecting headphones to an series mic, you can listen to audio while it is recorded. • Turn direct monitoring on to listen to audio as it is recorded without any time lag. (→P22) • When using landscape mode, confirm that the recording mode is “New Rec” before starting a new recording. becomes red. Touch Recording stops. Pausing recording 1.
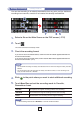
Adjusting the recording level When using an series mic, use the MIC GAIN control on its side to adjust the recording level. When using the mic built-in to the iOS device, adjust the DIGITAL MIC GAIN. (→P24) Setting the recording format 2 3 1 1. Touch 2. Touch REC FORMAT 3. Select the recording format The default setting is WAV. The options are WAV, AAC64kbps, AAC126kbps and AAC160kbps. WAV format Use to record with better audio quality.
Muting the input Follow these procedures to mute the input. 1 1. 2 Touch This mutes the input. 2. Touch This unmutes the input.
Landscape mode only only) (new Adding recordings (landscape mode You can start recording to an already recorded file from any point you like. Additional recordings can overwrite, overdub or be inserted into already recorded files. 3 4 7 6 5 1. Select a file on the Main Screen or the FILE screen (→P12) 2. Touch The screen switches to landscape mode. 3.
6. Touch Additional recording starts. 7. Touch Additional recording stops. The waveform of this additional recording is shown in red. 8. Touch to undo this additional recording This reverts the recording to the state before this additional recording was made. NOTE • If multiple additional recordings have been made, only the most recent additional recording can be undone. • Additional recordings cannot be undone after they have been saved.
Using mid-side recording ( series MS MS mic onlyonly featurefeature) series mic This app can be used for mid-side recording. To use this function, connect an series mic and set its stereo width switch to M-S. M-S appears 1. Touch 2. Touch Recording starts. NOTE • When you play a file that was recorded in mid-side mode, a stereo width adjustment control appears. Slide this to set the stereo width of the audio during playback.
Playback Follow these steps to play back recorded files. Selecting and playing files NOTE • The volume set with the volume control bar is stored in series mic itself and the will be applied when the mic is used with other applications. Playing 2 1 3 1. On the Main Screen, use 2. Touch Playback starts. During playback, Slide to adjust the output volume • Left to lower • Right to raise (Only appears when an series mic is connected) / to show the file you want to play lights green.
Pausing playback 1. During playback, touch When paused, Paused 2. Touch blinks green. again Playback starts again. NOTE 1, 2 • Pausing works the same way in landscape mode. Touch . Playing files from the FILE screen 2 3 1 1. Touch 2. Touch the file name on the FILE screen 3. Touch The selected file is highlighted blue. During playback, appears green. 13 Scrolling up and down is possible. The files appear in order of age, with the oldest file at the top of the list.
Adjusting the playback level When using an series mic, slide the volume control. series mic, use the iOS device volume buttons. When not using an Repeating playback of an interval You can repeat playback between two set points. These points can only be set when in landscape mode. 3 4 6 5 1. Select a file from the Main Screen or the FILE screen (→P12) 2. Touch The screen switches to landscape mode. 3. Slide the start locator to the starting point 4.
Editing and deleting files The app can be used to divide and delete recorded files, as well as to trim (delete) their beginnings and ends. Dividing files (landscape Landscape mode mode onlyonly) You can divide a recorded file into two parts. This function can only be used in landscape mode. 3 3 5 4 7 6 1. Select a file from the Main Screen or the FILE screen (→P12) 2. Touch The screen switches to landscape mode. 3.
6. Touch New, Overwrite or Cancel A “Now Processing” message appears. When file division completes, “Complete!” appears. 7. New Create divided files and also save the original file. Overwrite Create divided files and delete the original file. Cancel Cancel division. Touch OK NOTE • During division, do not turn off the iOS device or quit . Doing so could cause loss of data.
4. Slide the start locator to the interval ending point 5. Touch to trim the file to the selected interval A “Choose edit.” message appears: 6. Touch “Trim between START and END” 7. Touch New, Overwrite or Cancel A “Save as new file?” message appears. When trimming completes, “Complete!” appears. A “Now Processing” message appears. When trimming completes, “Complete!” appears. 8. New Create trimmed file and also save the original file.
Deleting files The app can be used to delete recorded files. 2 3 1 4 5 1. Touch 2. Touch 3. Touch the names of files that you want to delete 6 A screen opens where you can select files to delete. marks appear next to the names of selected files. You can select multiple files.
4. Touch 5. Touch “Delete” 6. Touch A confirmation message appears: “Delete File? This will delete the selected file(s). It cannot be undone!” The FILE Screen reappears after deletion completes. The Main Screen reopens. ver. 2.0) 2.0 Deleting all files (newNew in inver. You can delete all the files in the app at the same time. 1 1. Touch 2. Touch 3. Touch “Delete” 2 on the file deletion selection screen This selects all the files.
Using effects The app can be used to apply effects to recorded files. 5 1 3 4 2 6 7 9 1. Select a file from the Main Screen or the FILE screen (→P12) 2. Touch 3. Touch EQ, REVERB or MASTERING 4. Make effect settings For details about how to use and set each effect, see P21.
5. Touch 6. Touch “Save with EFFECT/NORMALIZE” 7. On the “Save as new file?” message, touch New, Overwrite or Cancel to select how the file is saved 8. on the effect setting screen New The original file is not changed. A new file is created with the effect applied. The new file is saved and named with the newest number. Overwrite The original file is overwritten with the effect applied. Cancel No file is created with the effect applied.
Effect settings ■ EQ (adjust/correct sound quality) Slide the faders on the frequency bands (160Hz/400Hz/800Hz/3.2kHz/6.4kHz/12kHz) to adjust the sound quality. Touch to restore sound to its flat state (no EQ). ■ REVERB (add sound reverberations) REVERB This is OFF by default. Touch ROOM, JAZZ CLUB, CONCERT HALL, ARENA or STADIUM.
Enabling direct monitoring ( seriesseries only feature) only feature Sound can be output directly from the mic for monitoring without any time lag. 2 1 1. Touch 2. Touch DIRECT MONITOR 3. Touch ON or OFF 4. Touch 3 4 The Main Screen reopens. NOTE • The direct monitoring setting has no effect when using the series mic with any app other than . • When direct monitoring is on, you will able to monitor sounds input through the mic even when a file is playing back.
Setting the AUTO GAIN ( feature onlyonly feature) When the AUTO GAIN/LIMITER switch is set to AUTO GAIN, the gain will be adjusted suitably in response to the input level according to the setting. 2 1 4 1. Touch 2. Touch AUTO GAIN 3. Touch CONCERT, SOLO or MEETING 4. 3 The default setting is SOLO.
Adjusting DIGITAL MIC GAIN Adjust the recording level to record quiet sound sources at a higher level and loud sources at a lower level. 2 3 1 1. Touch 2. Touch DIGITAL MIC GAIN 3. Slide 4 to adjust the gain (dB) This shows the adjusted gain value (dB) • –∞ means input is muted 4. Slide to adjust the gain (dB) • Left to lower • Right to raise Touch The Main Screen reopens.
Using AUTO REC The AUTO REC function can be set to start and stop recording automatically. 2 3 5 4 1 1. Touch 2. Touch AUTO REC 3. Touch ON/OFF, START LEVEL or AUTO STOP 4. Touch 5. Touch You can turn automatic recording ON/OFF and set its start level and stop conditions. See P26–28 for how to make each setting. The Main Screen reopens. Recording will start automatically when the input level exceeds the START LEVEL.
Turning the AUTO REC function ON/OFF 1 2 1. Touch ON/OFF on the AUTO REC screen 2. Touch ON or OFF When set to ON, “AUTO” will appear on the Record button. Setting the START LEVEL Set the level that causes automatic recording to start. This shows the adjusted level value 1 2 Slide to adjust the level • Left to lower • Right to raise 1. Touch START LEVEL on the AUTO REC screen 2. Slide to adjust the automatic recording start level You can set this level between –48dB and 0dB.
Turning the AUTO STOP function ON/OFF Set the number of seconds until automatic recording stops after the level goes below the set STOP LEVEL. 4 2 1 3 1. Touch AUTO STOP on the AUTO REC screen 2. Touch ON/OFF 3. Touch the number of seconds until automatic recording stops 4. Touch The AUTO STOP screen reopens.
Setting the STOP LEVEL Set the level at which automatic recording stops. 4 2 1 1. Touch AUTO STOP on the AUTO REC screen 2. Touch STOP LEVEL 3. Slide 4. Touch 3 to adjust the automatic recording stop level You can set this level between –48dB and 0dB. The default setting is –24dB. The AUTO STOP screen reopens.
Sharing recorded files You can upload your recordings to the SoundCloud music sharing service and send them by email so others can listen to them. Uploading files to SoundCloud 3 1 2 6 4 5 7 1. Load the file on the Main Screen (→P12) NOTE • If an interval is selected, the file will be trimmed to that interval before being uploaded. 2.
3. Touch SoundCloud 4. Touch 5. Log in to SoundCloud and touch The SoundCloud account input screen appears. If you do not have a SoundCloud account, you can create one on the SoundCloud web site. An “Uploading...” message appears. When uploading completes, a “Complete!” message appears. NOTE • During uploading, do not turn off the iOS device or quit could cause loss of data. 6. Touch 7. Touch . Doing so The Main Screen reopens.
Sending a file by email You can attach a recorded file to an email and send it. 3 1 2 1. Touch Email on the SHARE screen 2. Touch An email message with the recording attached is created. NOTE • If an interval is selected, the file will be trimmed to that interval before being attached to the email. • If no email account has been set up on the device, this message appears: “No Email Account. Please set up an email account in order to send email.” 3.
Changing the name of a shared file 1. 2 “Enter New File name” appears. 1 Touch on the SoundCloud/Email screen 3 2. Input the file name 3. Touch Rename 1. Touch on the SoundCloud/Email screen The file name is changed. Changing sharing settings 2,3 1 2. 3. The SETTING screen appears. Touch SHARE TO, M-S >> STEREO ENCODE, WAV >> AAC ENCODE or Email Limit Change the setting SHARE TO Set whether the files you upload to SoundCloud are PRIVATE or PUBLIC.
Transferring recordings to a computer 1. Connect the iOS device to the computer and launch iTunes 2. Select the iOS device in iTunes 3. Open the Apps tab 4. Select “HandyRec.” from the Apps list in the File Sharing area at the bottom of the screen. The recording files are shown. 5. Select the file 6. Click “Save to…” 7. Select the place where you want to save the file The file is saved to the computer. NOTE • You can also drag and drop files to where you want to save them.
Updating series mic firmware Connect an series mic to update its firmware to the latest versions. . This example uses an 2 3 Current version >> Version after update 1 4 5 1. Touch 2. Scroll down the MENU, and touch FIRMWARE UPDATE If the shown. series mic is connected properly, the current version and the latest version will be NOTE • If “Unsupported function.” appears, the 35 series mic is not connected properly.
3. Touch 4. When “Update version?” appears, touch Update An “Updating...” message appears. Touch Cancel to stop the update. When updating finishes, “Rebooting the iQ5... Do not disconnect the iQ5.” appears and then the Main Screen reopens automatically. (This example uses an . The message that appears when the update finishes will show the name of the connected series mic.) NOTE • During a firmware update, do not disconnect the series mic from the iOS device or quit .
Other options Swapping left and right input channels series only feature The left and right channels can be swapped when using an series mic. Use this series mic are actually reversed, function when the left and right channels of the such as when using the built-in camera of the iOS device to record video. 1. Touch 2. Touch L/R SWAP 3. Touch ON or OFF The MENU screen opens. The L/R SWAP screen opens. Turn ON to swap the left and right channels of the series mic.