608E.book 1 ページ 2004年4月19日 月曜日 午前10時44分 Operation Manual © ZOOM Corporation Reproduction of this manual, in whole or in part, by any means, is prohibited.
1608E.book 2 ページ 2004年4月19日 月曜日 午前10時44分 USAGE AND SAFETY PRECAUTIONS USAGE AND SAFETY PRECAUTIONS SAFETY PRECAUTIONS • Telephone wiring ground or lightning arrestor (risk of lightning stroke) In this manual, symbols are used to highlight warnings and • Environment cautions for you to read so that accidents can be prevented.
1608E.book 3 ページ 2004年4月19日 月曜日 午前10時44分 USAGE AND SAFETY PRECAUTIONS Usage Precautions MIDI is a registered trademark of Association of Musical Electronics Industry(AMEI). • Electrical interference For safety considerations, the MRS-1608 has been designed All other trademarks and registered trademarks are the to provide maximum protection against the emission of property of their respective owners. electromagnetic radiation from inside the device, and protection from external interference.
1608E.book 4 ページ 2004年4月19日 月曜日 午前10時44分 Contents USAGE AND SAFETY PRECAUTIONS . . . 2 Using scrub/preview . . . . . . . . . . . . . . . . . . . . . . . . 38 Changing the scrub direction and duration . . . . . . . 38 Introduction . . . . . . . . . . . . . . . . . . . . . . . . 7 Re-recording only a specified region (punch-in/out function) . . . . . . . . . . . . . . . . . . .39 Introducing the MRS-1608 . . . . . . . . . . . . 9 Recorder . . . . . . . . . . . . . . . . . . . . . . . . . . . . . .
1608E.book 5 ページ 2004年4月19日 月曜日 午前10時44分 Contents Reference [Phrase Looping] . . . . . . . . . . . 67 Which kind of phrases can be used? . . . . . . . . 67 Loading a phrase . . . . . . . . . . . . . . . . . . . . . . . . 68 Basic phrase loading steps . . . . . . . . . . . . . . . . . . . 68 Importing a phrase from the current project . . . . . . 69 Importing a WAV/AIFF file . . . . . . . . . . . . . . . . . . . . 70 Importing a phrase from a different project . . . . . . .
1608E.book 6 ページ 2004年4月19日 月曜日 午前10時44分 Contents Changing the insert location of the insert effect . . . 140 Selecting the patch for the insert effect . . . . . . . . . 141 Editing the insert effect patches . . . . . . . . . . . . . . . 142 Storing/swapping insert effect patches . . . . . . . . . 145 Editing the name of an insert effect patch . . . . . . . 145 Applying the insert effect only to the monitor signal . . . . . . . . . . . . . . . . . . . . . . . . . . . . . . . . . .
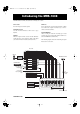
1608E.book 7 ページ 2004年4月19日 月曜日 午前10時44分 Introduction Thank you for selecting the ZOOM MRS-1608 MultiTrak Recording Studio (simply called the “MRS-1608” in this manual). The MRS-1608 is a fascinating product with the following features. ■ Brings together everything you need for complete music production The MRS-1608 provides all the functionality you need for professional music production: hard disk recorder, drum/bass machine, sampler, digital mixer, effects, CD-R/RW drive and more.
1608E.book 8 ページ 2004年4月19日 月曜日 午前10時44分 Introduction ■ Rhythm section can be used to provide guide rhythm or accompaniment The rhythm section provides more than 400 types of accompaniment patterns from the internal drum sound generator. What’s more, you can create your own original patterns using real-time or step input. Patterns can be used as a guide rhythm during recording, or programmed together with chords to create an entire rhythm song.
1608E.book 9 ページ 2004年4月19日 月曜日 午前10時44分 Introducing the MRS-1608 The MRS-1608 is internally divided into the following five sections. ● Recorder ● Effects Records and plays back audio signals. ● Rhythm section Process input signals, recorder playback signals, or drum/ bass sound source signals in various ways, to achieve various sound characteristics. Uses the internal drum/bass sound source to play rhythms.
1608E.book 10 ページ 2004年4月19日 月曜日 午前10時44分 Introducing the MRS-1608 Recorder Recorder The recorder section of the MRS-1608 has 16 audio tracks: eight mono tracks (tracks 1 – 8) and four stereo tracks (tracks 9/10 – 15/16). (A “track” is a separate section for recording audio data.) Up to 8 tracks can be recorded simultaneously and up to 16 tracks can be played back simultaneously. Each of the tracks has ten switchable virtual tracks (called “V-takes”).
1608E.book 11 ページ 2004年4月19日 月曜日 午前10時44分 Introducing the MRS-1608 Mixer The signals from audio tracks 1 – 16, and the drum and bass sounds (drum track/bass track) are sent to separate mixer channels for individual adjustment of volume and tone and to create a stereo mix. For each track, parameters such as volume, panning, and 3-band EQ can be controlled independently. Effects The MRS-1608 provides two types of effects: insert effect and send/return effect.
1608E.
1608E.
1608E.
1608E.book 15 ページ 2004年4月19日 月曜日 午前10時44分 Connections Connect your instrument, microphone, audio devices, and MIDI devices as shown in the following diagram. Synthesizer or sampler etc. When connecting stereo output devices such as a synthesizer or CD player, connect the L output of the external device to the odd-numbered INPUT jack and the R output to the even-numbered INPUT jack.
08E.book 16 ページ 2004年4月19日 月曜日 午前10時44分 Connections You can use either GUITAR/BASS INPUT jack 1 or INPUT jack 1, and either GUITAR/BASS INPUT jack 2 or INPUT jack 2. If both jacks are connected, the GUITAR/BASS INPUT jacks 1/2 are given priority.
1608E.book 17 ページ 2004年4月19日 月曜日 午前10時44分 Installing the CD-R/RW Drive To install the separately available CD-R/RW drive into the MRS-1608 model without preinstalled CD-R/RW drive, proceed as follows. Before installing the drive, make sure that all cables and the AC adapter are disconnected. 1. Turn the MRS-1608 over and remove the blank panel from the drive mounting section of the front panel. To remove the blank panel, pull out the groove in the center. Blank panel Front Panel 2.
1608E.book 18 ページ 2004年4月19日 月曜日 午前10時44分 Installing the CD-R/RW Drive 4. Plug the power cable and flat cable from the main unit into the respective connectors on the CD-R/RW drive. Power cable Flat cable Rear Panel 5. Push the CD-R/RW drive all the way into the bay, so that the screw holes on the bottom of the MRS-1608 and the screw holes of the CD-R/RW drive are aligned. 6. Fasten the CD-R/RW drive with the four supplied panhead screws.
1608E.book 19 ページ 2004年4月19日 月曜日 午前10時44分 Power On/Off This section explains the procedure for turning the MRS-1608 on and off. Turning power on 1. Make sure that the MRS-1608 and peripheral equipment is turned off. 2. Make sure that AC adapter, instrument, and monitor system (or headphones) are correctly connected to the MRS-1608. (For information on connections, refer to page 15.) At this time, the volume setting of the connected instrument and monitor system should be minimum.
1608E.book 20 ページ 2004年4月19日 月曜日 午前10時44分 Listening to a Demo Song When shipped from the factory, the internal hard disk of the MRS-1608 contains two demo songs. To listen to them, proceed as follows. Selecting the demo song On the MRS-1608, song data are managed in units called “projects”. A project encompasses recorded audio data, rhythm and effect settings, and other information. When you load a project, the complete state in which that song was saved will be reproduced.
1608E.book 21 ページ 2004年4月19日 月曜日 午前10時44分 Let’s Record This section demonstrates the basic recording procedure of the MRS-1608. As an example, it explains how to record a guitar connected to the GUITAR/BASS INPUT jack 1 on track 1. 1. Press the [NEW PROJECT] key and then press the [ENTER] key. A new project is created, and the recording standby condition is activated. 5. Repeatedly press status key 1 until the key is lit in red.
1608E.book 22 ページ 2004年4月19日 月曜日 午前10時44分 Quick Tour Now let’s use your MRS-1608 to do some serious recording. This Quick Tour describes the five steps that cover the entire process of recording tracks and completing a song. ■ Step 1: Preparations Shows how to create a new project, select a guide rhythm, and perform other steps necessary for recording. ■ Step 2: Recording the first track 3. Press the [NEW PROJECT] key in the control section.
1608E.book 23 ページ 2004年4月19日 月曜日 午前10時44分 Quick Tour 1.2 Selecting the rhythm pattern to use The MRS-1608 has a built-in rhythm function that operates in sync with the recorder. This lets you use drum sounds (drum kits) and bass sounds (bass programs) to create repeated rhythm patterns of several measures. By combining various patterns, you can create the rhythm accompaniment for an entire song (rhythm song). 1. Verify that the [DRUM]/[BASS] status keys are lit in green.
1608E.book 24 ページ 2004年4月19日 月曜日 午前10時44分 Quick Tour 5. To change the tempo, press the [TEMPO] key in the rhythm section and then turn the dial to change the tempo value shown on the display. The tempo value can be set in 0.1 BPM steps. Step 2: Recording the first track In this step, you record the first track while listening to the guide rhythm of the rhythm section. As an example we describe how to record an electric guitar on track 1 with the insert effect. 2.
1608E.book 25 ページ 2004年4月19日 月曜日 午前10時44分 Quick Tour section lights up occasionally when you play the instrument at the loudest level. apply the insert effect to the guitar signal connected to the GUITAR/BASS INPUT jack. ● When using the GUITAR/BASS INPUT jack 1. Press the [INPUT SOURCE] key in the effect section. May briefly flash The insert position of the insert effect is indicated on the second line of the display. The default is “IN” (INPUT).
1608E.book 26 ページ 2004年4月19日 月曜日 午前10時44分 Quick Tour instruments such as synthesizer or electric piano. HINT ● MASTERING To record without using the insert effect, press the [BYPASS] key An algorithm suitable for processing the final stereo mixdown signal. in the effect section. The key lights up and the insert effect is When you select an algorithm, the respective key lights up and a patch (effect program) using the selected algorithm is shown on the display. INSERT Standard No.
1608E.book 27 ページ 2004年4月19日 月曜日 午前10時44分 Quick Tour parameters for left/right stereo tracks are set to the same values. This is useful for recording from stereo sources such as synthesizers or CD players. recording will stop. The indication “wait...” is briefly shown on the display, and then the main screen reappears. HINT The duration of the “wait...” period may differ. Never turn power • Normally, you can select up to two tracks simultaneously.
1608E.book 28 ページ 2004年4月19日 月曜日 午前10時44分 Quick Tour Step 3: Overdubbing In this step, you will learn how to record another instrument on track 2, while listening to the content you recorded in step 2. Adding parts in this way is called “overdubbing”. 3.1 Making settings for input sensitivity and insert effect As in step 2, adjust input sensitivity and recording level, and make settings for the insert effect. 1. 2. 3. 4.
1608E.book 29 ページ 2004年4月19日 月曜日 午前10時44分 Quick Tour Step 4: Mixing When you have finished recording all tracks, you can use the built-in mixer to adjust parameters such as volume level, EQ (equalizer), and panning (stereo left/right positioning) to create a pair of stereo tracks. 3. Use the cursor left/right keys or the status keys to select the track for which you want to make a setting.
1608E.book 30 ページ 2004年4月19日 月曜日 午前10時44分 Quick Tour Track parameter list Parameter Corresponding Display key Setting range EQ HI G -12 – +12dB EQ HI FREQUENCY EQ HI F 500 – 18000(Hz) EQ MID GAIN EQ MID G -12 – +12dB EQ MID F 40 – 18000(Hz) EQ MID Q 0.1 – 1.
1608E.book 31 ページ 2004年4月19日 月曜日 午前10時44分 Quick Tour 4.3 Applying the send/return effect 3. 4. The track signals sent to the internal mixer can be processed by an effect that is connected internally to the send/return loop of the mixer. (This is called a send/return effect.) The MRS-1608 incorporates two kinds of send/return effects (chorus/delay and reverb). Select the patch for the other send/return effect in the same way. To return to the main screen, press the [EXIT] key several times.
1608E.book 32 ページ 2004年4月19日 月曜日 午前10時44分 Quick Tour 4.4 Applying the insert effect to a track ● When an algorithm other than 8x COMP EQ is selected You can select one of eight mono tracks (TR 1 – TR 8) or two mono tracks/one stereo track (TR 1/2 – TR 15/16) as insert location. You can apply the insert effect to the output of any track, so that it post-processes the output signal of the track. IN SRC TR1 ◆ Changing the algorithm/insert position of the insert effect 1.
1608E.book 33 ページ 2004年4月19日 月曜日 午前10時44分 Quick Tour ◆ Changing the insert position of the insert effect Step 5: Mixdown When the mix is ready, you can transfer it onto two tracks to create the finished song. This is referred to as “mixdown”. There are two ways of doing this: use the MASTER OUTPUT or DIGITAL OUTPUT connectors and record the song on an external recorder, or use the internal master track of the MRS-1608 to record.
1608E.book 34 ページ 2004年4月19日 月曜日 午前10時44分 Quick Tour 5.2 Mixdown on the master track After mastering effect settings have been completed, record the final mix on the master track. 1. 2. Press the ZERO [U] key to return to the beginning of the song. Press the PLAY [R] key to play the song, and check the level after the [MASTER] fader. The signal level after the [MASTER] fader can be checked by observing the level meter in the lower right of the display.
1608E.book 35 ページ 2004年4月19日 月曜日 午前10時44分 Reference [Recorder] This chapter explains the functions and operation steps of the recorder section. • If you select the master track, “M” is shown as the track V-takes number. About V-takes Each track 1 – 16 of the recorder contains ten virtual tracks, called “V-takes”. For each track, you can select one such take, which will be used for recording and playback.
1608E.book 36 ページ 2004年4月19日 月曜日 午前10時44分 Reference [Recorder] Assigning V-take names A V-take that has been recorded will be automatically assigned a default name, according to the following pattern. (xx denotes the track number, and yy the V-take number.) TR 3- 2 GTR 3- 2 NOTE Only the name of the V-take currently selected for a track can GTRxx-yy V-take recorded through CLEAN, DIST, or ACO/BASS SIM algorithm of insert effect be changed. 2.
1608E.book 37 ページ 2004年4月19日 月曜日 午前10時44分 Reference [Recorder] HINT If the contents of a V-take are fully erased, the name reverts to “NO DATA”. Moving to a desired point in the song (locate function) You can specify a location within the song in time units (minutes/seconds/milliseconds) or in measure units (measure/beat/tick) units, and move to that location.
1608E.book 38 ページ 2004年4月19日 月曜日 午前10時44分 Reference [Recorder] Finding a desired location (scrub/preview function) The MRS-1608 provides a “scrub” function that lets you search for a desired location while repeatedly playing a short region before or after the current point. This is convenient to accurately find the point at which a specific sound starts or stops. When the scrub function is on, you can use the “preview function” that plays 0.7 seconds before and after the current point.
1608E.book 39 ページ 2004年4月19日 月曜日 午前10時44分 Reference [Recorder] • In the default condition of the MRS-1608, the foot switch HINT You can also use the cursor up/down keys to change the scrub playback length. is set to control recorder playback/stop. To use the foot switch to punch-in/out, you must first change the foot switch setting (→ p. 181). 3. To change the direction of scrub playback, use the cursor left/right keys to cause the scrub playback direction indication to flash, and turn the dial.
1608E.book 40 ページ 2004年4月19日 月曜日 午前10時44分 Reference [Recorder] Using auto punch-in/out Auto punch-in/out is a function that lets you specify beforehand the region to be re-recorded. Punch-in will occur automatically when you reach the starting location (In point), and punch-out will occur automatically when you reach the ending location (Out point).
1608E.book 41 ページ 2004年4月19日 月曜日 午前10時44分 Reference [Recorder] Recording several tracks on a master track (mixdown function) This section explains how to play recorded audio tracks as well as drum/bass track sounds and record them as a stereo mix on a master track (mixdown). Master track mixdown steps Here’s how to mix recorder tracks and the rhythm section sound onto two stereo channels and record these on the master track. 1.
1608E.book 42 ページ 2004年4月19日 月曜日 午前10時44分 Reference [Recorder] 2. Press the ZERO [U] key to return to the beginning of the song, and then press the PLAY [R] key. Playback of the master track starts. You can use the [MASTER] fader to adjust the playback volume. • If necessary, you can play back all tracks 1 – 16, and bounce 3. Making bounce settings To stop recorder playback, press the STOP [P] key. 4.
1608E.book 43 ページ 2004年4月19日 月曜日 午前10時44分 Reference [Recorder] ◆ Selecting the recording destination Vtake By default, the result of the bounce operation will be recorded on the V-take that is currently selected for the recording track(s). To play back a track while bouncing onto another V-take of that track, you can use the following procedure to change the recording destination V-take.
1608E.book 44 ページ 2004年4月19日 月曜日 午前10時44分 Reference [Recorder] source” on page 44 and select “MASTER” as source. 8. To turn off the bounce function, press the [BOUNCE] key. The [BOUNCE] key goes out, and the bounce function is canceled. Recording the drum/bass sound (rhythm recording) • DRUM TR Drum track • BASS TR Bass track 4. Turn the dial to select “DRUM TR” or “BASS TR” as recording source. 5. Press the [EXIT] key several times to return to the main screen.
1608E.book 45 ページ 2004年4月19日 月曜日 午前10時44分 Reference [Recorder] as recording source”. Input HINT It is also possible to use a MIDI keyboard or similar device 1 2 3 4 5 6 7 8 instead of the pads to play drum/bass sounds. Status keys 6. Press the [BOUNCE] key. The key goes out.
1608E.book 46 ページ 2004年4月19日 月曜日 午前10時44分 Reference [Recorder] When pressed, a key lights up, and the corresponding input is active. 4. While the instruments are played, adjust the [INPUT] controls to obtain a suitable input sensitivity level. When using the GUITAR/BASS INPUT jacks 1/2, perform the adjustment with the [GUITAR/BASS INPUT] control 1/2 on the front panel. 5.
1608E.book 47 ページ 2004年4月19日 月曜日 午前10時44分 Reference [Recorder] The mark number is assigned automatically in ascending order from the beginning of the song. If you add a new mark between two existing marks, the subsequent marks will be renumbered. 00 0102 01 02 03 04 0102 01 02 03 04 05 Song Mark number 00 Here’s how to delete a mark that you assigned. 1. Add a mark Mark number Deleting a mark Song Locate the mark that you want to delete.
1608E.book 48 ページ 2004年4月19日 月曜日 午前10時44分 Reference [Recorder] Making settings for precount operation In the default condition of a project, a pre-count of four beats is heard before the start of recording. The number of beats and the pre-count volume can be changed as follows. 4. To change the volume of the pre-count, use the cursor left/right keys to bring up the indication “PreCount VOLUME” on the display, and press the [ENTER] key. The display indication changes as follows.
1608E.book 49 ページ 2004年4月19日 月曜日 午前10時44分 Reference [Track Editing] This section explains how to edit audio data contained on tracks 1 – 16 of the recorder section. There are two major types of editing functions: specifying a range within a track for editing, and editing an entire V-take. Editing a range of data The procedure for specifying a range within a track and then performing an editing action is explained below.
1608E.book 50 ページ 2004年4月19日 月曜日 午前10時44分 Reference [Track Editing] NOTE • You can also press the status keys for two adjacent odd/even- Copy Src START numbered mono tracks together to select these tracks. • Repeatedly pressing the status keys for stereo tracks selects 0 0 0 the odd-numbered track, even-numbered track, and stereo 0 001 1 0 00 track in sequence.
1608E.book 51 ページ 2004年4月19日 月曜日 午前10時44分 Reference [Track Editing] The display indication changes as follows. Copy Dst TO 0 213 2 13 0 058 3 0 00 2. 3. Press the [ENTER] key. The display indication changes to “Move Src END”. Move Src END 7. Specify the copy destination start point in the same way as for the copy source, and press the [ENTER] key. The indication “COPY SURE?” appears on the display. 8. To execute the copy operation, press the [ENTER] key.
1608E.book 52 ページ 2004年4月19日 月曜日 午前10時44分 Reference [Track Editing] Erasing a specified range of data Trimming a specified range of data You can erase the audio data of a specified range and return the range to the non-recorded condition. You can erase the audio data of a specified range and adjust the data start/end point (trimming).
1608E.book 53 ページ 2004年4月19日 月曜日 午前10時44分 Reference [Track Editing] be played. Fade Src END 5. Press the [ENTER] key. The indication “TRIM SURE?” appears on the display. 0 024 0 24230 230 018 2 12 00 6. To execute the trimming operation, press the [ENTER] key. When the trimming operation is completed, the unit returns to the track edit menu. By pressing the [EXIT] key instead of the [ENTER] key, you can cancel the operation and back up one step at a time. 4.
1608E.book 54 ページ 2004年4月19日 月曜日 午前10時44分 Reference [Track Editing] Reversing a specified range of audio data Changing the duration of a specified range of data You can reverse the order of a specified range of audio data. You can change the duration of the specified range of audio data on a track without changing the pitch (time stretch/compress). The stretched or compressed data can be written over the old data on the same track or pasted on another track while leaving the source data unchanged.
1608E.book 55 ページ 2004年4月19日 月曜日 午前10時44分 Reference [Track Editing] • Tempo (BPM) Sets the tempo (beats per minute) after time stretch/ compress, using the tempo set in the rhythm song as reference. In the default condition, the current tempo of the rhythm section is shown. 3. Use the cursor left/right keys to select the unit for making the time stretch/compress setting. The selected unit flashes. 4. Turn the dial to make the time stretch/ compress setting.
1608E.book 56 ページ 2004年4月19日 月曜日 午前10時44分 Reference [Track Editing] Audio track Audio track Pitch compensation (D Major) PitchFix Bass sequence HINT • When you select “BassSeq”, step 3 is not necessary. • When you select “BassSeq” for pitch compensation, the note in the octave closest to the source material is selected. If the Pitch compensation (Chromatic) source and the bass track pitch are far apart, the results may be unpredictable. 3.
1608E.book 57 ページ 2004年4月19日 月曜日 午前10時44分 Reference [Track Editing] 6. To start pitch compensation, hold down the REC [O] key and press the PLAY [R] key. Recording starts with the pitch compensation applied. If you have selected “BassSeq” in step 2, you can check the bass track level on the level meter in the display. By using the cursor left/right keys during recording, you can call up and edit the parameter values set in steps 2 – 5.
1608E.book 58 ページ 2004年4月19日 月曜日 午前10時44分 Reference [Track Editing] 1. Select the rhythm pattern or rhythm song to be used for harmony generation. When the selection is finished, press the [EXIT] key to return to the main screen. NOTE Make sure that the selected rhythm pattern/rhythm song comprises suitable chord information. 2. Refer to steps 1 – 6 of “Basic steps for range editing” to select the track/V-take for harmony generation, and press the [ENTER] key.
1608E.book 59 ページ 2004年4月19日 月曜日 午前10時44分 Reference [Track Editing] 9. Press the cursor down key to cause the counter indication to flash. Then use the cursor left/right keys and the dial to specify the start point for harmony generation. You can also use the MARKER [U]/[I] keys, ZERO [U] key, and REW [T]/FF [Y] keys to locate the point. HINT The manual and automatic punch-in/punch-out functions can also be used at this point. 10.
1608E.book 60 ページ 2004年4月19日 月曜日 午前10時44分 Reference [Track Editing] 2. Use the cursor up/down keys and the dial/ status keys to select the track/V-take to be used as destination. If you specify the same track/V-take as the source, the harmony data will be added to the original data and the Vtake will be overwritten. You can also specify a stereo track or two mono tracks as destination. 7.
1608E.book 61 ページ 2004年4月19日 月曜日 午前10時44分 Reference [Track Editing] HINT The manual and automatic punch-in/punch-out functions can also be used at this point. 11. To start Duo Harmony generation, hold down the REC [O] key and press the PLAY [R] key. Editing using V-takes Recorded audio data can also be edited in V-take units. This is convenient to exchange the data on two V-takes or delete a V-take that is no longer needed. The procedure is explained in this section. 12.
1608E.book 62 ページ 2004年4月19日 月曜日 午前10時44分 Reference [Track Editing] HINT Pressing the status key for a stereo track repeatedly selects the odd-numbered track and even-numbered track in sequence. condition before editing, use the capture and swap functions (→ p. 65) for that track. Erasing a V-take 3. Press the [UTILITY/TRACK EDIT] key in the display section. A menu for editing audio data in V-take units appears on the display. 4.
1608E.book 63 ページ 2004年4月19日 月曜日 午前10時44分 Reference [Track Editing] COPY TO TR 4- 1 2. Use the cursor left/right keys and the dial to select the destination track/V-take, and press the [ENTER] key. The indication “COPY SURE?” appears on the display. If audio data exist at the copy destination, the indication “OverWrt?” is shown. When the copy operation is performed, these data will be overwritten. 3. To execute the copy operation, press the [ENTER] key once more.
1608E.book 64 ページ 2004年4月19日 月曜日 午前10時44分 Reference [Track Editing] Importing a V-take from another project You can import any V-take from another project into a specified track/V-take of the current project. Any audio data on the destination V-take are overwritten by the imported V-take. Track in import source project 4. Press the [ENTER] key. The indication “IMPORT SURE?” appears on the display. If audio data exist at the import destination, the indication “OverWrt?” is shown.
1608E.book 65 ページ 2004年4月19日 月曜日 午前10時44分 Reference [Track Editing] Track capture and swap You can capture the audio data of any track and temporarily store them on the hard disk. Later you can swap the captured data with the current data of the track. This lets you save the state of a track before an editing operation. If the result of the operation is not as desired, you can then easily restore the track to its previous state.
1608E.book 66 ページ 2004年4月19日 月曜日 午前10時44分 Reference [Track Editing] Swapping track data and captured data HINT You can swap the current data of a track with the captured data. 6. By performing the swap operation once more, you can return the track contents to the previous condition. To return to the main screen, press the [EXIT] key several times. 1. From the main screen, press the [UTILITY/ TRACK EDIT] key in the display section. The indication “UTILITY TR EDIT” appears on the display. 2.
1608E.book 67 ページ 2004年4月19日 月曜日 午前10時44分 Reference [Phrase Looping] The MRS-1608 lets you handle part of a recorded track or an audio file on CD-ROM as a phrase that can be loaded and played freely, in a preprogrammed sequence or for a specified number of times. The result can be written to any track/Vtake. This function is called “phrase looping”. For example, you could use a commercially available sampling CD to pick up drum loops in any desired order, and use these to create a rhythm track.
1608E.book 68 ページ 2004年4月19日 月曜日 午前10時44分 Reference [Phrase Looping] Loading a phrase This section describes how to load a phrase into the phrase pool. 5. Use the cursor left/right keys to bring up the indication “PHRASE IMPORT” on the display, and press the [ENTER] key. The menu for selecting the import source appears on the display. Basic phrase loading steps IMPORT TAKE When loading phrases, some steps are similar for each type. 1.
1608E.book 69 ページ 2004年4月19日 月曜日 午前10時44分 Reference [Phrase Looping] Importing a phrase from the current project By moving the flashing section to the MEASURE/BEAT/ TICK or MARKER field on the display, you can specify the point as a measure, beat, tick, or as a mark number. You can specify a range from any track/V-take of the current project and use it as a phrase. HINT 1. Refer to steps 1 – 6 of “Basic phrase loading steps” to select “TAKE” as import source. Then press the [ENTER] key.
1608E.book 70 ページ 2004年4月19日 月曜日 午前10時44分 Reference [Phrase Looping] Importing a WAV/AIFF file IMPORT LOOP.WAV You can import an audio file (WAV/AIFF) from a CDROM or CD-R/RW disc inserted in the CD-R/RW drive or from the internal hard disk. Before doing this, the following preparations are necessary. File name HINT ● When importing from the CD-R/RW drive Insert a CD-ROM or CD-R/RW disc containing audio files into the CD-R/RW drive.
1608E.book 71 ページ 2004年4月19日 月曜日 午前10時44分 Reference [Phrase Looping] import process. When the process is complete, the phrase menu appears again. By pressing the [EXIT] key instead of the [ENTER] key, you can cancel the operation and back up one step at a time. PHRASE PH003-02 No.2 Phrase name Phrase number HINT The name “PHxxx-yy” is automatically assigned to the loaded phrase (where xxx is the current project number and yy the phrase number).
1608E.book 72 ページ 2004年4月19日 月曜日 午前10時44分 Reference [Phrase Looping] imported, the indication “EMPTY” appears instead of the phrase name. 4. Press the [EDIT] key. A parameter of the selected phrase appears. PHRASE MEAS x02 No.1 5. Use the cursor up/down keys to call up the parameter you want to edit. ● MEAS xXX (XX = 01 – 99) This parameter specifies to how many measures the playback range of the phrase corresponds.
1608E.book 73 ページ 2004年4月19日 月曜日 午前10時44分 Reference [Phrase Looping] Copying a phrase You can copy a phrase to any other phrase number. Any phrase at the copy destination will be overwritten (erased). This is convenient to use one phrase as a starting point and save it with different parameter settings. 1. From the main screen, press the [UTILITY/ TRACK EDIT] key in the display section. The indication “UTILITY TR EDIT” appears on the display. 2.
1608E.book 74 ページ 2004年4月19日 月曜日 午前10時44分 Reference [Phrase Looping] Using FAST input for the phrase loop When creating a phrase loop, the FAST (Formula Assisted Song Translator) method developed by ZOOM can be used to specify phrase sequence and number of plays. The keys and pads of the rhythm section are used for FAST input, as described below. [)] key Enters the closing bracket ")" used for linking several phrases. [(] key Enters the opening bracket "(" used for linking several phrases.
1608E.book 75 ページ 2004年4月19日 月曜日 午前10時44分 Reference [Phrase Looping] 3. HINT If the formula does not fit on two lines, the indication scrolls by one character each. If you use the cursor keys to move the input position, the line scrolls accordingly. Press the [UTILITY/TRACK EDIT] key once more. The phrase utility menu appears on the display. PHRASE IMPORT If you make a mistake during input, correct it as follows.
1608E.book 76 ページ 2004年4月19日 月曜日 午前10時44分 Reference [Phrase Looping] 6. When you have selected a track/V-take, press the [ENTER] key. A screen for selecting the phrase loop number for formula input appears. CREATE LOOP01 HINT Ten phrase loops (LOOP01 – LOOP10) can be created. aligned to the measure start of the rhythm song.
1608E.book 77 ページ 2004年4月19日 月曜日 午前10時44分 Reference [Mixer] This section explains the functions and operation of the two mixer types built into the MRS-1608. About the mixer HINT The mixer of the MRS-1608 is divided into two sections: an “input mixer” that processes the input signals from the INPUT jacks, and a “track mixer” that processes the signals from the audio tracks and the drum/bass track of the recorder section. Details of each mixer are described below.
1608E.
1608E.book 79 ページ 2004年4月19日 月曜日 午前10時44分 Reference [Mixer] When the setting is complete, press the [EXIT] key to return to the main screen. HINT • With the default settings of a project, the insert effect is inserted into the input mixer, and a patch suitable for guitar/ bass recording is selected. repeatedly press the status key for one track until the key is lit in red, and then hold the key while pressing the status key for the other track.
1608E.book 80 ページ 2004年4月19日 月曜日 午前10時44分 Reference [Mixer] NOTE • The diagrams above show the signal flow when the insert effect has not been inserted into the input mixer. When the insert effect is inserted, the signal flow will change, depending on the number of input and output channels of the effect (→ p. 141). • In 8-track recording mode (→ p. 45), the signals from inputs 1 – 8 are sent to tracks 1 – 8.
1608E.book 81 ページ 2004年4月19日 月曜日 午前10時44分 Reference [Mixer] ◆ Track parameter list Track 1–8 Track 9 – 16 O O O O O O O O O O O O O O O O O O O O O Adjusts the chorus/delay effect send level for the track/input. O O O O Adjusts the reverb effect send level for the track/input.
1608E.book 82 ページ 2004年4月19日 月曜日 午前10時44分 Reference [Mixer] Linking two tracks (stereo link) In the MRS-1608, the parameters of adjacent oddnumbered/even-numbered mono tracks (1/2, 3/4, 5/6, 7/8) can be linked, resulting in a pair of stereo tracks. (This function is referred to as “stereo link”.) The setting procedure is as follows. 1. Press any key in the track parameter section. 2. Press the status key of one of the mono tracks that you want to stereo-link. 3.
1608E.book 83 ページ 2004年4月19日 月曜日 午前10時44分 Reference [Mixer] 5. MASTER SUB SEND ON While the SUB-OUT SEND ON/OFF parameter of the master track is ON, the indication “xxx SUB SEND MASTER” (where xxx is the track/input name) will be shown when another track or input is called up. For this track/input, the SUB-OUT SEND parameter cannot be modified. 3. Turn the dial to set the parameter to OFF.
1608E.book 84 ページ 2004年4月19日 月曜日 午前10時44分 Reference [Mixer] Using the solo function If desired, you can mute all other tracks except one during playback of the recorder section. This is called the “solo function”. It is convenient to fine-tune the parameters for a certain track. 1. From the main screen, perform playback of the recorder section and press the [SOLO] key. The key lights up. NOTE Also when the [SOLO] key is lit, the input signals are always mixed.
1608E.book 85 ページ 2004年4月19日 月曜日 午前10時44分 Reference [Mixer] 4. Use the cursor left/right keys to move the flashing section, and turn the dial to select a character. Repeat this until the name is as desired. For information on available characters, refer to page 36. 5. To carry out the store process, press the [STORE] key or the [ENTER] key. The current mixer and effect settings will be saved as a scene. When the process is completed, the unit returns to the screen of step 2.
1608E.book 86 ページ 2004年4月19日 月曜日 午前10時44分 Reference [Mixer] panning parameters manually for each track. MARK ED SCENE No.1 Scene number HINT 1. Press the [SCENE] key in the control section, and then press the [UTILITY/ TRACK EDIT] key in the display section. The following screen appears on the display. In this condition, you can select whether the scene controls the fader action. To cancel a scene assignment, turn the dial until the display indicates “ -- “. 6.
1608E.book 87 ページ 2004年4月19日 月曜日 午前10時44分 Reference [Rhythm] This section explains the functions and operation of the built-in rhythm section of the MRS-1608. About the rhythm section The rhythm section of the MRS-1608 uses internal drum sounds and bass sounds to generate rhythm accompaniment. It can be used instead of a metronome by playing simple rhythm patterns, or you can program a sequence of rhythm patterns and chord progression into the rhythm accompaniment for an entire song.
1608E.book 88 ページ 2004年4月19日 月曜日 午前10時44分 Reference [Rhythm] Rhythm patterns Rhythm pattern mode and rhythm song mode A project can contain accompaniment patterns with drum/bass performance data for up to 99 measures each. This is called a rhythm pattern. The MRS-1608 has 511 such patterns. Inside each rhythm pattern, the area that holds the drum performance data is called the “drum sequence”, and the area that holds the bass performance data is called the “bass sequence”.
1608E.book 89 ページ 2004年4月19日 月曜日 午前10時44分 Reference [Rhythm] Playing rhythm patterns This section explains how to play rhythm patterns, how to change the tempo, and how to change the drum kit or bass program. Selecting a rhythm pattern This section explains how to select and play one of the 511 rhythm patterns. 1. From the main screen, press the [PATTERN] key in the rhythm section, so that the key lights up. The rhythm pattern selection screen appears.
1608E.book 90 ページ 2004年4月19日 月曜日 午前10時44分 Reference [Rhythm] 3. Turn the dial to adjust the tempo. The tempo can be adjusted over a range of 40.0 – 250.0 (BPM). NOTE 4. 4. To change the tempo manually, hit the [TEMPO] key repeatedly at the desired tempo. The average of the key press intervals is determined and set as the new tempo. 5. To return to the main screen, press the [EXIT] key several times.
1608E.book 91 ページ 2004年4月19日 月曜日 午前10時44分 Reference [Rhythm] ◆ Changing the bass program 1. Press the [BASS] key. You can now use the pads to play a bass program. 2. Press the [KIT/PROG] key in the rhythm section. The currently selected bass program is shown on the display. 1. From the main screen, press the [DRUM] key. The key lights up, and a drum kit to play can be selected. In the default condition of a project, pad bank 1 is selected. 2.
1608E.book 92 ページ 2004年4月19日 月曜日 午前10時44分 Reference [Rhythm] When you hit a pad while pressing the [STEP] key, the pad plays repeatedly at the specified interval (roll play). For example, you can repeat a kick drum at quarter note intervals, or play a hihat in sixteenth note units. To stop roll play, release the pad. If you release the [STEP] key first, roll play continues also when you release the pad. To stop roll play in this case, press the pad once more.
1608E.book 93 ページ 2004年4月19日 月曜日 午前10時44分 Reference [Rhythm] CHROMATC C C# D D# G# A A# B E F F# G F# G# A B B C# D# E E F# G# A MAJOR MINOR F# G A B B C D E E F# G A Creating an original rhythm pattern This section explains how you can create your own original rhythm patterns. There are two ways of doing this: real-time input where you record your play on the top panel pads, and step input where play is stopped and you enter the sounds one by one.
1608E.book 94 ページ 2004年4月19日 月曜日 午前10時44分 Reference [Rhythm] The setting range is 1 – 8 (1/4 – 8/4). EDIT QUANTIZE 5. To set the quantize value, make sure the indication “EDIT QUANTIZE” is shown on the display, and press the [ENTER] key. The display indication changes as follows. The quantize value is the smallest note unit for recording a pattern. When performing real-time input, your play is recorded using the note steps selected here. The default setting is “16” (a sixteenth note). QUANTIZE 16 9.
1608E.book 95 ページ 2004年4月19日 月曜日 午前10時44分 Reference [Rhythm] 5. While listening to the metronome, tap the pads. Your performance on the pads will be recorded as a drum sequence according to the quantization setting. The intensity with which you hit the pads will also be recorded. When you reach the end of the pattern, the unit automatically returns to the first measure, and real-time input continues.
1608E.book 96 ページ 2004年4月19日 月曜日 午前10時44分 Reference [Rhythm] 2. Press the [BASS] key so that the key lights up. In this condition, you can play the bass program with the pads. Your play will be recorded as a bass sequence. Bass track 3. As necessary, press the [BANK/OCTAVE] key to switch the scale and octave of the bass program. 4. Hold down the REC [O] key and press the PLAY [R] key. A four-beat pre-count is heard, and rhythm pattern recording starts.
1608E.book 97 ページ 2004年4月19日 月曜日 午前10時44分 Reference [Rhythm] 4 . . . . . .Quarter note 8 . . . . . .Eighth note 12 . . . . .Eighth triplet note 16 . . . . .Sixteenth note (default) 24 . . . . .Sixteenth triplet note 32 . . . . .Thirty-second note Hi . . . . .1 tick (1/48 of quarter note) If you only press the [STEP] key, no playing information is entered, but the step advances by an interval corresponding to the current quantize value. This becomes a rest (see illustration below). 1.
1608E.book 98 ページ 2004年4月19日 月曜日 午前10時44分 Reference [Rhythm] Bass sequence step input Q: 4 001 3 0 8. Repeat steps 6 – 7 while changing the step length as necessary, to enter the desired rhythm pattern. When you reach the end of the pattern, the unit automatically returns to the first measure, letting you enter more instrument sounds. When you use the [STEP] key to move step by step through a recorded rhythm pattern, the pad recorded at the respective position lights up. 9.
1608E.book 99 ページ 2004年4月19日 月曜日 午前10時44分 Reference [Rhythm] 3. As necessary, press the [BANK/OCTAVE] key to select the octave for step input. When the setting is complete, press the [EXIT] key to return to the previous screen. Q:4 D: x1 001 2 0 4. Press the REC [O] key. The display indication changes as follows. In this condition, step input is possible. HINT • The intensity with which you hit the pad is also recorded on Quantize value Duration value the bass sequence.
1608E.book 100 ページ 2004年4月19日 月曜日 午前10時44分 Reference [Rhythm] 12. To return to the main screen, press the [EXIT] key several times. Entering rhythm pattern chord information When you have recorded a rhythm pattern, and you later set the chord information (root + chord type), the bass phrase in a rhythm song will be transformed based on the original chord information of that rhythm pattern. 6. When the setting is complete, press the [EXIT] key.
1608E.book 101 ページ 2004年4月19日 月曜日 午前10時44分 Reference [Rhythm] Changing the drum/bass sequence volume level This screen allows you to specify the bass sequence volume. Bs LEVEL 15 The playback volume of the drum sequence and bass sequence can be adjusted with the [DRUM] and [BASS] faders. If necessary, the volume levels can also be individually programmed for each rhythm pattern. The display shows the current volume setting (0 – 15). 1.
1608E.book 102 ページ 2004年4月19日 月曜日 午前10時44分 Reference [Rhythm] In this condition, you can edit the rhythm pattern name. NAME Pat 500 5. Use the cursor left/right keys to move the flashing position to the character you want to change, and turn the dial to select a character. For information on available characters, refer to page 36. 6. Repeat step 5 until the name is as desired. 7. To return to the main screen, press the [EXIT] key several times.
1608E.book 103 ページ 2004年4月19日 月曜日 午前10時44分 Reference [Rhythm] copy destination rhythm pattern as the selected pattern. By pressing the [EXIT] key instead of the [ENTER] key, you can cancel the operation and back up one step at a time. 6. To return to the main screen, press the [EXIT] key several times. Deleting a rhythm pattern This section explains how to delete all data from a specified rhythm pattern, returning it to the blank state. 1.
1608E.book 104 ページ 2004年4月19日 月曜日 午前10時44分 Reference [Rhythm] Rhythm song number SONG No0 SONG000 BANK:1 Rhythm song name The indication “EOS” (End of Song) shows the position where the rhythm song ends. For an empty song, “EOS” will be located at the beginning. Therefore nothing happens if you play the song. Current pad bank (or octave) Current position 1 (measure number) When the rhythm song is empty, the indication “EMPTY” is shown in the rhythm song name field.
1608E.book 105 ページ 2004年4月19日 月曜日 午前10時44分 Reference [Rhythm] PTN EOS INSERT? P001x 2 Rhythm pattern number to insert 003 1 0 Number of measures to insert In this condition, you can insert rhythm pattern information. (measure 1 number) Song 5. Current position 2 PATTERN 002 3 End of Song Turn the dial to select the rhythm pattern that you want to insert. HINT 6. Use the cursor up/down keys to specify the number of measures to insert.
1608E.book 106 ページ 2004年4月19日 月曜日 午前10時44分 Reference [Rhythm] ● Inserting a rhythm pattern in a song Move to the point you want to insert the rhythm pattern, and perform steps 4 – 7. A new rhythm pattern is inserted at the current location, and all subsequent patterns are shifted back by the duration of the inserted pattern.
1608E.book 107 ページ 2004年4月19日 月曜日 午前10時44分 Reference [Rhythm] precedence over other formulas. For example, entering 0 + (1 + 2) x 2 + 3 will result in the following rhythm pattern play sequence. HINT • If the formula does not fit on two lines, the indication scrolls by one character each. If you use the cursor left/right keys to move the input position, the line scrolls left and right PATTERN 0 PATTERN 1 PATTERN 2 accordingly. • For FAST input, leading zeros are omitted.
1608E.book 108 ページ 2004年4月19日 月曜日 午前10時44分 Reference [Rhythm] 5. When formula input is completed, press the [ENTER] key. The display indication changes as follows. In this condition, you can select the rhythm song number in which you want to write the song. 3. Use the cursor up/down keys to bring up the indication “ROOT” on the first line of the display.
1608E.book 109 ページ 2004年4月19日 月曜日 午前10時44分 Reference [Rhythm] in the same way as described in steps 3 – 6. You can move the input location within a rhythm song in the following ways. If you have made a mistake or want to make a change, proceed as follows. ● To change chord information ● Moving in steps of a measure Use the cursor left/right keys to move to the beginning of the preceding or following measure.
1608E.book 110 ページ 2004年4月19日 月曜日 午前10時44分 Reference [Rhythm] If a key is not lit, press it so that it lights up. Use the ZERO [U] key to align the current position with the beginning of the rhythm song. 2. Press the REC [O] key. The [REC] key lights up and rhythm pattern input for the rhythm song becomes possible. For details on how to move the current location, refer to page 108. 5. Use the cursor up/down keys to select the type of event that you want to input.
1608E.book 111 ページ 2004年4月19日 月曜日 午前10時44分 Reference [Rhythm] Playing a rhythm song Editing a rhythm song This section explains how to play one of the 10 rhythm songs that were created by inputting rhythm pattern and chord information. This section explains how to edit a rhythm song that you have created. 1. Copying a specified range of measures From the main screen, press the [SONG] key. The key lights up and the rhythm song selection screen appears.
1608E.book 112 ページ 2004年4月19日 月曜日 午前10時44分 Reference [Rhythm] 2. Press the [RHYTHM] key. The key lights up, and a rhythm song can be created or edited. COPY END 008 3. Press the [EDIT] key. The rhythm song edit menu appears. 6. Turn the dial to select the copy source end measure, and press the [ENTER] key. The screen for selecting the copy destination appears. 4. COPY TO 001 7.
1608E.book 113 ページ 2004年4月19日 月曜日 午前10時44分 Reference [Rhythm] 1. From the main screen, press the [SONG] key so that the key is lit. 2. 2. Press the [RHYTHM] key. The key lights up, and a rhythm song can be created or edited. Press the [RHYTHM] key. The key lights up, and a rhythm song can be created or edited. 3. 3. 4. Turn the dial to select the copy source rhythm song. 4. Press the [INSERT/COPY] key. The display indication changes as follows.
1608E.book 114 ページ 2004年4月19日 月曜日 午前10時44分 Reference [Rhythm] 5. Use the cursor left/right keys to move the flashing section, and turn the dial to select a character. For information on available characters, refer to page 36. 6. Repeat step 5 until the name is as desired. 7. When the name has been input, press the [EXIT] key. The rhythm song name is changed, and the display returns to the rhythm song edit menu. To return to the main screen, press the [EXIT] key several times.
1608E.book 115 ページ 2004年4月19日 月曜日 午前10時44分 Reference [Rhythm] 5. Use the cursor left/right keys to select an item to set. The following items are available. • Instrument sound Lets you select a single drum/percussion sound from the currently selected drum sound set to assign to a pad. For a list of numbers and corresponding sound names, refer to the appendix at the end of this manual. • PITCH Adjusts the pitch of the drum/percussion sound for the pad. The setting range is -7.
1608E.book 116 ページ 2004年4月19日 月曜日 午前10時44分 Reference [Rhythm] Assigning a name to a drum kit Copying a drum kit You can assign a name to a drum kit. You can copy the currently selected drum kit to another kit number. This is useful to create variations of a drum kit. 1. From the main screen, press the [RHYTHM] key so that the key lights up. 2. Press the [DRUM] key in the rhythm section, and then the [KIT/PROG] key. The drum kit selection screen appears on the display. 3.
1608E.book 117 ページ 2004年4月19日 月曜日 午前10時44分 Reference [Rhythm] Adjusting the volume of each pad with the faders While playing a rhythm song or rhythm pattern, you can adjust the volume for each pad in the currently selected drum kit by using the faders. This is useful to adjust the volume of each instrument before mixdown. 1. From the main screen, press the [RHYTHM] key so that the key lights up. 2. Press the [DRUM] key in the rhythm section, and then the [KIT/PROG] key.
1608E.book 118 ページ 2004年4月19日 月曜日 午前10時44分 Reference [Rhythm] 5. Turn the dial to select the source project, and press the [ENTER] key. The subsequent steps differ, depending on which selection was made in step 4. • When ALL was selected Verify that the indication “IMPORT SURE?” is shown on the display. Proceed to step 7. • When PATTERN was selected The source rhythm pattern is shown on the display. Turn the dial to select the desired rhythm pattern, and press the [ENTER] key.
1608E.book 119 ページ 2004年4月19日 月曜日 午前10時44分 Reference [Rhythm] during real-time input of a rhythm pattern. • PAD SENS Change the pad sensitivity which determines the volume level in relation to the force with which the pad is struck. • MIDI Make MIDI-related settings (→ p. 170). • IMPORT Import rhythm patterns and rhythm songs from another project saved on the hard disk (→ p. 117). • MEMORY Check the remaining amount of rhythm pattern and rhythm song memory.
1608E.book 120 ページ 2004年4月19日 月曜日 午前10時44分 Reference [Rhythm] Adjusting the sensitivity of the pads Checking the remaining amount of memory You can specify the volume that is produced according to the force with which you hit the pads (pad sensitivity). Perform steps 1 – 3 of “Basic procedure” to bring up the indication “UTILITY PAD SENS”, and press the [ENTER] key. Then turn the dial to choose one of these settings.
1608E.book 121 ページ 2004年4月19日 月曜日 午前10時44分 Reference [Pad Sampler] This section explains the pad sampler function which lets you import short sound passages from audio tracks or a CDROM and assign these to the pads for playing. How the pad sampler works The pad sampler is a function which lets you assign material from audio tracks or a CD-ROM to the pads of the MRS-1608 for playing. This can be used to add effect sounds to a song or play a rhythm pattern/rhythm song with your original sounds.
1608E.book 122 ページ 2004年4月19日 月曜日 午前10時44分 Reference [Pad Sampler] Material that can be imported into the sample pool The following types of audio material can be imported into the sample pool. (1) Any audio track from the currently loaded project You can select any track/V-take from the currently loaded project and specify a range for use as a sample.
1608E.book 123 ページ 2004年4月19日 月曜日 午前10時44分 Reference [Pad Sampler] SAMPLE IMPORT 6. Verify that “SAMPLE IMPORT” is shown on the display and press the [ENTER] key. You can now select the type of import source. The display now shows “ImprtSrc TR xx-yy” (where xx is the track number and yy the V-take number). In this condition, you can select the track/V-take to use as import source. 2. Use the dial or the status keys to select the track, and use the cursor up/down keys to select the V-take.
1608E.book 124 ページ 2004年4月19日 月曜日 午前10時44分 Reference [Pad Sampler] 5. Press the [ENTER] key. The display indication changes as follows. NOTE • To copy audio files to the internal hard disk, the optional UIB02 card is necessary. For information on using the option card, ImprtSrc END 0 0 2 10 002 2 24 00 see page 183. • Any subfolders in the WAV_AIFF folder are not recognized by the MRS-1608. • The following procedure will not allow you to first listen to the audio files.
1608E.book 125 ページ 2004年4月19日 月曜日 午前10時44分 Reference [Pad Sampler] When you press the [ENTER] key in this condition, the files inside the selected folder are displayed. Turn the dial to select the desired file. By pressing the [EXIT] key, you can return to the next higher level. 4. When the file has been selected, press the [ENTER] key. Depending on the sampling frequency of the imported audio file, the following applies. ● Sampling frequency 44.
1608E.book 126 ページ 2004年4月19日 月曜日 午前10時44分 Reference [Pad Sampler] ● END Specifies the playback end point of the sample in milliseconds. In the default condition, this is the end of the sample (max. 22 seconds). ● NAME Editing a sample This section describes how you can copy and delete samples in the sample pool, and how you can perform waveform data editing on a specified range of a sample. Specifies the name of the sample. ● SIZE Indicates the size of the currently displayed sample. 7.
1608E.book 127 ページ 2004年4月19日 月曜日 午前10時44分 Reference [Pad Sampler] 6. HINT The copy process will overwrite the existing sample at the destination number. Take care not to accidentally overwrite a sample that you want to keep. 7. To execute the copy process, press the [ENTER] key. When the copy operation is completed, the unit returns to the sample selection screen. By pressing the [EXIT] key instead of the [ENTER] key, you can cancel the operation and back up one step at a time.
1608E.book 128 ページ 2004年4月19日 月曜日 午前10時44分 Reference [Pad Sampler] ● FADE I/O (Fade-in/out) Perform fade-in/fade-out over a specified audio data interval. 6. Use the cursor left/right keys to select the command, and press the [ENTER] key. The subsequent steps are the same as described for the respective editing commands in the track editing section of this manual. For REVERSE, see page 54. For FADE I/O, see page 53.
1608E.book 129 ページ 2004年4月19日 月曜日 午前10時44分 Reference [Pad Sampler] 5. screen. To return to the main screen, press the [EXIT] key several times. By pressing the [EXIT] key instead of the [ENTER] key, you can cancel the operation and back up one step at a time. Turn the dial to select the sampler program, and press the [ENTER] key. The selected sampler program is loaded into the pad sampler. When loading is complete, the unit returns to the rhythm pattern or rhythm song selection screen.
1608E.book 130 ページ 2004年4月19日 月曜日 午前10時44分 Reference [Pad Sampler] 9. Turn the dial to select the sample that you want to assign to the pad, and press the [ENTER] key twice. To hear the sample, you can press the PLAY [R] key at this point. The assignment process is carried out, and the unit returns to the screen of step 6. • MEMORY REMAIN Indicates the remaining amount of memory for the pad sampler, in terms of capacity or play time.
1608E.book 131 ページ 2004年4月19日 月曜日 午前10時44分 Reference [Pad Sampler] Editing a sampler program You can change the name of a sampler program or copy it to another program. The sampler program editing procedure is described below. 7. Use the cursor left/right keys to move the flashing section to the character you want to change, and turn the dial to select the new character. For information on available characters, refer to page 36. 8.
1608E.book 132 ページ 2004年4月19日 月曜日 午前10時44分 Reference [Pad Sampler] Deleting a sampler program SPL PRG SELECT You can delete an unneeded sampler program as follows. 5. Use the cursor left/right keys to bring up the indication “SPL PRG COPY” on the display, and press the [ENTER] key. The sampler program that will be used as copy source appears on the display. PRG COPY SPL PRG0 PRG:0 Copy source program name Copy source program number 6.
1608E.book 133 ページ 2004年4月19日 月曜日 午前10時44分 Reference [Pad Sampler] 6. Turn the dial to select the sampler program to delete, and press the [ENTER] key. The indication “SPL DEL SURE?” appears on the display. 7. To execute the delete process, press the [ENTER] key. When the delete operation is completed, the unit returns to the rhythm pattern or rhythm song selection screen. To return to the main screen, press the [EXIT] key several times.
1608E.book 134 ページ 2004年4月19日 月曜日 午前10時44分 Reference [Pad Sampler] 6. Turn the dial to select the desired pad bank (1 – 3). The sound assigned to the pads is switched immediately. When the setting is complete, press the [EXIT] key to return to the original screen. 7. Hit the pads to play the assigned samples. You can switch the function on and off by pressing the [DRUM] status key, and you can use the [DRUM] fader to adjust the pad sampler level.
1608E.book 135 ページ 2004年4月19日 月曜日 午前10時44分 Reference [Pad Sampler] 6. Press the PLAY [R] key while holding down the REC [O] key. A pre-count of four beats is heard, and then rhythm pattern recording starts. 7. While listening to the metronome, tap the pads. Your performance of the pad sampler will be recorded as a drum sequence. Recording pad sampler play on an audio track You can record your pad sampler play on an audio track.
1608E.book 136 ページ 2004年4月19日 月曜日 午前10時44分 Reference [Pad Sampler] 5. Press the [DRUM] and [BASS] keys in the rhythm section simultaneously to activate the pad sampler. 6. Select the sampler program you want to play. For details, see “Using the pads to play the pad sampler” (→ p. 133). 7. Press the [EXIT] key several times to return to the main screen. 8. Repeatedly press the status key of the audio track on which to record, until the key is lit in red. 9.
1608E.book 137 ページ 2004年4月19日 月曜日 午前10時44分 Reference [Pad Sampler] IMPORT PRJ001 Import source project name PRJ 001 Import source project number 6. Turn the dial to select the project, and press the [ENTER] key. A sampler program from the selected project is shown. IMPORT SPL PRG0 PRG:0 Program name Program number 7. Turn the dial to select the sampler program to import, and press the [ENTER] key. The indication “IMPORT SURE?” appears on the display. 8.
1608E.book 138 ページ 2004年4月19日 月曜日 午前10時44分 Reference [Effects] This section explains the functions and operation of the effect section built into the MRS-1608. insert the effect into a channel of the track mixer, the effect processes the playback signal from an audio track or the drum/bass track. By selecting a position immediately before the [MASTER] fader, you can use the effect to process the final mix before recording on the master track.
1608E.book 139 ページ 2004年4月19日 月曜日 午前10時44分 Reference [Effects] input x 2 and mono output x 2. Using the insert effect ● 8x COMP EQ This section explains how to select the position for the insert effect, how to select a patch, and how to edit the patch. This is an algorithm with eight separate inputs/outputs. Separate high-pass filter (HPF), compressor, and EQ settings are possible for each channel.
1608E.book 140 ページ 2004年4月19日 月曜日 午前10時44分 Reference [Effects] NOTE Patch PRE AMP/ DRIVE COMP • One of the input mixer outputs IN1 - IN8 can only be selected ZNR EQ if the 8-track recording function is enabled. • TR1-8 and TR9-16 are only available when the 8x COMP EQ algorithm is selected. VOL PDL MODULATION/ DELAY PAT LVL • IN1-8 can only be selected when the 8-track recording function is enabled and the 8x COMP EQ algorithm is selected.
1608E.book 141 ページ 2004年4月19日 月曜日 午前10時44分 Reference [Effects] 2. Press the [INPUT SOURCE] key. 3. The current insert position is shown on the display. 3. Turn the dial to select the input to use as insert position. If the 8-track recording function is enabled, operation will be different, depending on the selected algorithm. ● When 8x COMP EQ algorithm is selected Select IN1-8. In this condition, all input [ON/OFF] keys are lit in orange, and the effect is applied to inputs 1 - 8.
1608E.book 142 ページ 2004年4月19日 月曜日 午前10時44分 Reference [Effects] 2. Use the PATCH SELECT [W]/[Q] keys or turn the dial to select the patch. ● Using stereo input (or mono input x 2) insert effect on stereo input/stereo track The new patch is called up immediately. L HINT EFFECT The indication “EMPTY” appears instead of the patch name if the patch is empty. Selecting such a patch will not have an R effect. 3. To temporarily turn the insert effect off, press the [BYPASS] key in the effect section.
1608E.book 143 ページ 2004年4月19日 月曜日 午前10時44分 Reference [Effects] type, the effect parameter arrangement also changes.) Effect module type Effect MODULATION/ module DELAY Effect type Effect parameters COMPRESS SENS CHORUS FLANGER PHASER DEPTH RATE MIX DEPTH RATE FB POSITION RATE COLOR 3. Use the cursor left/right keys to select the effect module to edit. This section explains how to edit the effect type and effect parameters for the currently selected patch. 1.
1608E.book 144 ページ 2004年4月19日 月曜日 午前10時44分 Reference [Effects] 7. NOTE • The indications shown in the table on the previous page are for the condition where the effect module is on. When the effect module is off, the indication “-OFF-” is shown on the second line. • The 8x COMP EQ algorithm does not include a ZNR module. 4. To toggle the effect module on or off, bring up the indication for the module on the display, and then press the [ENTER] key.
1608E.book 145 ページ 2004年4月19日 月曜日 午前10時44分 Reference [Effects] Storing/swapping insert effect patches Editing the name of an insert effect patch A patch that you have edited can be stored in any location of the same algorithm. You can also store an existing patch in another location to create a copy of that patch. Interchanging the position of patches (swapping) is also possible. This section explains how to edit the name of the currently selected patch. 1. 1.
1608E.book 146 ページ 2004年4月19日 月曜日 午前10時44分 Reference [Effects] Applying the insert effect only to the monitor signal Normally, when the insert effect is applied to the input mixer, the signal processed by the effect will be recorded on the track. If necessary, however, you can apply the insert effect only to the monitor signal, and record the unprocessed input signal on the track.
1608E.book 147 ページ 2004年4月19日 月曜日 午前10時44分 Reference [Effects] Using the send/return effect SEND REV TightHal No.0 This section explains how to select and edit patches for the send/return effect (chorus/delay, reverb). Patch name About the send/return effect patches The “reverb” and “chorus/delay” send/return effects are separate and independent.
1608E.book 148 ページ 2004年4月19日 月曜日 午前10時44分 Reference [Effects] 4. To change the effect type, turn the dial. When the effect type is changed, the effect parameters will also change accordingly. NOTE Keep in mind that if you select another patch without first storing the edited patch, the changes will be lost. To keep the results of your editing session, refer to the following section. TYPE DELAY Storing/swapping send/return effect patches HINT the indicator reverts to “EDIT”.
1608E.book 149 ページ 2004年4月19日 月曜日 午前10時44分 Reference [Effects] Editing the name of a send/return effect patch Importing patches from another project This section explains how to edit the name of the patch that is currently selected for a send/return effect. If required, you can import all patches or specified patches of the insert effect or send/return effect from another project that is already saved on the hard disk. 1. 2.
1608E.book 150 ページ 2004年4月19日 月曜日 午前10時44分 Reference [Effects] 4. Turn the dial to select the import destination, and press the [ENTER] key. The indication “SURE?” appears on the display. 5. To carry out the import process, press the [ENTER] key. All patches or the specified patch of the selected project will be imported. When all patches have been imported, the insert effect or send/return effect selection screen appears again. If a single patch was imported, the screen of step 3 appears again.
1608E.book 151 ページ 2004年4月19日 月曜日 午前10時44分 Reference [Creating a CD] This section describes how to use the CD-R/RW drive in the MRS-1608 to create an audio CD or store a project from the hard disk onto a CD-R/RW disc. NOTE • This section does not apply to MRS-1608 models without integrated CD-R/RW drive. • Mixed-mode CDs or copy-controlled CDs cannot be played or read.
1608E.book 152 ページ 2004年4月19日 月曜日 午前10時44分 Reference [Creating a CD] Creating an audio CD This section describes how to create an audio CD using a completed project as source material. Creating an audio CD by project 5. Verify that the indication “AUDIO CD BURN CD” is shown on the display, and press the [ENTER] key. The indication “BURN CD TIME” is shown, along with the duration of the master track (V-take) that is currently selected for writing.
1608E.book 153 ページ 2004年4月19日 月曜日 午前10時44分 Reference [Creating a CD] ● Disc-at-once (DAO) CD Trk01 SURE? 0 327 3 27320 320 8. To carry out the write process, press the [ENTER] key once more. By pressing the [EXIT] key instead of the [ENTER] key, you can cancel the operation and back up one step at a time. During the write process, the indication “wait...” is shown on the display. The counter indicates the progress status of the write process.
1608E.book 154 ページ 2004年4月19日 月曜日 午前10時44分 Reference [Creating a CD] 6. Turn the dial to select “DAO” (disc-at-once) or “TAO” (track-at-once), and press the [ENTER] key. The screen for registering projects for the album appears. END OF ALBUM 0 0 0 8. When the project for track 1 has been selected, use the cursor right key to move to track 2. The display indication changes as follows. END OF ALBUM Track 1 0 9. The indication “END OF ALBUM” denotes the end of the album list of projects.
1608E.book 155 ページ 2004年4月19日 月曜日 午前10時44分 Reference [Creating a CD] ● To switch the V-take for the master track Press the [EXIT] key repeatedly to return to the main screen. Load the project for which you want to switch the V-take, and select the V-take for the master track. Then return to the album screen. 11. When you have stored all desired projects in the album, press the [ENTER] key twice. The display indication changes as follows.
1608E.book 156 ページ 2004年4月19日 月曜日 午前10時44分 Reference [Creating a CD] [MARK] key again, you can return to the previous condition. The marker enable/disable selection can be made at any time while the album screen is shown. Including a playlist in an album If the mark function is enabled for the project registered as track 1 of the audio CD, the following indication appears.
1608E.book 157 ページ 2004年4月19日 月曜日 午前10時44分 Reference [Creating a CD] Playing an audio CD To play an audio CD inserted in the CD-R/CD-RW drive, proceed as follows. This method can also be used to audition a CD-R/CD-RW disc which has not been finalized yet. Track number The number of the currently selected track on the audio CD is shown. Finalize status When a * symbol is shown here, a non-finalized CD-R/RW disc is inserted.
1608E.book 158 ページ 2004年4月19日 月曜日 午前10時44分 Reference [Creating a CD] 8. For track selection and for controlling playback stop/pause, use the transport section keys. ● PLAY [R] key Playback of the selected track starts. Pressing the key during playback sets the system to pause mode. ● STOP [P] key Playback stops, and the system returns to the beginning of the current track. ● FF [Y] key Playback stops, and the system jumps to the beginning of the next track.
1608E.book 159 ページ 2004年4月19日 月曜日 午前10時44分 Reference [Creating a CD] 6. To carry out the finalizing process, press the [ENTER] key once more. The finalizing process starts. When the process is finished, the display shows “FINALIZE COMPLETE”. 7. To return to the main screen, press the [EXIT] key several times. HINT A CD-RW disc can be returned to the blank condition also after finalizing, by erasing all data.
8E.book 160 ページ 2004年4月19日 月曜日 午前10時44分 Reference [Creating a CD] 6. Press the [ENTER] key. The display now shows the indication “CDRW ERS SURE?”. 3. Press the REC [O] key. The display indication changes as follows. In this condition, you can select the target for the audio data. 7. To carry out the erase process, press the [ENTER] key once more. The erasing operation starts. When the operation is finished, the display shows “CDRW ERS COMPLETE”.
1608E.book 161 ページ 2004年4月19日 月曜日 午前10時44分 Reference [Creating a CD] Backup and restore This section explains how you can use the CD-R/RW drive in the MRS-1608 to back up a project to a CD-R/ RW disc and how to restore a project from a disc backup. You can either create backups for individual projects or save all projects in a common operation. Saving a single project to CD-R/RW disc You can select any project and save it on a CD-R/RW disc for backup.
1608E.book 162 ページ 2004年4月19日 月曜日 午前10時44分 Reference [Creating a CD] CHANGE DISC002 PRJ 000 Disc 1 PRJ 001 When this message is shown, insert the next CD-R/RW disc and press the [ENTER] key. The backup operation resumes. If more than two discs are required, the above steps will be repeated. PRJ 000 PRJ 001 PRJ 002 PRJ 003 PRJ 004 MRS-1608 NOTE When a backup spans several discs, the discs must be used in the same order for restore. Be sure to note the disc number on the case and label of the disc.
1608E.book 163 ページ 2004年4月19日 月曜日 午前10時44分 Reference [Creating a CD] 7. ALL SAVE SURE? 6. To execute the backup, press the [ENTER] key. To cancel, press the [EXIT] key instead. When you press the [ENTER] key, backup starts from the project with the lowest number. The display shows the disc number, the project number, and the indication “BURNING”. To return to the main screen, press the [EXIT] key several times.
1608E.book 164 ページ 2004年4月19日 月曜日 午前10時44分 Reference [Creating a CD] NOTE If the backup of the project spans multiple discs, be sure to insert the first disc that contains data of the desired project first. If you insert another disc, the project data will not be read correctly. 5. Press the [ENTER] key. The name of the project on the disc, and the number which is to be assigned to the project are shown on the display.
1608E.book 165 ページ 2004年4月19日 月曜日 午前10時44分 Reference [Projects] This section describes how to perform operations for entire projects. About projects Project operations On the MRS-1608, the data needed to reproduce a song you create are managed in units called “projects”. By loading a project from the hard disk, you can always go back to exactly the same condition that existed when the project was saved. A project contains the following information.
1608E.book 166 ページ 2004年4月19日 月曜日 午前10時44分 Reference [Projects] ● PROJECT SEQ PLAY Continuously play the master tracks from several projects saved on the hard disk (→ p. 177). 3. Press the [ENTER] key to execute the operation (or change the setting) that you selected. For details on the procedure, refer to the sections that follow. Creating a new project This operation creates a new project. 1. Refer to steps 1 – 2 of “Basic procedure” to bring up the indication “PROJECT NEW” on the display.
1608E.book 167 ページ 2004年4月19日 月曜日 午前10時44分 Reference [Projects] Checking the project size/ available hard disk capacity This operation displays the size of the currently loaded project, the available capacity of the internal hard disk, and the remaining recording time. 1. 2. Refer to steps 1 – 2 of “Basic procedure” to bring up the indication “PROJECT SIZE” on the display. Then press the [ENTER] key. Use the cursor up/down keys to select the desired screen from one the following options.
1608E.book 168 ページ 2004年4月19日 月曜日 午前10時44分 Reference [Projects] Erasing a project Changing the project name This operation erases the specified project from the hard disk. This operation lets you edit the name of the currently loaded project. 1. 1. Refer to steps 1 – 2 of “Basic procedure” to bring up the indication “PROJECT ERASE” on the display. Then press the [ENTER] key.
1608E.book 169 ページ 2004年4月19日 月曜日 午前10時44分 Reference [Projects] NOTE Protecting a project This operation lets you write-protect the currently loaded project, which disables project storing and editing. When protect is ON, the following operations will be impossible. A project that is not protected will be automatically saved when power is turned off or when another project is loaded. If you have finished a song, we recommend to turn protect ON.
1608E.book 170 ページ 2004年4月19日 月曜日 午前10時44分 Reference [MIDI] This section explains the MIDI-related settings and functions of the MRS-1608. About MIDI MIDI (Musical Instrument Digital Interface) is a standard that allows messages such as performance data (collectively called “MIDI messages”) to be exchanged between devices such as electronic musical instruments and computers. The MRS-1608 supports MIDI and is equipped with the following two MIDI connectors.
1608E.book 171 ページ 2004年4月19日 月曜日 午前10時44分 Reference [MIDI] Making MIDI-related settings ● PRG CHG Turn Program Change transmission on/off. This section explains how to make MIDI-related settings. The procedure is the same for most settings. The basic steps are as follows. ● MTC Turn MIDI Time Code transmission on/off. Basic procedure • For information on the SMF playback procedure, see page HINT 174. 1.
1608E.book 172 ページ 2004年4月19日 月曜日 午前10時44分 Reference [MIDI] Also, when you play back a rhythm pattern or rhythm song on the MRS-1608, the drum/bass track playing information will be transmitted as Note On/Off messages. Turning Timing Clock messages on or off This setting specifies whether the MIDI synchronization message Timing Clock will be transmitted. Refer to steps 1 – 4 of “Basic procedure” to bring up the indication “MIDI CLOCK” on the display and press the [ENTER] key.
1608E.book 173 ページ 2004年4月19日 月曜日 午前10時44分 Reference [MIDI] Turning Program Change messages on or off You can specify whether Program Change messages will be transmitted. Program Change are MIDI messages that changes a sound number of MIDI device such as synthesizer. Refer to steps 1 – 4 of “Basic procedure” to bring up the indication “MIDI PRG CHG” on the display and press the [ENTER] key. Then turn the dial to select one of the following settings.
1608E.book 174 ページ 2004年4月19日 月曜日 午前10時44分 Reference [MIDI] Using the SMF player Using the SMF player function, the MRS-1608 can read Format 0 SMF (Standard MIDI Files) from a CD-ROM/R/ RW disc and load the contents into a project. Once loaded, an SMF can perform playback in sync with the recorder section or rhythm section, using the sounds of the rhythm section or MIDI sound sources connected to the MIDI OUT connector. This section explains how to use the SMF playback function.
1608E.book 175 ページ 2004年4月19日 月曜日 午前10時44分 Reference [MIDI] Selecting the SMF output destination SMF CH 1 – 8, 11 – 16 CH 9 – 10 MIDI OUT Rhythm song When playing an SMF, you can select whether to send the entire playing information to an external sound source or to play certain channels with the internal sound sources of the MRS-1608. The SMF output destination is specified using the following two parameters.
1608E.book 176 ページ 2004年4月19日 月曜日 午前10時44分 Reference [MIDI] SMF playback 6. Press the [ENTER] key. In this condition, you can select an SMF imported into the project for playback. You can select any SMF imported into a project and play it as follows. FILE SEL SEQ1 NOTE • When playing an SMF, the rhythm section tempo will be disregarded, and playback starts with the timing programmed HINT in the SMF.
1608E.book 177 ページ 2004年4月19日 月曜日 午前10時44分 Reference [Other Functions] This section explains various other functions of the MRS-1608. Playing several projects continuously (sequence play) SEQ PLAY LIST 1 EMPTY 0 0 0 The MRS-1608 lets you line up the master tracks from multiple projects saved on the hard disk and play them continuously in a specified order (sequence play). This is handy to record several projects on an external device such as a MD recorder.
1608E.book 178 ページ 2004年4月19日 月曜日 午前10時44分 Reference [Other Functions] 6. Press the cursor right key. The display indication changes as follows. (The END OF LIST indication has moved to the second position.) In this condition, you can select the second project to play. 8. When you have registered all desired projects in the playlist, press the [EXIT] key several times to return to the main screen. HINT END OF LIST The playlist contents are stored automatically. No.2 NOTE 7.
1608E.book 179 ページ 2004年4月19日 月曜日 午前10時44分 Reference [Other Functions] automatically loaded and played. During project playback, the following keys can be used to select a track, pause play, or locate a certain point. ● PLAY [R] key Starts playback from the beginning of the current project. ● STOP [P] key Interrupts project playback and returns to the start of the current project.
1608E.book 180 ページ 2004年4月19日 月曜日 午前10時44分 Reference [Other Functions] • When you change the reference pitch of the tuner, the pitch of the rhythm section bass program will also change Pitch is flat Correct pitch Pitch is sharp 5. > A > A >>A >A
1608E.book 181 ページ 2004年4月19日 月曜日 午前10時44分 Reference [Other Functions] For example, when you select the tuner type “GUITAR”, the display shows the following information. Tuner type GUITAR E Target note for string number 3. String6 String number Play the indicated string as an open string, and perform tuning. 4. Use the cursor up/down keys to select other string numbers. Tune the other strings in the same way. 5.
1608E.book 182 ページ 2004年4月19日 月曜日 午前10時44分 Reference [Other Functions] Preventing digital copying of a master disc or master tape (D PRTCT=OFF) When mixing down to a DAT recorder, MD recorder or similar via the DIGITAL OUTPUT jacks, you can prevent digital copies (third-generation copies) from being made from your completed master disc or tape onto another digital recorder. The procedure is as follows.
1608E.book 183 ページ 2004年4月19日 月曜日 午前10時44分 Reference [Other Functions] SYSTEM FOOT SW 3. Use the cursor left/right keys to bring up the indication “UTILITY LVL MET” on the display, and press the [ENTER] key. The current level meter setting will be displayed. LVL MET POST The settings have the following meaning. ● POST (default setting) The meter shows the level of the signal after passing through the faders and [REC LEVEL] control.
1608E.book 184 ページ 2004年4月19日 月曜日 午前10時44分 Reference [Other Functions] 5. To cancel the UIB mode at the MRS-1608, press the [EXIT] key. The indication “HDD scan...” is shown, and the MRS1608 returns to normal mode. HINT It is also possible to set the MRS-1608 to the on-line state when turning the unit on. Hold down the [USB] key while turning power to the MRS-1608 on. When you press the [ENTER] key, the MRS-1608 and computer will be in the online state (“I/F WORKING” is shown).
1608E.book 185 ページ 2004年4月19日 月曜日 午前10時44分 Reference [Other Functions] 2. Use the cursor left/right keys to select the ScanDisk function. ● AutoRepr (Auto Repair) This function tests all files on the hard disk and automatically repairs damaged files. ● ChekFile (Check File) This function only tests all files, but does not automatically repair them. If a problem is found, a message is displayed on the screen. 3. To execute the selected function, press the [ENTER] key. ScanDisk starts.
1608E.book 186 ページ 2004年4月19日 月曜日 午前10時44分 Reference [Other Functions] Hard disk maintenance using the supplied CD-ROM Using the CD-ROM supplied with the MRS-1608, the following functions can be performed. ◆ Restoring the factory default condition (RECOVER) This action restores all data including the demo song to the condition in which the unit was originally shipped from the factory. All projects created by the user will be erased. • Once erased, user-created projects cannot be restored.
1608E.book 187 ページ 2004年4月19日 月曜日 午前10時44分 Specifications ● Recorder Physical track Virtual take Drum track Bass track Simultaneous recording track Simultaneous playback track Recording data format Maximum recording time Project Marker Locator Track editing Punch in/out Other function 16 160 (10 V-takes per track) 1 (stereo) 1 8 19 (16 audio + stereo drum + bass) 16-bit linear (non-compressed) Approx.
1608E.book 188 ページ 2004年4月19日 月曜日 午前10時44分 Troubleshooting If there are problems during operation of the MRS-1608, check the following points first. Problems during playback ◆ No sound, or sound is very weak • Check the connections to your monitor system, and the volume setting of the system. • Make sure that the status keys in the mixer section are lit in green and that the faders are raised. If a key is out, press it to make it light up in green.
1608E.book 189 ページ 2004年4月19日 月曜日 午前10時44分 Troubleshooting Problems with effects ◆ Insert effect cannot be inserted When the 8x COMP EQ algorithm is selected, the selection of insert points is limited (→ p. 140). ◆ Insert effect does not apply ◆ Cannot record or edit a rhythm pattern/ rhythm song • When the [RHYTHM] key is out or blinking, it is not possible to record or edit a rhythm pattern or rhythm song. Press the [RHYTHM] key so that the key is lit.
1608E.book 190 ページ 2004年4月19日 月曜日 午前10時44分 Troubleshooting messages at the MRS-1608 (→ p. 172). • When synchronizing on the MTC (MIDI Time Code), make sure that MTC output is enabled at the MRS1608 (→ p. 173). • Make sure that the external MIDI device is set to receive MIDI clock or MTC and synchronize to it. • Make sure that the external MIDI device is in playback mode.
1608E.book 191 ページ 2004年4月19日 月曜日 午前10時44分 Appendix Effect Parameters Insert Effect ◆CLEAN, DIST, ACO/BASS SIM, BASS algorithm COMP module Type COMPRESS Parameter SENS ATTACK LEVEL Keeps the dynamic range consistent. Parameter description Parameter SENS Setting range 0 – 10 Description Adjusts the compression input sensitivity. ATTACK 0 – 10 Adjusts the compression attack speed. LEVEL 1–8 Adjusts the module output level.
1608E.book 192 ページ 2004年4月19日 月曜日 午前10時44分 Appendix Parameter description Parameter GAIN Setting range 1 – 30 Description TONE 0 – 10 Adjusts the tone. LEVEL 1–8 Adjusts the module output level. Adjusts the amount of gain. Selects the cabinet type COMBO Combo-type cabinet. BRIGHT Produces a brighter tone than Combo. FLAT CABINET Cabinet with a flat response. STACK Stack-type cabinet. BsCombo Combo-type cabinet for bass. BsStack Stack-type cabinet for bass.
1608E.book 193 ページ 2004年4月19日 月曜日 午前10時44分 Appendix STEP RING MOD CRY EXCITER AIR WIDE DELAY ECHO FIX-WAH ARRM-PIT DEPTH RATE RESONANC Changes the sound with step-like filter characteristics. POSITION RATE BALANCE Produces a metallic sound. POSITION RESO SENS Talking-modulator-like effect. FREQ DEPTH LowBoost Gives the sound more focus and spatial definition. SIZE TONE MIX Simulates the air ambience of the room, giving the sound spatial depth.
1608E.book 194 ページ 2004年4月19日 月曜日 午前10時44分 Appendix Selects the changing width. OFF PEDAL R MODE Frequency stays constant. Use the expression pedal to change the frequency. UP Minimum→ maximum DOWN Maximum→ minimum HI Setting value → maximum LO Minimum→ setting value Selects the control waveform.
1608E.book 195 ページ 2004年4月19日 月曜日 午前10時44分 Appendix ◆MIC algorithm COMP/LIM module Type COMPRESS LIMITER Parameter THRSHOLD RATIO ATTACK LEVEL RATIO RELEASE LEVEL Keeps the dynamic range consistent. THRSHOLD Controls the signal peeks. Parameter description Parameter THRSHOLD Setting range -24 – 0 Description Adjusts the sensitivity. COMP: 1 – 26 RATIO Adjusts the compression degree of the signal. LIMIT: 1 – 54, ∞ ATTACK 0 – 10 Adjusts the compression attack speed.
1608E.book 196 ページ 2004年4月19日 月曜日 午前10時44分 Appendix STEP RING MOD CRY EXCITER AIR DELAY ECHO DOUBLING FIX-WAH ARRM-PIT DEPTH RATE RESONANC Changes the sound with step-like filter characteristics. RATE BALANCE Produces a metallic sound. RESONANC SENS Talking-modulator-like effect. FREQ DEPTH LowBoost Gives the sound more focus and spatial definition. SIZE TONE MIX Simulates the air ambience of the room, giving the sound spatial depth.
1608E.book 197 ページ 2004年4月19日 月曜日 午前10時44分 Appendix DELAY module Type DELAY L/R ECHO L/R DOUBLE L/R Parameter TIME FB MIX Delay effect with a delay time of up to 5 seconds. TIME FB MIX Delay effect with warm sound, up to 5 second delay time. TIME TONE MIX Doubling effect with a delay time of up to 100 milliseconds. Parameter description Parameter Setting range DOUBLING: 1 – 100 Description TIME DELAY, ECHO: 1 – 5000, T 4x4 – T 1/4 Adjusts the delay time in 1-ms steps.
1608E.book 198 ページ 2004年4月19日 月曜日 午前10時44分 Appendix MODULATION/DELAY module Type CHORUS FLANGER PHASER TREMOLO PITCH RING MOD DOUBLING DELAY ECHO Parameter DEPTH RATE MIX RATE FB Adds pulsation and spaciousness to the sound. DEPTH Produces a unique, undulating sound. RATE COLOR Produces a swooshing sound. DEPTH RATE CLIP TONE BALANCE Periodically varies the level of the sound. SHIFT Modifies the pitch of the direct sound. RATE BALANCE Produces a metallic sound.
1608E.book 199 ページ 2004年4月19日 月曜日 午前10時44分 Appendix ◆8x COMP EQ algorithm Module 1 – 8 Unit Type Parameter HPF1 - 8 HPF COMP1 - 8 COMPRESS FREQ Filter passing the high frequency signal through. RATIO THRSHOLD LIMITER EQ1 - 8 THRSHOLD ATTACK LEVEL RATIO RELEASE LEVEL MID LOW LEVEL Keeps the dynamic range consistent. Controls the signal peeks. HIGH EQ Three-band equalizer. Parameter description Parameter FREQ Setting range 0 – 10 Description Sets the cut-off frequency.
1608E.book 200 ページ 2004年4月19日 月曜日 午前10時44分 Appendix NORMALIZER module Type NORMLZR Parameter GAIN Set the input level of the 3 BAND COMP/Lo-Fi module. Parameter description Parameter GAIN Setting range -12 – 12 Description Adjusts the level. 3 BAND EQ module See the CLEAN, DIST, ACO/BASS SIM, BASS algorithm. DIMENSION/RESONANCE module Type DIMENSN RESONNC Parameter RISE 1 RISE 2 Produces spatial width. DEPTH FreqOFST RATE TYPE RESONANC EFX LVL DRY LVL A resonance filter with LFO.
1608E.book 201 ページ 2004年4月19日 月曜日 午前10時44分 Appendix Send/return Effect CHORUS/DELAY module Type CHORUS DELAY Parameter LFO TYPE DEPTH RATE PRE DLY EFX LVL PAN EFX LVL Adds pulsation and spaciousness to the sound. TIME FB DAMP REV SEND Delay effect with a delay time of up to 10 seconds. Parameter description Parameter LFO TYPE Setting range MONO, STEREO Description Selects the LFO phase: Mn (monaural) or St (stereo). DEPTH 0 – 10 Adjusts the depth of the effect.
1608E.book 202 ページ 2004年4月19日 月曜日 午前10時44分 Appendix Effect Patch Insert Effect ◆CLEAN algorithm No.
1608E.
1608E.book 204 ページ 2004年4月19日 月曜日 午前10時44分 Appendix ◆MIC algorithm No.
1608E.
1608E.book 206 ページ 2004年4月19日 月曜日 午前10時44分 Appendix ◆8x COMP EQ algorithm No.
1608E.book 207 ページ 2004年4月19日 月曜日 午前10時44分 Appendix ◆MASTERING algorithm No.
1608E.book 208 ページ 2004年4月19日 月曜日 午前10時44分 Appendix Send/return Effect ◆CHORUS/DELAY No.
1608E.book 209 ページ 2004年4月19日 月曜日 午前10時44分 Appendix Rhythm Pattern In “Song” columns (No. 35 – 234), normal patterns and fill-in ones are gathered up on a style basis to ease rhythm song programming. No.
1608E.
1608E.book 211 ページ 2004年4月19日 月曜日 午前10時44分 Appendix Drum Kits STANDARD No. ANALOG Name 0 Standard 1 DryFunk 2 Basic 3 Tight 4 Funk 1 5 Reggae 1 6 Analog 1 7 Analog 2 8 Snap 9 Pop 10 Brush 11 Reggae 2 12 Loose 13 Funk 2 14 Percuss 15 SFX 16 Minor7 17 Major7 No. 0 1 2 3 4 5 6 7 8 9 10 11 12 13 14 15 CLASSIC Name Punch Near Room 1 Analog 1 Analog 2 Room 2 HipHop 1 HipHop 2 HipHop 3 Techno 1 Techno 2 Techno 3 Percuss SFX Minor7 Major7 No.
1608E.book 212 ページ 2004年4月19日 月曜日 午前10時44分 Appendix Instruments STANDARD Category Kick Snare Tom Hi-hat 212 No.
1608E.
1608E.
1608E.book 215 ページ 2004年4月19日 月曜日 午前10時44分 Appendix Phrases 1 Drum Loops 2 Beats Variation Rhythm Breakbeats 1 Latin Loops 2 3 Asian Loops 1 Hardcore Loop 2 1 Songs Control Variations 2 Drum Bass Loops 1 1 Reggae Variations 2 ZOOM MRS-1608 No.
1608E.
1608E.book 217 ページ 2004年4月19日 月曜日 午前10時44分 Appendix MRS-1608 Hard Disk Contents RHYTHM.SEQ Rhythm pattern/rhythm song data xxxxxxxx.ZSD Drum kits/bass program/sampler program data The hard disk in the MRS-1608 is composed of two partitions called “MRS-USR” and “MRS-FAC”. The “MRS-FAC” partition contains files to perform hard disk maintenance. Never attempt to manipulate the files in this partition.
1608E.book 218 ページ 2004年4月19日 月曜日 午前10時44分 Appendix MIDI implementation 1.
1608E.book 219 ページ 2004年4月19日 月曜日 午前10時44分 Appendix MIDI implementation chart [HardDisk Recorder Model MRS-1608 ] MIDI Implementation Chart Date : Transmitted Recognized 10 Feb. 2004 Version: 1.00 Remarks Function ...
1608E.book 220 ページ 2004年4月19日 月曜日 午前10時44分 INDEX ■ Symbols and numerals ( . . . . . . . . . . . . . . . . . . . . . . . . . . . . . . . . . . . . 74, 106 ) . . . . . . . . . . . . . . . . . . . . . . . . . . . . . . . . . . . . 74, 106 + . . . . . . . . . . . . . . . . . . . . . . . . . . . . . . . . . . . 74, 106 X . . . . . . . . . . . . . . . . . . . . . . . . . . . . . . . . . . . 74, 106 8x COMP EQ. . . . . . . . . . . . . . . . . . . . . . . . . . . . . 139 8-track recording mode . . . . . . . . .
1608E.book 221 ページ 2004年4月19日 月曜日 午前10時44分 INDEX each pad . . . . . . . . . . . . . . . . . . . . . . . . . . . . . . 114 Copying a drum kit . . . . . . . . . . . . . . . . . . . . . . . 116 Creating your own drum kit. . . . . . . . . . . . . . . . . 114 MIDI channel . . . . . . . . . . . . . . . . . . . . . . . . . . . . 171 Drum sequence . . . . . . . . . . . . . . . . . . . . . . . . . . . 88 Drum sound set . . . . . . . . . . . . . . . . . . . . . . . . 87, 90 Drum track . . . . . . . . . . . . . . .
1608E.book 222 ページ 2004年4月19日 月曜日 午前10時44分 INDEX MIDI OUT jack . . . . . . . . . . . . . . . . . . . . . . . . . . . 170 MIDI related troubleshooting information . . . . . . 189 Mixdown . . . . . . . . . . . . . . . . . . . . . . . . . . . . . . 33, 41 Mixer . . . . . . . . . . . . . . . . . . . . . . . . . . . . . . 11, 29, 77 Move Moving a range of data . . . . . . . . . . . . . . . . . . . . . 51 Moving a V-take . . . . . . . . . . . . . . . . . . . . . . . . . . 63 MRS series compatibility . . . . .
1608E.book 223 ページ 2004年4月19日 月曜日 午前10時44分 INDEX Entering pattern information using step input . . . . . . . . . . . . . . . . . . . . . . . . . . . . . . . . . 104 Importing from another project . . . . . . . . . . . . . . 117 Selecting a rhythm song . . . . . . . . . . . . . . . . . . . 103 Transposing the entire rhythm song . . . . . . . . . . 112 Rhythm song mode . . . . . . . . . . . . . . . . . . . . . . . . 87 ROOT . . . . . . . . . . . . . . . . . . . . . . . . . . . . . . 108, 109 ■S Sample . .
1608E.book 224 ページ 2004年4月19日 月曜日 午前10時44分 The FCC regulation warning (for U.S.A.) This equipment has been tested and found to comply with the limits for a Class B digital device, pursuant to Part 15 of the FCC Rules. These limits are designed to provide reasonable protection against harmful interference in a residential installation.