MRS-8(E).book 1 ページ 2004年7月30日 金曜日 午後5時24分 Operation Manual © ZOOM Corporation Reproduction of this manual, in whole or in part, by any means, is prohibited.
MRS-8(E).book 2 ページ 2004年7月30日 金曜日 午後5時24分 USAGE AND SAFETY PRECAUTIONS USAGE AND SAFETY PRECAUTIONS • Pay close attention to the labelling of the battery to SAFETY PRECAUTIONS make sure you choose the correct type. • When not using the unit for an extended period, remove the batteries from the unit. In this manual, symbols are used to highlight warnings and • If battery leakage has occurred, wipe the battery cautions for you to read so that accidents can be prevented.
MRS-8(E).book 3 ページ 2004年7月30日 金曜日 午後5時24分 USAGE AND SAFETY PRECAUTIONS Usage Precautions * MIDI is a registered trademark of Association of Musical Electronics Industry(AMEI). * SD Logo is a trademark. • Electrical interference For safety considerations, the MRS-8 has been designed to provide maximum protection against the emission of electromagnetic radiation from inside the device, and protection from external interference.
MRS-8(E).book 4 ページ 2004年7月30日 金曜日 午後5時24分 Contents USAGE AND SAFETY PRECAUTIONS . . . . . . . . . . . . . . . . . . . . . 2 Introduction . . . . . . . . . . . . . . . . . . . . . . . . 7 Introducing the MRS-8 . . . . . . . . . . . . . . 8 Recorder . . . . . . . . . . . . . . . . . . . . . . . . . . . . . . 8 Step 4: Mixing . . . . . . . . . . . . . . . . . . . . . . . . 26 4.1 4.2 4.3 Adjusting volume, panning, and EQ. . . . . . 26 Applying the send/return effect . . . . . . . . .
MRS-8(E).book 5 ページ 2004年7月30日 金曜日 午後5時24分 Contents Reference [Track Editing] . . . . . . . . . . . 44 Editing rhythm patterns . . . . . . . . . . . . . . . . . 75 Editing a range of data . . . . . . . . . . . . . . . . . . 44 Copying a rhythm pattern . . . . . . . . . . . . . . . . . . . 75 Erasing a rhythm pattern . . . . . . . . . . . . . . . . . . . . 76 Basic steps for range editing. . . . . . . . . . . . . . . . Copying a specified range of data. . . . . . . . . . . .
MRS-8(E).book 6 ページ 2004年7月30日 金曜日 午後5時24分 Contents Reference [Projects]. . . . . . . . . . . . . . . 104 Troubleshooting. . . . . . . . . . . . . . . . . . . 120 About projects . . . . . . . . . . . . . . . . . . . . . . . 104 Problems during playback. . . . . . . . . . . . . . 120 Working with projects. . . . . . . . . . . . . . . . . . 104 Problems during recording . . . . . . . . . . . . . 120 Basic procedure . . . . . . . . . . . . . . . . . . . . . . . . Loading a project . . . . . . . . . . .
MRS-8(E).book 7 ページ 2004年7月30日 金曜日 午後5時24分 Introduction Thank you for selecting the ZOOM MRS-8 MultiTrak Recording Studio (simply called the “MRS-8” in this manual). The MRS-8 is a fascinating product with the following features. • Four major functions in a compact unit The MRS-8 combines an 8-track SD card recorder, effect device, digital mixer, and drum/bass machine in a single unit of amazingly compact dimensions. Everything you need to create music is right there.
MRS-8(E).book 8 ページ 2004年7月30日 金曜日 午後5時24分 Introducing the MRS-8 The MRS-8 is internally divided into the following four sections. ● Recorder Recorder Records and plays back audio signals. ● Rhythm section Uses the internal drum/bass sound source to play rhythms. ● Mixer Mixes the signals from the recorder and the drum/bass sound source into a stereo signal, for output via the output jacks and for mixdown on dedicated master tracks.
MRS-8(E).book 9 ページ 2004年7月30日 金曜日 午後5時24分 Introducing the MRS-8 Currently selected V-take on tracks 1 – 8 and master track The playback signals from the audio tracks and the drum/ bass sounds are sent to the built-in digital mixer to create a stereo mix. For each track/sound, parameters such as volume, panning, and 2-band EQ (Hi and Lo) can be controlled independently.
MRS-8(E).
MRS-8(E).
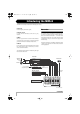
MRS-8(E).book 12 ページ 2004年7月30日 金曜日 午後5時24分 Connections MIDI sequencer (computer etc.) The INPUT 1 connector accepts a standard phone plug cable (unbalanced). The INPUT 2 connector accepts an XLR plug cable (balanced) or a phone plug cable (balanced or unbalanced). Guitar MIDI interface MIDI IN When a passive electric guitar/bass or other instrument with high output impedance is connected to INPUT 1, set the [INPUT 1 SELECT] switch to GUITAR/BASS.
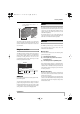
MRS-8(E).book 13 ページ 2004年7月30日 金曜日 午後5時24分 Inserting SD Card and Batteries Inserting an SD card Inserting the batteries For operating the MRS-8, an SD card or a miniSD card with adapter (capacity 16 MB or more) must be inserted as storage media. Before inserting a card, verify that the write protect feature is turned off. Make sure that power to the MRS-8 is turned off, and then insert the card as shown below. The MRS-8 can be powered from batteries.
MRS-8(E).book 14 ページ 2004年7月30日 金曜日 午後5時24分 Power On/Off To turn the MRS-8 on and off, follow the steps described below. complete, the main screen appears. Power-on HINT 1. Make sure that the MRS-8 and peripheral equipment is turned off. Turn down the volume controls of connected equipment, the MRS-8, and the monitor system. 2. Insert an SD card into the card slot. 3. Set the [POWER ON/OFF] switch of the MRS-8 to ON.
MRS-8(E).book 15 ページ 2004年7月30日 金曜日 午後5時24分 Let’s Record This section demonstrates the basics of recording and playback with the MRS-8. As an example, we explain how to record an electric guitar connected to the INPUT 1 connector. 1. 2. Connect the guitar to the INPUT 1 connector and set the [INPUT 1 SELECT] switch to GUITAR/BASS (for a passive guitar) or MIC/LINE (for an active guitar). Press the [NEW PROJECT] key in the display section.
MRS-8(E).book 16 ページ 2004年7月30日 金曜日 午後5時24分 Let’s Record in the lower part of the display. Adjust the recording level so that the 0 (dB) segment for IN 1 flashes slightly when the guitar is at maximum volume. your instrument along with the rhythm pattern. 0 (dB) segment Input 1 recording level 8. Lit in green Lit in red HINT • If you do not want a rhythm pattern, select an empty rhythm pattern (→ p. 18) or mute the drum/bass sound (→ p. 19).
MRS-8(E).book 17 ページ 2004年7月30日 金曜日 午後5時24分 Quick Tour Now let’s use your MRS-8 to do some actual recording. This Quick Tour describes the five steps that cover the entire process from preparation until the completion of a song. • Step 1: Preparations Shows how to create a new project, select a guide rhythm, and perform other steps necessary for recording. • Step 2: Recording the first track Shows how to record the first track while using the insert effect on the input signal.
MRS-8(E).book 18 ページ 2004年7月30日 金曜日 午後5時24分 Quick Tour HINT Rhythm pattern number • When creating a new project, the lowest free project number is automatically selected. 001#117 MTNs1Vb • It is also possible to create a new project from the project menu (→ p. 105). 1 Rhythm pattern name 5. Press the [ENTER] key. A new project is created, and the main screen for audio track recording/playback appears.
MRS-8(E).book 19 ページ 2004年7月30日 金曜日 午後5時24分 Quick Tour In the default condition of a project, the sound the bass program (bass track) is muted. Therefore only the drum kit (drum track) is heard when the rhythm pattern plays. • When drum track is selected HINT During rhythm pattern play, the pads corresponding to the currently produced sound of the drum kit (or pitch of the bass program) are flashing. You can also tap the pads to play the drum sounds/bass notes. 4.
MRS-8(E).book 20 ページ 2004年7月30日 金曜日 午後5時24分 Quick Tour Step 2: Recording the first track is selected as input source. To use two input sources simultaneously, hold down one INPUT [ON/OFF] key while pressing the other one. In this step, we explain how to select an audio track for recording, how to record while listening to the guide rhythm of the rhythm section, and how to use the insert effect on the input signal. 2.1 Adjusting input sensitivity 1. Connect an instrument to the INPUT 1/2 connector.
MRS-8(E).book 21 ページ 2004年7月30日 金曜日 午後5時24分 Quick Tour 4. While playing your instrument, adjust the [INPUT] control for the input(s) selected in step 2, to adjust the input sensitivity. The sensitivity of INPUT 1 and the built-in mic is adjusted with the [INPUT] 1 control. The sensitivity of INPUT 2 is adjusted with the [INPUT] 2 control. Make adjustments so that the [PEAK] indicator in the input section flickers slightly when you play your instrument at its loudest volume.
MRS-8(E).book 22 ページ 2004年7月30日 金曜日 午後5時24分 Quick Tour • LINE An algorithm suitable mainly for recording line-level output instruments such as synthesizer or electric piano. • Dual MIC An algorithm for two entirely separate mono input and mono output channels, for use with two microphones. • MASTERING (shown on the display as “MASTRING”) An algorithm suitable for processing the final stereo mixdown signal. HINT When “EMPTY” is shown as the patch name, the patch is empty.
MRS-8(E).book 23 ページ 2004年7月30日 金曜日 午後5時24分 Quick Tour • When the insert effect is bypassed for recording, setting the REC LVL parameter to 100 (default) results in unity gain (the recording level same as the input level). 2.3 Selecting a track and recording Mono track selected Now we will select a track and record the input sound (with the insert effect applied) on that track. 1. When a status key is red, the track is in the recording standby condition and the input signal is assigned to that track.
MRS-8(E).book 24 ページ 2004年7月30日 金曜日 午後5時24分 Quick Tour Both keys light up, and a pre-count of 4 beats is heard. Then recording will begin. Record the first instrument track while listening to the guide rhythm from the rhythm section. The track will be played back together with the selected guide rhythm from the rhythm section. HINT • You can specify a position in minutes/seconds/milliseconds or measures/beats/ticks and move directly to that point ( → p. HINT 35).
MRS-8(E).book 25 ページ 2004年7月30日 金曜日 午後5時24分 Quick Tour Step 3: Overdubbing In this step, you will learn how to record another instrument on another track, while listening to the content you recorded in step 2. Adding parts in this way is called “overdubbing”. 3.1 Making settings for input sensitivity and insert effect As in step 2, select the input source, adjust input sensitivity and recording level, and make settings for the insert effect. 1. 2. 3.
MRS-8(E).book 26 ページ 2004年7月30日 金曜日 午後5時24分 Quick Tour Step 4: Mixing When you have finished recording all tracks, you can use the built-in mixer to adjust parameters such as volume level, EQ (equalizer), and panning (stereo left/right positioning) to create the stereo mix. NOTE In some cases, the current fader position may not match the volume setting value for a track stored in a project (such as when the fader was moved for another project and then the previous project was called again).
MRS-8(E).book 27 ページ 2004年7月30日 金曜日 午後5時24分 Quick Tour The parameters that can be selected for tracks 1 – 8 and for drum/bass track are listed in the table below. ■ Track parameter list Parameter EQ HI GAIN Display Setting range Description -12 – +12dB Adjusts high frequency EQ boost/cut. 500 – 18000(Hz) Selects turnover frequency for high frequency EQ. -12 – +12dB Adjusts low frequency EQ boost/cut. 40 – 1600(Hz) Selects turnover frequency for low frequency EQ.
MRS-8(E).book 28 ページ 2004年7月30日 金曜日 午後5時24分 Quick Tour ■ Selecting the send/return effect patch 8. To return to the main screen, press the [EXIT] key. 1. From the main screen, press the [SEND/ RETURN] key in the effect section. The display changes as follows. From this screen, you can select the send/return effect patch. SEND VoChorus Patch name 0 Turn the dial to select the patch. The send/return effect has 60 patches (of which 40 are preprogrammed).
MRS-8(E).book 29 ページ 2004年7月30日 金曜日 午後5時24分 Quick Tour CLEAN Standard Step 5: Mixdown 0 4. Use the cursor up/down keys to select the algorithm, and turn the dial to select the patch. The currently selected algorithm/patch is shown on the display. If required, switch the patch while playing the song to check the sound. When you finish checking it, stop the song and press the [EXIT] key to return to the main screen. When the mix is ready, you can transfer it onto two tracks to create the finished song.
MRS-8(E).book 30 ページ 2004年7月30日 金曜日 午後5時24分 Quick Tour The current insert effect position is shown on the display. 2. Turn the dial to bring up the indication “MASTER” on the second line of the display. After the mastering effect settings have been made, record the final mix on the master track. 1. IN SRC MASTER The insert effect is now inserted immediately before the [MASTER] fader. 3. 5.
MRS-8(E).book 31 ページ 2004年7月30日 金曜日 午後5時24分 Quick Tour 5. When recording is completed, press the STOP [P] key. 6. To play the master track, repeatedly press the [MASTER] status key until it is lit in green. Lit in green Press repeatedly While the [MASTER] status key is lit in green, the master track can be played. During this period, the signals from all other tracks are muted. The insert and send/return effects are also disabled. 7. Return to the beginning of the song, and press the PLAY [R] key.
MRS-8(E).book 32 ページ 2004年7月30日 金曜日 午後5時24分 Reference [Recorder] This chapter explains the various audio recording and playback functions. V-takes Track number Each audio track (1 – 8) and the master track contains ten virtual tracks, called “V-takes”. For each track, you can select one such take, which will be used for recording and playback. For example, you can switch V-takes as you record multiple vocal or guitar solos on the same track, and later compare them and select the best V-take.
MRS-8(E).book 33 ページ 2004年7月30日 金曜日 午後5時24分 Reference [Recorder] • BAS x-yy V-take recorded through BASS algorithm of insert effect Cursor • MIC x-yy V-take recorded through MIC algorithm of insert effect TakeName ±TR TR 2- 1 5.
MRS-8(E).book 34 ページ 2004年7月30日 金曜日 午後5時24分 Reference [Recorder] subsequent characters move one position to the right. To clear the old name first, press the [EDIT] key repeatedly until all characters are erased, and then start the input procedure. When all characters are cleared and you press pad 1 repeatedly, the character under the cursor changes in the order A → B → C → 1 → A → B ...
MRS-8(E).book 35 ページ 2004年7月30日 金曜日 午後5時24分 Reference [Recorder] Moving to a desired point in the song (locate function) Setting marks in a song (marker function) Using the counter indication on the display, you can specify a location within the song in time units (minutes/ seconds/milliseconds) or in measure units (measures/ beats/ticks), and move to that location. This function lets you set index information (marks) at any position in a song. Up to 100 marks can be set in one project.
MRS-8(E).book 36 ページ 2004年7月30日 金曜日 午後5時24分 Reference [Recorder] Locating a mark This section explains how to select a mark and move to its position. This can be done in two ways: you can use dedicated keys to jump to marks in the vicinity, or you can specify the mark number directly. ■ Locating the next or previous mark 2. Press the [MARK/CLEAR] key in the control section. The selected mark will be deleted, and subsequent marks will be renumbered.
MRS-8(E).book 37 ページ 2004年7月30日 金曜日 午後5時24分 Reference [Recorder] 5. To stop repeat playback, press the STOP [P] key. 6. To turn off repeat playback, press the [A-B REPEAT] key. The key goes out, and repeat playback is turned off. The A/B point locations will be erased. Re-recording only a specified region (punch-in/ out function) Punch-in/out is a function that lets you re-record just a specified region of a previously recorded track.
MRS-8(E).book 38 ページ 2004年7月30日 金曜日 午後5時24分 Reference [Recorder] 5. Repeatedly press the status key for the track on which to perform punch-in/out, until the key is lit in red. 6. Use the Locate function to go to a spot before the In point. If the current location is outside the region between the In and Out points, the status key flashes in red. When the current location is between the In point and Out points, the status key is lit in red.
MRS-8(E).book 39 ページ 2004年7月30日 金曜日 午後5時24分 Reference [Recorder] Master track mixdown steps Here’s how to mix audio tracks and the drum/bass track sound onto two stereo channels and record these on the master track. 1. Press the [TRACK PARAMETER] key in the display section and use the cursor up/down keys to bring up the indication “TR x-yy” on the display (where x is the track number and yy is the V-take number). TR 4- 1 GTR 4- 1 2.
MRS-8(E).book 40 ページ 2004年7月30日 金曜日 午後5時24分 Reference [Recorder] 3. Combining multiple tracks on one or two tracks (bounce function) “Bounce” is a function that mixes the sound from the audio tracks and drum/bass track, and records them on a mono or stereo audio track. (This is sometimes called “ping-pong recording”.) You might bounce the contents of tracks 1 – 6 onto tracks 7/8 and then switch the V-takes of tracks 1 – 6 to record new versions of your performance.
MRS-8(E).book 41 ページ 2004年7月30日 金曜日 午後5時24分 Reference [Recorder] bounced result, set the Pan parameter for the odd-numbered and even-numbered tracks to separate left and right settings. REC TAKE CURRENT The following settings are available. • CURRENT (default) The bounce result will be recorded on the V-take currently selected for the recording track. • 1 – 10 Regardless of the V-take currently selected for the track, the bounce result will be recorded on the specified V-take. 4.
MRS-8(E).book 42 ページ 2004年7月30日 金曜日 午後5時24分 Reference [Recorder] Recording drum/bass sound on audio tracks (rhythm recording) The MRS-8 allows you to bounce only the drum track or bass track onto any track, while playing all tracks. This function is called “rhythm recording”. This lets you record a drum fill-in by hitting the pads while listening to the audio tracks.
MRS-8(E).book 43 ページ 2004年7月30日 金曜日 午後5時24分 Reference [Recorder] 6. When play is complete, press the STOP [P] key. 7. Press the [BOUNCE] key. The key goes out, and bounce recording is canceled. To return to the normal condition, switch the recording source back to “MASTER”, as described in “Selecting the recording source”. COUNT 4 Number of pre-count beats Making settings for precount operation In the default condition of a project, a pre-count of four beats is heard before the start of recording.
all.fm 44 ページ 2004年7月30日 金曜日 午後6時49分 Reference [Track Editing] This section explains how to edit audio data contained on tracks 1 – 8 of the recorder section. There are two major types of editing functions: specifying a range within a track for editing, or editing an entire V-take. Editing a range of data • Trim Retain only a specified range of audio data and erase the rest. The procedure for specifying a range within a track and then performing an editing action is explained below.
MRS-8(E).book 45 ページ 2004年7月30日 金曜日 午後5時24分 Reference [Track Editing] 2. 7. Press the [ENTER] key. The subsequent steps will differ, depending on which command was selected in step 4. See the sections for the respective commands. 8. When the editing command has been carried out, press the [EXIT] key repeatedly to return to the main screen. Use the cursor left/right keys to move the flashing section of the counter, and turn the dial to specify the copy start point.
MRS-8(E).book 46 ページ 2004年7月30日 金曜日 午後5時24分 Reference [Track Editing] The display changes as follows. From this screen, you can specify the copy destination start point. Copy Dst TO 3 15 0 2. Use the cursor left/right keys to move the flashing section of the counter, and turn the dial to specify the move start point. The point can be specified in minutes/seconds/ milliseconds, or in measures/beats/ticks.
MRS-8(E).book 47 ページ 2004年7月30日 金曜日 午後5時24分 Reference [Track Editing] 7. Specify the move destination start point in the same way as for the move source, and press the [ENTER] key. The indication “Move SURE?” appears on the display. Ers Src END 1 44 0 40- 4-23 00 8. To carry out the move operation, press the [ENTER] key once more. When the move operation is completed, the unit returns to the track edit menu.
MRS-8(E).book 48 ページ 2004年7月30日 金曜日 午後5時24分 Reference [Track Editing] 2. Use the cursor left/right keys to move the flashing section of the counter, and turn the dial to specify the start point. The point can be specified in minutes/seconds/ milliseconds, or in measures/beats/ticks. The display changes as follows. In this condition, you can specify the fade-in/out start point.
MRS-8(E).book 49 ページ 2004年7月30日 金曜日 午後5時24分 Reference [Track Editing] 2. Use the cursor left/right keys to move the flashing section of the counter, and turn the dial to specify the reverse start point. The point can be specified in minutes/seconds/ milliseconds, or in measures/beats/ticks. Fade-in I-1 I-2 I-3 HINT If you specify a point where no audio data exist, the second line of the display shows *. Fade-out o-1 o-2 o-3 3. Press the [ENTER] key. The display changes to “Rvrs Src END”.
MRS-8(E).book 50 ページ 2004年7月30日 金曜日 午後5時24分 Reference [Track Editing] Editing using V-takes Recorded audio data can also be edited in V-take units. This is convenient to exchange the data on two V-takes or delete a V-take that is no longer needed. The procedure is explained in this section. Basic steps for V-take editing When editing audio data in V-take units, some steps are similar for each action. These are as follows. 1. From the main screen, press the [TRACK PARAMETER] key in the display section.
MRS-8(E).book 51 ページ 2004年7月30日 金曜日 午後5時24分 Reference [Track Editing] Erasing a V-take You can erase the audio data on a specified V-take. The Vtake is returned to the non-recorded condition. Erase 1. Refer to steps 1 – 5 of “Basic steps for Vtake editing” to select the track/V-take to erase and to bring up the indication “ERASE” on the display. Then press the [ENTER] key. The indication “ERASE SURE?” appears on the display. 2. To carry out the erase operation, press the [ENTER] key once more.
MRS-8(E).book 52 ページ 2004年7月30日 金曜日 午後5時24分 Reference [Track Editing] destination, the indication “E” is shown next to the V-take number. 2. Use the cursor left/right keys or the status keys and the dial to select the destination track/V-take, and press the [ENTER] key. If no audio data exist at the move destination, the indication “MOVE SURE?” appears on the display. If audio data exist, the indication “OverWrt?” is shown. When the move operation is performed, these data will be overwritten. 3.
MRS-8(E).book 53 ページ 2004年7月30日 金曜日 午後5時24分 Reference [Track Editing] Track capture and swap Track/V-take number TR 6- 1 T06-LdVo 2 V-take name 3. Use the cursor left/right keys and the dial to select the track/V-take to import, and press the [ENTER] key. When an unrecorded track/V-take is selected, the indication “NO DATA” is shown instead of the V-take name. You can capture the audio data of any track and temporarily store them.
MRS-8(E).book 54 ページ 2004年7月30日 金曜日 午後5時24分 Reference [Track Editing] Swapping track data SYSTEM PROJECT 2. Use the cursor left/right keys to bring up the indication “SYSTEM CAP/SWAP” on the display, and press the [ENTER] key. The display changes as follows. CAPTURE TR1 3. Use the status keys or the dial to select a track for capture. The status key for the currently selected track is lit in orange. It is also possible to select the master track.
MRS-8(E).book 55 ページ 2004年7月30日 金曜日 午後5時24分 Reference [Mixer] This section explains the functions and operation of the mixer built into the MRS-8. About the mixer The MRS-8 incorporates a mixer that processes the audio track output signals as well as the drum kit/bass program output signals (the drum track/bass track) into a stereo mix that is supplied to the MASTER OUTPUT jacks. The mixer adjusts parameters such as level, panning, EQ, and send/return effect intensity for each track.
MRS-8(E).book 56 ページ 2004年7月30日 金曜日 午後5時24分 Reference [Mixer] If no recording track is selected, the signal from the inputs can be sent to the mixer and mixed to the output signal during bounce and mixdown. In this case, track parameters such as panning and send/return effect depth can be set for the input signal.
MRS-8(E).book 57 ページ 2004年7月30日 金曜日 午後5時24分 Reference [Mixer] • Selecting the built-in mic and INPUT 2 Press the [MIC] key so that the key is lit. Then hold the INPUT [ON/OFF] 1 key and press the INPUT [ON/OFF] 2 key so that both keys are lit. CLEAN Standard 0 6. INPUT [ON/OFF] key INPUT [ON/OFF] key Use the cursor up/down keys and the dial to select the effect patch, and press the [EXIT] key. The main screen returns.
MRS-8(E).book 58 ページ 2004年7月30日 金曜日 午後5時24分 Reference [Mixer] • Stereo track or two mono tracks selected 0 (dB) segment One Input source Recorder INPUT 1 (built-in mic) or INPUT 2 Odd-numbered track Even-numbered track Input 2 recording level Input 1 recording level Recorder Two Input sources After setting the recording level, press the [EXIT] key to return to the main screen.
all.fm 59 ページ 2004年7月30日 金曜日 午後6時51分 Reference [Mixer] 2. Adjusting the signal for each track (track parameters) Use the cursor left/right keys or the status keys to select the track/input to be set. TR 3 EQ HI G The mixer of the MRS-8 lets you adjust various aspects for each track (called track parameters), such as level, panning, EQ, and send/return effect intensity.
MRS-8(E).book 60 ページ 2004年7月30日 金曜日 午後5時24分 Reference [Mixer] NOTE When the recording track is selected, the input signal does not pass through the mixer but is supplied directly to the track. Therefore, if a track is in recording standby mode, the input track parameter settings will have no effect. (However, the REC LVL parameter is always active.) 4. Turn the dial to adjust the value. 5.
MRS-8(E).book 61 ページ 2004年7月30日 金曜日 午後5時24分 Reference [Rhythm] This section explains the functions and operation of the built-in rhythm section of the MRS-8. About the rhythm section The rhythm section of the MRS-8 uses internal drum sound and bass sound sources to generate rhythm accompaniment. It can be used instead of a metronome by playing simple rhythm patterns, or you can program a sequence of rhythm patterns and chord progression into the rhythm accompaniment for an entire song.
MRS-8(E).book 62 ページ 2004年7月30日 金曜日 午後5時24分 Reference [Rhythm] Rhythm patterns A project can contain over 500 accompaniment patterns with drum/bass performance data for up to 99 measures each. This is called a rhythm pattern. Inside each rhythm pattern, the area that holds the drum performance data is called the “drum sequence”, and the area that holds the bass performance data is called the “bass sequence”.
MRS-8(E).book 63 ページ 2004年7月30日 金曜日 午後5時24分 Reference [Rhythm] 4. Playing rhythm patterns This section explains how to select a rhythm pattern for playback, and how to change the tempo and sound. Selecting a rhythm pattern Proceed as follows to select and play one of the more than 500 rhythm patterns. 1. From the main screen, press the [SONG/ PATTERN] key in the rhythm section repeatedly, until the key is out. The rhythm pattern selection screen appears.
MRS-8(E).book 64 ページ 2004年7月30日 金曜日 午後5時24分 Reference [Rhythm] 2. Turn the dial to adjust the tempo. The tempo can be adjusted over a range of 40.0 – 250.0 (BPM). The currently selected drum kit/bass program name is shown. DRUM KIT Standard 3. To change the tempo manually, hit the [TEMPO] key repeatedly at the desired tempo. The average of the key press intervals is determined and set as the new tempo. 4. Drum kit name BASS PRG Finger To return to the main screen, press the [EXIT] key repeatedly.
MRS-8(E).book 65 ページ 2004年7月30日 金曜日 午後5時24分 Reference [Rhythm] HINT Pad=BASS Major Immediately after creating a new project, the pad bank 1 is selected. Scale type 2. Turn the dial to select the pad bank to use (1 – 3). The sounds assigned to the nine pads are switched immediately. For a list of drum/percussion sounds in each pad bank, see the appendix at the end of this manual. E 1 Range number Scale key-note 2. To change the key-note of the scale, use the cursor up/down keys.
MRS-8(E).book 66 ページ 2004年7月30日 金曜日 午後5時24分 Reference [Rhythm] 6. To switch the scale type and range during play, repeat steps 2 – 4. The scale type and range can also be switched while a rhythm pattern or rhythm song is playing. When you press the [EXIT] key, the rhythm pattern or rhythm song selection screen appears again. 7. To return to the main screen, press the [EXIT] key repeatedly. Creating a rhythm pattern This section explains how you can create your own rhythm patterns.
MRS-8(E).book 67 ページ 2004年7月30日 金曜日 午後5時24分 Reference [Rhythm] indicates that the setting has already been fixed and cannot be changed. PTN EDIT QUANTIZE 4. To set the quantize value, make sure that the indication “PTN EDIT QUANTIZE” is shown on the display, and press the [ENTER] key. The display changes as follows. QUANTIZE 16 7. Turn the dial to select the desired setting. The setting range is 1 – 99 measures.
MRS-8(E).book 68 ページ 2004年7月30日 金曜日 午後5時24分 Reference [Rhythm] 4. Hold down the REC [O] key and press the PLAY [R] key. A four-beat pre-count (one measure) is heard, and rhythm pattern recording starts. During recording, a click sound (metronome sound) is heard, according to the tempo and time signature setting. The current position is shown on the counter in measures/beats/ticks. HINT • You can use step input to add playing information to a rhythm pattern recorded with real-time input.
MRS-8(E).book 69 ページ 2004年7月30日 金曜日 午後5時24分 Reference [Rhythm] HINT When you select an empty pattern and record it, the pattern name “Patxxx” (where xxx is the pattern number) is automatically assigned. You can edit this pattern name as necessary (→ p. 75). Bass sequence real-time input For real-time input of a bass sequence, you play the pads of the MRS-8. 1. At the rhythm pattern screen, select an empty rhythm pattern number or a rhythm pattern number where only a drum sequence has been recorded.
MRS-8(E).book 70 ページ 2004年7月30日 金曜日 午後5時24分 Reference [Rhythm] keys, the performance of all pads is erased from the bass sequence. If you only press the PLAY [R] (RHYTHM STEP) key, no playing information is entered, but the step advances by an interval corresponding to the current quantize value. This becomes a rest (see illustration below). 1. Bass sequence At the rhythm pattern screen, select an empty rhythm pattern number. 2. Press the [DRUM/BASS] key repeatedly, until the key is lit.
MRS-8(E).book 71 ページ 2004年7月30日 金曜日 午後5時24分 Reference [Rhythm] 5. Use the cursor up/down keys to select the quantize value. This setting becomes the length of one step. The quantize setting can be changed at any time during step input, using the cursor up/down keys. enter more sounds. When you use the PLAY [R] (RHYTHM STEP) key to move step by step through a recorded rhythm pattern, the pad recorded at the respective position lights up. You can edit the recorded sequence as follows. 4...........
MRS-8(E).book 72 ページ 2004年7月30日 金曜日 午後5時24分 Reference [Rhythm] Bass sequence step input Quantize: quarter note Duration: quarter note 1. Quantize: eighth note Duration: eighth note At the rhythm pattern screen, select an empty rhythm pattern number or a rhythm pattern number where only a drum sequence has been recorded. 2. Quantize: quarter note Quantize: eighth note Duration: quarter note Duration: sixteenth note 6. Turn the dial to select the duration value, as listed below.
MRS-8(E).book 73 ページ 2004年7月30日 金曜日 午後5時24分 Reference [Rhythm] 8. To enter a rest, press only the PLAY [R] (RHYTHM STEP) key. If you press the PLAY [R] (RHYTHM STEP) key by itself, the position advances by one step (duration of quantize value) but no play information is recorded.
MRS-8(E).book 74 ページ 2004年7月30日 金曜日 午後5時24分 Reference [Rhythm] 6. Use the cursor left/right keys to bring up the indication “PTN EDIT OrgChord” on the display, and press the [ENTER] key. The display changes as follows. OrgChord Major This screen allows you to specify the chord type for that rhythm pattern. 3. Use the cursor left/right keys to bring up the indication “PTN EDIT DR LEVEL” on the display, and press the [ENTER] key. The display changes as follows.
MRS-8(E).book 75 ページ 2004年7月30日 金曜日 午後5時24分 Reference [Rhythm] Assigning a name to a rhythm pattern When an empty rhythm pattern is selected and used for input, the pattern name “Pat xxx” (where xxx is the pattern number) is automatically assigned. You can edit this pattern name as necessary. 1. From the main screen, press the [SONG/ PATTERN] key in the rhythm section repeatedly, until the key is out. The rhythm pattern selection screen appears. 2.
MRS-8(E).book 76 ページ 2004年7月30日 金曜日 午後5時24分 Reference [Rhythm] 6. To return to the main screen, press the [EXIT] key repeatedly. Erasing a rhythm pattern This section explains how to erase all data from a specified rhythm pattern, returning it to the blank state. NOTE Creating a rhythm song A rhythm song consists of a sequence of rhythm patterns with programmed chord and tempo information. The MRS-8 allows you to save up to 10 rhythm songs per project.
MRS-8(E).book 77 ページ 2004年7月30日 金曜日 午後5時24分 Reference [Rhythm] the rhythm song selection screen appears. Current position Rhythm song number 1 (measure number) Rhythm End of Song song SongNo0E EMPTY Rhythm song name 3. When the rhythm song is empty, the indication “EMPTY” is shown in the rhythm song name field, and the indication “E” is shown to the right of the rhythm song number. 2. Turn the dial to select a rhythm song number from 0 – 9. 3. To return to the main screen, press the [EXIT] key.
MRS-8(E).book 78 ページ 2004年7月30日 金曜日 午後5時24分 Reference [Rhythm] In this condition, you can input rhythm pattern information for the current point. 5. Turn the dial to select the rhythm pattern to insert. 6. Use the cursor up/down keys to specify the number of measures to insert. If you specify more measures than the original length of the rhythm pattern, the rhythm pattern will be repeated.
MRS-8(E).book 79 ページ 2004年7月30日 金曜日 午後5時24分 Reference [Rhythm] • Inserting a rhythm pattern in a song Use the cursor left/right keys to move to the point where the rhythm pattern should be inserted, and perform steps 4 – 7. A new rhythm pattern is inserted at the current location, and all subsequent patterns are moved back by the duration of the inserted pattern.
MRS-8(E).book 80 ページ 2004年7月30日 金曜日 午後5時24分 Reference [Rhythm] • Repeat multiple patterns Use the “(“ and “)” symbols (opening and closing brackets) to link a group of patterns for repetition. Formulas enclosed in brackets take precedence over other formulas. For example, entering 0 + (1 + 2) x 2 + 3 will result in the following rhythm pattern play sequence. HINT • If the formula does not fit on two lines, the indication scrolls by one character each.
MRS-8(E).book 81 ページ 2004年7月30日 金曜日 午後5時24分 Reference [Rhythm] If you make a mistake during input, you can correct it as follows. • Deleting a number/symbol Use the cursor left/right keys to move the flashing segment to the number/symbol to delete, and press the [EDIT] key. • Inserting a number/symbol Use the cursor left/right keys to move the flashing segment to the point where you want to insert a number or symbol, and input the new number/symbol with the pads and keys. 5.
MRS-8(E).book 82 ページ 2004年7月30日 金曜日 午後5時24分 Reference [Rhythm] indication “EV→” on the display, and turn the dial to move forward or backward in 12-tick (16th note) units. ROOT A -1- 1- 0 HINT During chord information input, you can press the PLAY [R] key to check the rhythm pattern. The pattern will be played with the new chord setting applied. To stop play, press the STOP [P] key.
MRS-8(E).book 83 ページ 2004年7月30日 金曜日 午後5時24分 Reference [Rhythm] Entering other information Event type Symbol Description A rhythm song contains information about rhythm patterns, chord, tempo, time signature etc. in a matrix configuration, as shown at the bottom of this page. This is called event information. When the rhythm song is in the step input condition, you can move the current position with the cursor left/right keys etc.
MRS-8(E).book 84 ページ 2004年7月30日 金曜日 午後5時24分 Reference [Rhythm] DrLevel 15 If there is no corresponding event, the display will indicate “←xxx” (where xxx is the event name). This indicates that the previously input event information still applies. Playing a rhythm song This section explains how to select and play one of the 10 rhythm songs that were created by inputting rhythm pattern and chord information. 1. From the main screen, press the [SONG/ PATTERN] key repeatedly, until the key is lit.
MRS-8(E).book 85 ページ 2004年7月30日 金曜日 午後5時24分 Reference [Rhythm] 5. Editing a rhythm song This section explains how to edit a rhythm song that you have created. Turn the dial to select the measure to use as copy source start point, and press the [ENTER] key. The display changes as follows. This screen lets you specify the measure to be used as copy source end point.
MRS-8(E).book 86 ページ 2004年7月30日 金曜日 午後5時24分 Reference [Rhythm] 2. Turn the dial to select the rhythm song to transpose. 3. Press the [EDIT] key. The rhythm song edit menu appears. SongEdit TRANSPOS 4. Verify that the indication “TRANSPOS” is on the display, and press the [ENTER] key. The display changes as follows. TRANSPOS 0 Transpose value 5. Turn the dial to select the transpose setting (-6 – 0 +6), and press the [ENTER] key. The default setting is 0 (no transposing).
MRS-8(E).book 87 ページ 2004年7月30日 金曜日 午後5時24分 Reference [Rhythm] Erasing the rhythm song This section explains how to erase the entire rhythm song, resetting it to a blank state. NOTE Once you erase the rhythm song, it cannot be recovered. Use this function with care. 1. From the main screen, press the [SONG/ PATTERN] key repeatedly, until the key is lit. The rhythm song selection screen appears. 2. Turn the dial to select the rhythm song to erase.
MRS-8(E).book 88 ページ 2004年7月30日 金曜日 午後5時24分 Reference [Rhythm] Importing rhythm patterns and rhythm songs from another project This section explains how to import all rhythm pattern and rhythm song data or only a specific rhythm pattern from another project that was saved on the SD card. NOTE The import process will overwrite existing rhythm patterns/ rhythm songs in the currently selected project. Take care not to accidentally overwrite rhythm pattern or rhythm song data that you want to keep. 1.
MRS-8(E).book 89 ページ 2004年7月30日 金曜日 午後5時24分 Reference [Rhythm] Editing various settings of the rhythm section This section explains how to edit various settings that affect the entire rhythm section, such as adjusting the pad sensitivity or adjusting the volume of the metronome. Basic procedure The basic procedure for editing the rhythm section settings is the same for most items, as described below.
MRS-8(E).book 90 ページ 2004年7月30日 金曜日 午後5時24分 Reference [Rhythm] • SPECIAL A special pre-count as shown below is heard. • LITE Maximum sensitivity. Even light taps will produce a loud volume. • NORMAL Normal sensitivity (default setting). Changing the metronome volume You can change the volume of the metronome that is heard when you record a rhythm pattern in real time. Perform steps 1 – 3 of “Basic procedure” to bring up the indication “UTILITY ClickVol”, and press the [ENTER] key.
MRS-8(E).book 91 ページ 2004年7月30日 金曜日 午後5時24分 Reference [Effects] This section explains the functions and operation of the effect section built into the MRS-8. result will be recorded when you carry out recording. When the insert effect is applied to one of the audio tracks (tracks 1 – 8) or the drum track/bass track (drum kit/bass program output signal), the effect processes only a specific track. This can be used to modify the sound of a recorded track.
MRS-8(E).book 92 ページ 2004年7月30日 金曜日 午後5時24分 Reference [Effects] Send level adjustment Send SEND LEVEL Send/return effect Return DRUM Using the insert effect 1 2 About insert effect patches The insert effect section contains a number of single effects such as compressor, distortion, and delay. Each of these separate effects is called an “effect module”. In the insert effect, the effect modules are connected in series.
MRS-8(E).book 93 ページ 2004年7月30日 金曜日 午後5時24分 Reference [Effects] Each effect module in an algorithm comprises two aspects, namely the effect type and the effect parameters. Even within the same algorithm, changing the effect type and/or the effect parameters can produce a variety of different sounds. PRE AMP/ DRIVE EQ MODULATION/ DELAY ZNR PAT LVL The edited effect type and parameter settings are stored as a so-called “patch”. The insert effect allows 20 – 50 patches per algorithm.
MRS-8(E).book 94 ページ 2004年7月30日 金曜日 午後5時24分 Reference [Effects] • Insert position immediately after input Algorithm name Recording on a mono track CLEAN Standard Patch name 0 L Input 1 Patch number 2. Use the cursor up/down keys to select the algorithm to use. When you select the algorithm, the patch currently selected for that algorithm becomes active. EFFECT (M→S) L Input 1 Input 1 Input 2 EFFECT (DUAL) Input 1 Track R L EFFECT (S→S) Track R L 3.
MRS-8(E).
MRS-8(E).book 96 ページ 2004年7月30日 金曜日 午後5時24分 Reference [Effects] NOTE The algorithm itself (type and arrangement of effect modules) cannot be edited. Effect module COMPRESS SENS 1. From the main screen, press the [INSERT EFFECT] key in the effect section repeatedly, until the key is lit. The insert effect patch selection screen is shown. CLEAN Standard 2. 4. MOD/DLY CHORUS HINT If the indication “EMPTY” is shown in the patch name field, all of the modules are set to off.
MRS-8(E).book 97 ページ 2004年7月30日 金曜日 午後5時24分 Reference [Effects] For effect modules which comprise multiple effect types, the name of the currently selected effect type is shown on the second line of the display. When you turn the dial in this condition, the effect type changes. module on again. FLANGER -OFFNOTE MOD/DLY FLANGER The modules included in TOTAL cannot be turned off. 9.
MRS-8(E).book 98 ページ 2004年7月30日 金曜日 午後5時24分 Reference [Effects] Storing or swapping insert effect patches An insert effect patch that you have edited can be stored in any location of the same algorithm. By storing an existing patch in another location, you can create a copy of that patch. Interchanging the position of patches (swapping) is also possible. Assigning a name to an insert effect patch This section explains how to assign a name to the currently selected insert effect patch. 1. 1.
MRS-8(E).book 99 ページ 2004年7月30日 金曜日 午後5時24分 Reference [Effects] NOTE Fader 1 Keep in mind that the name will revert to the previous name if you switch to another patch without storing the edited patch. 1 Insert effect 1. [MASTER] fader • DRY Only the unprocessed input signal will be recorded on the track. If the insert effect is applied to the input, the signal appearing at the MASTER OUTPUT jacks will be processed by the effect. Fader 1 1 Track 1 2. SYSTEM PROJECT 3.
MRS-8(E).book 100 ページ 2004年7月30日 金曜日 午後5時24分 Reference [Effects] 3. Using the send/return effect This section explains how to select and edit patches for the send/return effect. About the send/return effect patches The send/return effect of the MRS-8 is a single effect module for which one effect type (reverb, chorus, delay, etc.) can be selected. Each effect type has various effect parameters which can be adjusted to control the sound produced by the effect.
MRS-8(E).book 101 ページ 2004年7月30日 金曜日 午後5時24分 Reference [Effects] 4. Turn the dial to switch the effect type. When the effect type is changed, the effect parameters will also change accordingly. HINT • If the contents of a patch have been changed, the “EDIT” indicator in the upper part of the display will change to 8. Repeat steps 5 – 6 as necessary to edit other effect parameters. 9. When you have finished editing, press the [EXIT] key. The send/return effect patch selection screen appears again.
MRS-8(E).book 102 ページ 2004年7月30日 金曜日 午後5時24分 Reference [Effects] 4. To carry out the store/swap operation, press the [FUNCTION] key. When the store/swap operation is completed, the send/ return effect patch selection screen appears again. By pressing the [EXIT] key instead of the [FUNCTION] key, you can cancel the operation and back up one step at a time. 5. To confirm the new name, press the [FUNCTION] key in the control section twice. The patch is stored, overwriting the old information.
MRS-8(E).book 103 ページ 2004年7月30日 金曜日 午後5時24分 Reference [Effects] IMPORT ALL 3. Turn the dial to select ALL (import all patches) or PATCH (import single patch), and press the [ENTER] key. In this condition, you can select the project from which to import. IMPORT PRJ005 5 Project name Project number 4. Turn the dial to select the import source project, and press the [ENTER] key. The subsequent steps differ, depending on which selection was made in step 3.
MRS-8(E).book 104 ページ 2004年7月30日 金曜日 午後5時24分 Reference [Projects] This section describes how to perform operations for entire projects. About projects Working with projects On the MRS-8, the data needed to reproduce a song you create are managed in units called “projects”. By loading a project, you can always go back to exactly the same condition that existed when the project was saved. A project contains the following information.
MRS-8(E).book 105 ページ 2004年7月30日 金曜日 午後5時24分 Reference [Projects] • PROJECT NAME Edit the name of the currently loaded project. • PROJECT PROTECT Switch the protection status of the currently loaded project on or off. • PROJECT SEQ PLAY Continuously play the master tracks from several projects saved on the SD card (sequence play). HINT For details on the sequence play function, see page 111. screen.
MRS-8(E).book 106 ページ 2004年7月30日 金曜日 午後5時24分 Reference [Projects] Copying a project Erasing a project This operation duplicates a project that is saved on the SD card. This operation erases a saved project from the SD card. 1. NOTE Refer to steps 1 – 3 of “Basic procedure” to bring up the indication “PROJECT COPY” on the display. Then press the [ENTER] key. The name and number of the project to copy are shown on the display.
MRS-8(E).book 107 ページ 2004年7月30日 金曜日 午後5時24分 Reference [Projects] Changing the project name This operation lets you edit the name of the currently loaded project. 1. Refer to steps 1 – 3 of “Basic procedure” to bring up the indication “PROJECT PROTECT” on the display. Then press the [ENTER] key. The display changes as follows. 1. Refer to steps 1 – 3 of “Basic procedure” to bring up the indication “PROJECT NAME” on the display. Then press the [ENTER] key. The display changes as follows.
MRS-8(E).book 108 ページ 2004年7月30日 金曜日 午後5時24分 Reference [MIDI] This section explains the MIDI-related settings and functions of the MRS-8. About MIDI Making MIDI-related settings MIDI (Musical Instrument Digital Interface) is a standard that allows messages such as play data and sound data (collectively called “MIDI messages”) to be exchanged between devices including electronic musical instruments and computers.
MRS-8(E).book 109 ページ 2004年7月30日 金曜日 午後5時24分 Reference [MIDI] single channel via the MIDI OUT connector. of the song). • COMMAND Turn Start/Stop/Continue message transmission on/off. • MTC Turn MIDI Time Code transmission on/off. NOTE Control Change transmission is always enabled, except when the drum kit/bass program send channel is set to off. 4. Press the [ENTER] key to display the setting of the selected item, and turn the dial to change the setting.
MRS-8(E).book 110 ページ 2004年7月30日 金曜日 午後5時24分 Reference [MIDI] Turning Song Position Pointer messages on or off Turning MIDI Time Code (MTC) messages on or off You can specify whether Song Position Pointer messages will be transmitted. Song Position Pointer is a MIDI message that indicates the current position as a beat/clock count from the start. Normally it is used in conjunction with Timing Clock. Refer to steps 1 – 3 of “Basic procedure” to bring up the indication “MIDI SPP” on the display.
MRS-8(E).book 111 ページ 2004年7月30日 金曜日 午後5時24分 Reference [Other Functions] This section explains various other functions of the MRS-8. 4. Playing several projects continuously (sequence play) The MRS-8 lets you line up the master tracks from multiple projects saved on the SD card and play them continuously in a specified order (sequence play). This is handy to record several projects on an external recorder, or to play the accompaniment to multiple songs during a live performance.
MRS-8(E).book 112 ページ 2004年7月30日 金曜日 午後5時24分 Reference [Other Functions] (1) Project number/project name Shows the number and name of the project registered in the playlist. (2) V-take duration Shows the playing time of the V-take selected for the master track of the registered project, in minutes, seconds, and milliseconds. (3) Playback number Shows the playback position of the project. NOTE • Projects in which an unrecorded V-take is selected for the master track cannot be registered in a playlist.
MRS-8(E).book 113 ページ 2004年7月30日 金曜日 午後5時24分 Reference [Other Functions] • REW [T] key Stop playback, jump to the beginning of the previous project, and resume playback. PROJECT SELECT 3. Use the cursor left/right keys to bring up the indication “PROJECT SEQ PLAY” on the display, and press the [ENTER] key. The display shows the screen for selecting a playlist.
MRS-8(E).book 114 ページ 2004年7月30日 金曜日 午後5時24分 Reference [Other Functions] 4. Using the tuner function The MRS-8 incorporates a versatile tuner that can also accommodate 7-string guitar, 5-string bass and other unconventional tunings. This section explains how to use the tuner function. Play the note that you want to tune. The pitch is automatically detected, and the display shows the nearest note name (C, C#, D, D#, E...).
MRS-8(E).book 115 ページ 2004年7月30日 金曜日 午後5時24分 Reference [Other Functions] 7. When you have finished using the tuner function, press the [EXIT] key repeatedly to return to the main screen. While the tuner function is active, the cursor left/right keys serve to switch the tuning type. Tuning types and notes for each string are listed in the table below. For example, when you select the tuning type “GUITAR”, the display shows the following information.
MRS-8(E).book 116 ページ 2004年7月30日 金曜日 午後5時24分 Reference [Other Functions] Switching the level meter display type Adjusting the display contrast and backlight In the default condition of a project, the level meter below the display indicates the level of the signal after passing through the faders (post-fader). If required, you can change the setting so that the signal before passing through the level faders (pre-fader) is shown. To do this, proceed as follows.
MRS-8(E).book 117 ページ 2004年7月30日 金曜日 午後5時24分 Reference [Other Functions] Changing the SD card The SD card should normally only be removed or inserted while the MRS-8 is turned off. However, by using the following procedure, the SD card can be removed or inserted while the MRS-8 is on. NOTE If the SD card is changed without following the procedure below and while the MRS-8 is on, data may be permanently destroyed. 1. From the main screen, press the [SYSTEM/ UTILITY] key in the display section.
MRS-8(E).book 118 ページ 2004年7月30日 金曜日 午後5時24分 Reference [Other Functions] Formatting an SD card Checking the available SD card capacity/project size To format an SD card in the MRS-8, proceed as follows. This operation displays the remaining capacity of the SD card and the size of the currently loaded project. NOTE When you format a card, all data already on the card will be erased and cannot be restored. Perform this operation with care. 1.
MRS-8(E).book 119 ページ 2004年7月30日 金曜日 午後5時24分 Reference [Other Functions] PRJ SIZE 00007MB • PRJ SIZ (m/s units) This shows the size of the currently loaded project in terms of recorded time (converted into one track), in minutes (m), and seconds (s). PRJ SIZE 0001m09s To return to the main screen, press the [EXIT] key repeatedly. NOTE • These screens are for display only and contain no settings that can be changed. • The remaining recordable time is an approximation. Use it for general reference only.
MRS-8(E).book 120 ページ 2004年7月30日 金曜日 午後5時24分 Troubleshooting If there are problems during operation of the MRS-8, check the following points first. Problems during playback ■ No sound, or sound is very weak • Check the connections to your monitor system, and the volume setting of the system. • Make sure that the [MASTER] fader is raised. • Make sure that the status keys in the mixer section are lit in green and that the faders are raised. If a key is out, press it to make it light up in green.
MRS-8(E).book 121 ページ 2004年7月30日 金曜日 午後5時24分 Troubleshooting ■ The recorded sound is distorted ■ Cannot hear the rhythm song playback • Check whether the input sensitivity setting and record level setting are appropriate. • Make sure that you have not selected an empty rhythm song (→ p. 76). • When the insert effect is applied to the input, check whether the effect output level (patch level) setting is appropriate.
MRS-8(E).book 122 ページ 2004年7月30日 金曜日 午後5時24分 Troubleshooting • When synchronizing on the MTC (MIDI Time Code), make sure that the frame rate setting of both devices is matched and that the external MIDI device is set to playback standby (→ p. 110). Other problems ■ Cannot create a new project or copy a project • If the write protect switch of the SD card has been set to the write protect position, data cannot be saved on the card.
MRS-8(E).
MRS-8(E).book 124 ページ 2004年7月30日 金曜日 午後5時24分 Appendix Display 55 x 35 mm custom LCD with backlight Input 1 DC 9 V, 300 mA (ZOOM AD0006) Standard mono phone jack Input impedance10 kilohms Input 2 Power supply AC adaptor Battery 4 x IEC R6 (size AA); (MIC/LINE), 470 kilohms approx. battery life 4 hours/5 (GUITAR/BASS) hours (display backlight on/off) XLR-3-31/standard phone combo jack Dimension 300 (W) x 165 (D) x 60 (H) mm (Balanced) Weight 1.
MRS-8(E).book 125 ページ 2004年7月30日 金曜日 午後5時24分 Appendix Effect Parameters Insert Effect ■ CLEAN, DIST, ACO/BASS SIM, BASS algorithm COMP module Type COMPRESS Parameter SENS ATTACK LEVEL Keeps the dynamic range consistent. Parameter description Parameter SENS Setting range 0 – 10 Description Adjusts the compression input sensitivity. ATTACK 0 – 10 Adjusts the compression attack speed. LEVEL 1–8 Adjusts the module output level.
MRS-8(E).book 126 ページ 2004年7月30日 金曜日 午後5時24分 Appendix Parameter description Parameter GAIN Setting range 1 – 30 Description TONE 0 – 10 Adjusts the tone. LEVEL 1–8 Adjusts the module output level. Adjusts the amount of gain. Selects the cabinet type CM CABINET Combo-type cabinet. br Produces a brighter tone than CM. Ft Cabinet with a flat response. St Stack-type cabinet. bC Combo-type cabinet for bass. bS Stack-type cabinet for bass. Selects the loudspeaker type.
MRS-8(E).book 127 ページ 2004年7月30日 金曜日 午後5時24分 Appendix STEP RING MOD CRY EXCITER AIR WIDE DELAY ECHO FIX-WAH ARRM-PIT DEPTH RATE RESONANC Changes the sound with step-like filter characteristics. POSITION RATE BALANCE Produces a metallic sound. POSITION RESO SENS Talking-modulator-like effect. FREQ DEPTH LowBoost Gives the sound more focus and spatial definition. SIZE TONE MIX Simulates the air ambience of the room, giving the sound spatial depth.
MRS-8(E).book 128 ページ 2004年7月30日 金曜日 午後5時24分 Appendix Selects the changing width. R MODE oFF Frequency stays constant. UP Minimum→ maximum dn Maximum→ minimum HI Setting value → maximum Lo Minimum→ setting value Selects the control waveform. R WAVE 1 Rising sawtooth wave 2 Rising fin wave 3 Falling sawtooth wave 4 Falling fin wave 5 Triangle wave 6 Second power triangle wave 7 Sine wave 8 Square wave Adjusts the control waveform cycle. R SYNC 0.
MRS-8(E).book 129 ページ 2004年7月30日 金曜日 午後5時24分 Appendix Parameter description Parameter THRSHOLD Setting range OFF, 1 – 30 Description Adjusts the sensitivity. Set this high as far as the attacks or decays sound natural. ■ MIC algorithm COMP/LIM module Type COMPRESS LIMITER Parameter THRSHOLD RATIO ATTACK LEVEL RATIO RELEASE LEVEL Keeps the dynamic range consistent. THRSHOLD Controls the signal peeks.
MRS-8(E).book 130 ページ 2004年7月30日 金曜日 午後5時24分 Appendix AUTO PAN PITCH SLOW-ATK VIBE STEP RING MOD CRY EXCITER AIR DELAY ECHO DOUBLING FIX-WAH ARRM-PIT WIDTH RATE CLIP Pereodically moves the stereo position of the sound. SHIFT TONE BALANCE Modifies the pitch of the direct sound. TIME CURVE Creates a “violin playing” sound with soft attack. DEPTH RATE BALANCE RATE RESONANC Automatic vibrato effect. DEPTH Changes the sound with step-like filter characteristics.
MRS-8(E).book 131 ページ 2004年7月30日 金曜日 午後5時24分 Appendix MODULATION/DELAY module Type CHORUS FLANGER PHASER TREMOLO AUTO PAN PITCH RING MOD DELAY ECHO DOUBLING Parameter DEPTH RATE MIX Adds pulsation and spaciousness to the sound. DEPTH RATE FB COLOR LFO SFT RATE CLIP LFO SFT Produces a unique, undulating sound. RATE Produces a swooshing sound. DEPTH Periodically varies the level of the sound. WIDTH RATE CLIP Pereodically moves the stereo position of the sound.
MRS-8(E).book 132 ページ 2004年7月30日 金曜日 午後5時24分 Appendix DOUBLING module Type DOUBLE L/R Parameter TIME TONE MIX Doubling effect with a delay time of up to 100 milliseconds. Parameter description Parameter TIME Setting range 1 – 100 Description Adjusts the delay time in 1-ms steps. MIX 0 – 30 Adjusts the mix amount of the effect. TONE 0 – 10 Adjusts the tone. ZNR module See the CLEAN, DIST, ACO/BASS SIM, BASS algorithm.
MRS-8(E).book 133 ページ 2004年7月30日 金曜日 午後5時24分 Appendix DIMENSION/RESONANCE module Type DIMENSN RESONNC Parameter RISE 1 RISE 2 Produces spatial width. DEPTH FreqOFST RATE TYPE RESONANC EFX LVL DRY LVL A resonance filter with LFO. Parameter description Parameter RISE 1 Setting range 0 – 30 Description Adjusts the emphasizing degree of the stereo component. RISE 2 0 – 30 Adjusts the spaciousness that includes the monaural component. DEPTH 0 – 10 Adjusts the depth of the effect.
MRS-8(E).book 134 ページ 2004年7月30日 金曜日 午後5時24分 Appendix Effect Patch Insert Effect ■ CLEAN algorithm No.
MRS-8(E).
MRS-8(E).book 136 ページ 2004年7月30日 金曜日 午後5時24分 Appendix ■ MIC algorithm No.
MRS-8(E).
MRS-8(E).book 138 ページ 2004年7月30日 金曜日 午後5時24分 Appendix ■ MASTERING algorithm No.
MRS-8(E).book 139 ページ 2004年7月30日 金曜日 午後5時24分 Appendix Send/return Effect No. Name 0 1 2 3 4 5 6 7 8 9 10 11 12 13 14 15 16 17 18 19 20 21 22 23 24 25 26 27 28 29 30 31 32 33 34 35 36 37 38 39 40 - 59 VoChorus DeepDBL TightHal LargeHal TrStudio VcxRev RealPlat VinSprin Delay3/4 Natural GtChorus Doubling Echo Delay3/2 FastCho DeepCho ShortDLY SoloLead WarmyDly EnhanCho Detune Whole*1 Delay2/3 Delay1/4 BrgtRoom SoftHall SmallHal LiveHous DarkRoom Tunnel BigRoom PowerSt.
MRS-8(E).book 140 ページ 2004年7月30日 金曜日 午後5時24分 Appendix Rhythm Pattern In “Song” columns (No. 35-234), verses and fill-ins are gathered up on a style basis to make a rhythm song efficiently with FAST. For example, when you enter (71+72+73)x2+(74+75+76)x2, 16-measure fusion rhythm part is completed. ("V" of a pattern name means verse, and "F" does fill-in.) No.
MRS-8(E).
MRS-8(E).book 142 ページ 2004年7月30日 金曜日 午後5時24分 Appendix INTRO12 INTRO13 INTRO14 INTRO15 INTRO16 INTRO17 457 458 459 460 461 462 1 1 1 1 1 1 INTRO18 ENDING01 ENDING02 ENDING03 ENDING04 ENDING05 463 464 465 466 467 468 1 1 1 1 1 1 ENDING06 ENDING07 COUNT AllMute 469 470 471 472 1 1 2 1 473 I 508 509 510 EMPTY 0 METRO34 METRO44 1 1 Drum Kits/Bass Programs Drum Kit Bass Program No. Name No.
MRS-8(E).book 143 ページ 2004年7月30日 金曜日 午後5時24分 Appendix TRACKx_y.ZAF Audio data for each track/V-take (x; 0-7 corresponding to track number 1-8, y; 0-9 to V-take number 1-10) ■ SYS folder Contains the system-related files. MACPRM.ZIF Number of most recently edited project SEQPLY.LST Play list data ■ SYSTEM.BIN Common settings between projects on the card * Do not change the file names using a conventional SD card reader/writer. If the files have different names, they will not be recognized on the MRS-8.
MRS-8(E).book 144 ページ 2004年7月30日 金曜日 午後5時24分 Appendix MIDI implementation chart [SD card Recorder] Model MRS-8 MIDI Implementation Chart Transmitted Date : 30 Jun. 2004 Version: 1.00 Recognized Remarks Function ...
MRS-8(E).book 145 ページ 2004年7月30日 金曜日 午後5時24分 INDEX ■ Symbols and numerals ( ...................................... ) ...................................... + ..................................... X ..................................... ← PTN . . . . . . . . . . . . . . . . . . . . . . . . . . . . . . . . . 79 79 79 79 77 ■A A-B repeat function . . . . . . . . . . . . . . . . . . . . . . 36 Algorithm . . . . . . . . . . . . . . . . . . . . . . . . . . . . . . 92 Auto punch-in/out . . . . . . . . . . . . .
MRS-8(E).book 146 ページ 2004年7月30日 金曜日 午後5時24分 INDEX Editing a patch . . . . . . . . . . . . . . . . . . . . . . . . . Selecting a patch . . . . . . . . . . . . . . . . . . . . . . . Saving/swapping a patch . . . . . . . . . . . . . . . . . Signal flow . . . . . . . . . . . . . . . . . . . . . . . . . . . . 95 93 98 94 Inverting a specified range of data (track editing) . . . . . . . . . . . . . . . . . . . . . . . . . . 49 ■L Level meter . . . . . . . . . . . . . . . . . . . . . . . . . . . .
MRS-8(E).book 147 ページ 2004年7月30日 金曜日 午後5時24分 INDEX Erasing a rhythm pattern . . . . . . . . . . . . . . . . . 76 Real-time input . . . . . . . . . . . . . . . . . . . . . . 67, 69 Selecting a rhythm pattern . . . . . . . . . . . . . . . . 63 Step input . . . . . . . . . . . . . . . . . . . . . . . . . . 70, 71 Rhythm pattern mode . . . . . . . . . . . . . . . . . . . . 62 Rhythm recording function . . . . . . . . . . . . . . . . 42 Rhythm related problems . . . . . . . . . . . . . . . .
MRS-8(E).book 148 ページ 2004年7月30日 金曜日 午後5時24分 ■ The FCC regulation warning (for U.S.A.) This equipment has been tested and found to comply with the limits for a Class B digital device, pursuant to Part 15 of the FCC Rules. These limits are designed to provide reasonable protection against harmful interference in a residential installation.