
User manual


3 Click Wireless on the top menu.
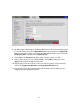
4 The Wireless Radio page appears. Under Select 2.4 or 5 GHz option. Select 2.4 GHz
if your existing wireless network used 802.11n. If your existing network used 802.11ac
or you just want to change the SSID for the 802.11ac network select 5 GHz. Click
Apply.
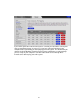
5 Then click Primary Network on the left-side menu and in the text box labeled
Network Name (SSID), type an SSID of your choice. The SSID needs to be at least
one character long, and it’s probably best to pick a name that you’ll recognize as
yours.
6 To change the wireless security, start by setting all the following drop-down menus to
Disable: WPA, WPA-PSK, WPA2, and WPA2-PSK.
7 Then select Enable for the mode(s) you choose for setting wireless security.
Note: To use WPA2 /WPA, all of the wireless devices on your network must support
either encryption method. In this case, enable:
• WPA-PSK and WPA2-PSK (if you want to use a Pre-Shared Key)
or
• WPA and WPA2 (use this only if your network uses a Radius Server.
This is very uncommon for a home network)
If you know that all your devices support the more secure WPA2 you can enable
WPA2 only (or WPA2-PSK if you want to use a Pre-Shared Key) instead of WPA and
WPA2.
8 In the WPA Pre-Shared Key text box (only if you selected an option requiring a
Pre-Shared Key), enter a passphrase of your choice (a minimum of 8 characters).
Write down this passphrase and put it where you can find it – on the bottom of the
Cable Modem/Router case, for instance.
9 Click Apply.
10 Now you may need to set up each of your wireless devices with the SSID and
passphrase.
If your devices were already setup with this SSID and passphrase then
your setup should be complete, otherwise, see
Chapter 3, Connecting other Devices
to the Cable Modem/Router for help on connecting your wireless computers and
devices.
Your security setup configuration is now complete!
31