AUDIO INTERFACE MANUAL © ZOOM Corporation Reproduction of this manual, in whole or in part, by any means, is prohibited.
Contents Audio interface manual Contents . . . . . . . . . . . . . . . . . . . . . . . . . . . . . . . . . . . 2 Audio interface and control surface . . . . . . . . . . . . . . . . . . . . 4 Cubase LE Installation overview . . . . . . . . . . . . . . . . . . . . . . 6 Audio interface . . . . . . . . . . . . . . . . . . . . . . . . . . . . . . . . . . . . . . . . 6 Control surface . . . .
Audio interface manual Mixer in audio interface mode . . . . . . . . . . . . . . . . . . . . . . . 26 Volume, reverb send, pan . . . . . . . . . . . . . . . . . . . . . . . . . . . . . . . . . . 26 Stereo link . . . . . . . . . . . . . . . . . . . . . . . . . . . . . . . . . . . . . . . . . . 26 Balance . . . . . . . . . . . . . . . . . . . . . . . . . . . . . . . . . . . .
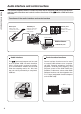
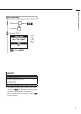
Audio interface and control surface Audio interface manual This section explains how to connect the unit with a computer and how to set up and with a DAW and other use the audio interface and control surface functions of the software. Functions of the audio interface and control surface INPUT jacks Guitars and other musical instruments, built-in stereo mic PHONES jack Playback device like headphones or an audio system OUTPUT jacks Stereo system, speakers with built-in amplifiers, etc.
The two onboard jacks include one highimpedance input. Both accept XLR and standard phone plugs and can provide phantom power (24 or 48V). Many sources are supported from highimpedance guitars and basses to dynamic and condenser microphones and linelevel devices like synthesizers. In addition, the built-in high-performance condenser microphones are convenient for recording acoustic guitars and vocals.
Cubase LE installation overview Audio interface manual To use the with DAW software, after installing that software, an audio driver must be installed and set to recognize it.* We explain how to do this with Cubase LE. ❷ Control surface ❶ Audio interface By using the between a computer and external audio devices and instruments, their signals can be recorded using a DAW or other software. Instruments and mics that require high impedance or phantom power can also be connected.
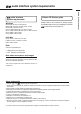
audio interface system requirements Windows Windows® XP SP3 or later (32-bit) Windows® Vista SP1 or later (32-bit, 64-bit) Windows® 7 (32-bit, 64-bit) 32-bit: Intel® Pentium® 4 1.8 GHz or faster 64-bit: Intel® Pentium® Dual Core 2.7 GHz or faster 32-bit: RAM 1 GB or faster 64-bit: RAM 2 GB or faster Audio interface manual audio interface system requirements Cubase LE Startup guide Please refer to the Cubase LE Startup Guide for detailed instructions on installing the ZOOM audio driver and Cubase LE.
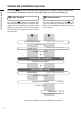
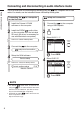
Connecting and disconnecting in audio interface mode Audio interface manual This is an overview of connecting and disconnecting the to a computer with a USB cable. For details, see the included Cubase LE Startup Guide guide. Connecting the for the first time 1 2 ☞ 3 4 ☞ to a computer 1 Install the Cubase LE DAW software on the computer. Install the ZOOM audio driver on the computer from the included SD card. (No driver is necessary for use with Macintosh computers.
Audio interface manual Disconnecting 1 Press the or press 2 below . Select YES. Change menu Press ENTER. NOTE Select CONTINUE to use the same settings as last time. • INSERT EFFECT settings • SEND RETURN EFFECT settings • Mixer settings • TUNER settings Select RESET to restore default settings for each item. • The audio interface and control surface funccan be used by drawing power tions of the through a USB cable from the USB bus. • We recommend always using the latest system software.
Using control surface functions Audio interface manual When using the connected by USB as an audio interface, the can be used to control Cubase LE’s transport and mixer. About the control surface keys and faders Control surface setup In control surface mode, the keys and knobs can be assigned to particular on the Cubase LE functions. See 5 6 Transport section P.11 About banks P.12 Fader section P.12 setup and connection on P.8-9 Then, launch Cubase LE.
Audio interface manual Transport section By setting up the control surface, the transport section keys can be assigned to individual functions in Cubase LE. F1 key F2 key F3 key REW key FF key STOP key Rewind Fast forward Stop F4 key F5 key PLAY key REC key Playback Record HINT You can connect a footswitch to the CONTROL IN jack to start and stop playback, and change effect patches, for example, with your foot when using the as an audio interface.
Fader section operation Audio interface manual Using the faders and status keys of the fader section, you can adjust the volume of corresponding Cubase LE tracks, mute and solo them, and arm them for recording. About banks Operating the fader section After setting up control surface operation, the main parameters of Cubase LE can be operfader and status keys. ated using the A group of tracks operated by the faders and status keys is called a “bank.
Audio interface manual level meters (Audio interface use) Signal just before being sent to computer shown Signal returning from the computer shown. Checking DAW recording levels Set “REC SIGNAL” (in the INSERT EFFECT menu) to set whether signals are sent to the computer “WET” (with effect) or “DRY” (without effect). Adjust so that the level meters do not clip (reach 0 dB).
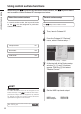
Setting the function keys Audio interface manual The five keys above the transport keys can be used as function keys (F1~F5) and assigned as desired. Function key setup 1 2 Open the “Device setup…” dialog in Cubase LE. 5 Select “Mackie Control”. Commands can be assigned using the three columns displayed on the right side of the window. 6 3 4 14 Choose the type of Cubase LE function from the Category pop-up menu. The items in this pop-up menu will differ depending on the category chosen.
Control surface functions quick reference guide Control Fader section Display section Audio interface manual These functions work with Cubase LE, Cubase, Logic Pro, SONAR, Ableton Live and Digital Performer.
Recording with Cubase LE In this chapter, we explain how to record into Cubase LE using the Audio interface manual 3 Create a new project Copy the ZOOM to the computer. project templates From the CubaseLE_template folder on the SD , copy the templates card included with the to the location where Cubase LE is installed. . Create a new project If you have copied the project templates to the designated folder, these project templates will be displayed when creating a new project.
Set the save location and click the “OK” button (“Choose” button on Mac OS X). The project file save location window is displayed. Audio interface manual 4 Create a new audio track 5 Set-up the audio tracks that were made as follows. To add a new audio track, select “Add Track” from the “Project” menu and then choose “Audio” from the sub-menu that appears.
Recording With Cubase LE Audio interface manual 8 Connect an instrument Enable track monitoring and recording. Channel corresponding to an audio track 6 Master Channel Connect an instrument such as a guitar to an INPUT jack and choose an effect patch. The chosen effect patch will be applied to the signal and can be recorded on the computer via the USB port. See the following for information about how to input signal. set the ☞ Reference: Operation Manual Connections Selecting effect patches 7 P.
9 10 Audio interface manual Adjust the recording level After adjusting the recording level, click the Monitor button so that it becomes grey. While playing the instrument, adjust the input level and set the Cubase LE recording level. Monitor button Level Meter This turns off display of the input level, and mutes . the signal from the computer to the When the Monitor button is off, the signal just before it is sent to the computer can be monitored PHONES and OUTPUT jacks.
Recording with Cubase LE Audio interface manual Recording 12 Check the recording (playback) Click the Record button on the Transport Panel to start recording. Stop button 1 Lower the master channel fader. Record button As you play the instrument, a recorded waveform is drawn in real time in the project window. To stop recording, click the Stop button in the Transport Panel. 2 Click the Go to Zero (|<) button in the Transport Panel to return to the beginning of the project.
Audio interface manual Tips to improve performance 4 Raise the master channel fader to a suitable playback level. When using Cubase LE, application performance could become extremely delayed or error messages such as “cannot synchronize with USB audio interface” might be displayed. Should such things happen often, the following measures might improve the situation. ➊ Quit other running programs.
Importing audio into Cubase LE Audio interface manual By connecting a computer and the with a USB cable and setting the to function as a card reader, you can import audio data as WAV files into Cubase LE audio tracks. Importing by drag & drop 1 2 3 Connect the computer and the with a USB cable. 5 Press USB. Launch Cubase LE. Open the Cubase LE project into which you want to import audio data. Select READER. Change menu Press Enter. Access the from the computer.
Select the file (or files) that you wish to import from the “AUDIO” folder and drag and drop them into the Cubase LE project window. 9 Audio interface manual 7 In the “Import Options” window click the “Copy Files to Working Directory” check box, and click the OK button. The audio files are loaded into Cubase LE tracks. When a file is dragged and dropped, a window will open asking how Cubase LE should place the file.
Importing audio into Cubase LE Audio interface manual Using the “Import” command 1 2 3 Connect the computer and the with a USB cable. Select READER. Change menu Access the from the computer. コンピューターからR24を操作 24 Open the Cubase LE project into which you want to import audio data. Press USB. Press ENTER. 4 5 Launch Cubase LE. 6 From the Cubase LE “File” menu select “Import” and “Audio File…” The “Import Audio” window opens.
Select the desired audio file (or files) from the “AUDIO” folder of the project from which you wish to import. Click “Open.” 9 Audio interface manual 7 When importing multiple files at one time, select either “Different Tracks” or “One Track” as the import method. The audio data is assigned to one or more Cubase LE tracks. 8 Importing files will cause the “Import Options” window to appear. In the “Import Options” window click the “Copy File(s) to Working Directory” check box, and click the OK button.
Mixer in audio interface mode Audio interface manual In audio interface mode you can make a mix for monitoring using the internal mixer. In addition, you can adjust the balance of the sound from the internal mixer and from the computer. Volume, reverb send, pan You can be adjust the reverb send, pan, volume and stereo link settings in the same way as in recorder mode. Stereo link Link INPUT 1 and 2 to handle them as stereo pairs. Operation is the same as in recorder mode. (Reference: Operation Manual P.
Tuner Chromatic tuner HINT TOOL > TUNER 1 2 • The default value of the standard pitch is 440 Hz. • Tuners other than the chromatic tuner can also be used. Press TOOL. ☞ Reference: Operation Manual Select TUNER. Change menu Press ENTER. 3 4 5 Tuner To change the standard pitch, beneath . press the Select the standard pitch. P.108 NOTE Tuner settings are saved when you end (EXIT) audio interface mode and can be used again the next time. ☞ Reference: Operation Manual Tune the instrument.
Effects in audio interface mode Audio interface manual The insert and send-return effects can both be used when the sampling frequency is set to 44.1 kHz. Basic operation is the same but there are a few differences in the menus. Insert effect Send return effect As in recording mode, you can select the insert location and the insert effect algorithm, as well as the effect patches to be applied to the signal being recorded. When used as an audio interface, the send reverb can only be used for monitoring.
Working with patches Patch operations Patch initialization (factory reset) For both insert and send return effects EFFECT > INITIAL Menus used for patch operations 1 Selecting patches Press EFFECT. Selecting effect type INSERT EFFECT/SEND REVERB Select a patch from an algorithm to use an insert or send reverb effect. (Reference: Operation Manual P.83) Insert effect Press the beneath . beneath .
Control surface setup for other DAWs Audio interface manual You can set up the as a controller for use with a variety of DAW software besides Cubase LE. Please refer to the manual for the software that you are using. Logic Control surface setup 1 Select “Preferences” > “Control surfaces” > “Setup…” from the “Logic Pro” menu. Function key setup 1 This opens the “Setup” window. 2 3 Click on the top left “New” and select “Install” from the pull-down menu.
Audio interface manual SONAR Control surface setup 1 2 3 Select “Controller/Surface” from the “Options” menu to open the “Controller/Surface” window. Click the “Add” button and open the “Controller/Surface Settings” window. Choose “ZOOM R Series” from the drop-down menu of the “Controller/ surface” column. Select “ZOOM R8” in the input/ output port column. For Cakewalk SONAR, installation of a control surface plug-in is necessary. Please install it when installing the driver.
Control surface setup for other DAWs Audio interface manual Ableton Live Control surface setup 1 Select “Preferences” from the “Option” (Windows) or “Live” (Mac) menu. The Preferences window will open. 2 Click the “MIDI” setting tab on the left side of Preferences window to select it. The setup window related to MIDI will open. 3 Select “Mackie Control” in the pulldown menu of the Control Surface column.
9 Control surface setup 1 2 3 Launch the Audio MIDI Setup application (/Applications/Utilities). Open the MIDI Studio window (Window > MIDI Studio) and confirm that “R8” is displayed. Click “Add Device.” A “new external device” will be added. 4 Click the “new external device” to select it, and then click the “Show Info” button. 5 Enter the name “R8” in the “Device Name” field.
4-4-3 Kanda-Surugadai, Chiyoda-ku, Tokyo 101-0062 Japan Web Site: http://www.zoom.co.
Using the R8 with Mac OS X 10.5.8 If noise should occur when using the as an audio interface with Mac OS X 10.5.8, follow the procedures below to change the audio class setting. Setting the audio class 1 2 3 Connect the and the computer by USB cable. Then, turn the power ON. ●● When using Windows or Mac OS X 10.6.5, use the default setting of UAC2.0. Select AUDIO I/F. Change menu Select CLASS and set it to UAC1.0. Change menu Change setting 5 Select EXECUTE.
Cubase LE Startup Guide Windows This Cubase LE Startup Guide explains how to install Cubase LE on a computer and make connections and other settings for the To connect the to a computer running Windows 7 (or Windows Vista or XP) and to enable audio input/output, proceed as follows. This installation description uses Windows 7 as an example. Select the language Choose the language and click [OK]. . Connect the to the computer using a USB cable and enable use as an audio interface.
Continued from front Windows Mac OS X Start Cubase LE. Then, open the “Devices” menu, select “Device Setup...” and click “VST Audio System”. To start Cubase LE, double-click the Cubase LE shortcut icon that was created on the desktop. After startup, select “ZOOM R8 ASIO Driver” as the ASIO driver in the right section of the Device Setup window. When you change the ASIO driver selection, a confirmation message appears. Click the “Switch” button.